Introduction
For complete functionality of the new features in release
2.00.41, you must already be running Version 1.1.0. or higher. If you are not
running a version greater than 1.1.0, follow the Version
1.1.0 Update instructions first and then return to do the update for Version 2.00.41
There are two parts to the upgrade: 1)
downloading the software and 2)
upgrading the Orion accessory unit. Each part of the upgrade is
explained in the following two sections of this document. Read
each section carefully before proceeding.
See What's New to read about what has been fixed, changed, and added.
Download the Software
To implement this release you need a PC running Microsoft Windows XP SP2
or later. Click on the following link to download the necessary software: Orion TI-84 Plus firmware file Orion TI-84 Plus
Release-02.00.41.zip.
When download is complete, follow these steps:
- Open the folder on your computer where the firmware file was downloaded.
- Right click on the file and choose extract. OR press the application key while the file is selected.
- From the context menu, select Extract All.
- Follow the steps to extract it to a folder of your choice.
When finished, your chosen folder should contain a folder named Orion. Make a note of the location of this folder for use in the next
section of this document.
Upgrade Orion Accessory Unit
The following are required to perform the upgrade to the Orion Accessory unit:
- Orion TI-84 Plus Unit
- Standard A to Mini-B USB cable
- A PC running Windows XP SP2 or later
- Orion TI-84 Plus Upgrade Utility v1.1.6.exe file
found in the Orion folder. (See the Download the Software section of this
document.)
- Orion TI-84 Plus Release v02.00.41.bin file found in
the Orion folder (see above).
Device Connection Modes
- Upgrade Mode: The Orion TI-84 Plus must be connected in this
mode in order to upgrade the device. This process is explained below in step 4
of the firmware upgrade procedure.
- Normal Mode: When the device is plugged into the PC, this is the default mode.
In this mode an upgrade cannot be performed; however, the device will begin to charge
the battery.
Orion TI-84 Plus Firmware Upgrade Procedure
- Turn off the TI-84 Plus, if it is already on.
- Connect the Mini-B USB cable to the Orion TI-84 Plus unit and
plug the other end of the USB cable into the PC. If this is the first time
you have connected the Orion to the PC, the PC may install drivers.
Wait for the driver installation to finish before continuing. You
may need administration rights to install the drivers.
- Run the Orion TI-84 Plus Upgrade Utility. The
upgrade utility dialog box displays "Orion TI-84 Plus is connected." At this
stage, the device is in Normal mode and the software shows that it
is not connected in upgrade mode.
- To connect the Orion TI-84 Plus unit with the Upgrade Utility
in upgrade mode, press and hold down the Cursor UP key on the Orion unit.
- With one hand, press the Cursor UP key on the
Orion unit. With your other hand press both the CTRL
and Shift keys simultaneously.
- Release the CTLR and
Shift keys first; then release Cursor
UP key. At this point, the utility upgrade dialog box displays
"Orion TI-84 Plus is connected" in the device status field, and "Do you want to
upgrade/downgrade/repair the device?" in the message field (see
Figure 1).
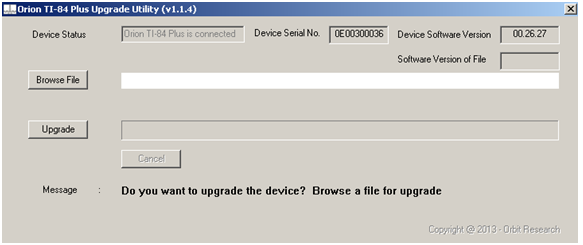
Figure 1. Device is in Upgrade Mode
- If the device is connected in Upgrade mode, the utility shows
the device serial number and the software version of the device at top right
corner of the window.
- Browse and select the firmware file (e.g., "Orion TI-84 Plus
Release vxx.xx.xx.bin"). The GUI (graphical user interface) also
shows the software version of the selected file.
- Click on the Upgrade button.
- The utility begins upgrading the device (see Figure 2).
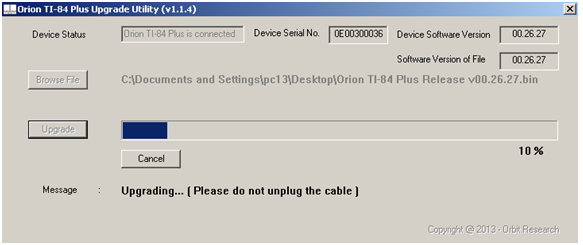
Figure 2. Upgrading the device
- During firmware upgrade, the Orion TI-84 Plus gives vibration
indications every few seconds.
- Wait for the message "Device upgrade has been completed" in the
upgrade utility dialog box (see Figure 3). Do not unplug the cable.
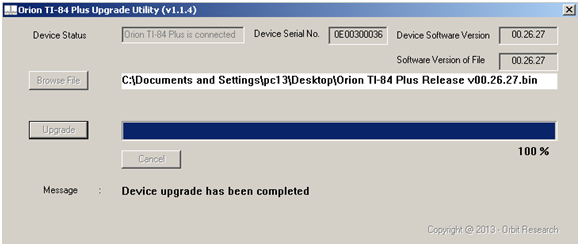
Figure 3. Device upgrade has been
completed successfully
- When you hear the "Device upgrade is completed successfully"
announcement from the device, unplug the USB cable.
- If you have additional calculators to upgrade, you may connect another at
this time and begin the upgrade process (see the Upgrade TI-84 OS
section of this document). If you are done upgrading, close the upgrade utility.
- Done. Device is ready to use.
Verification
The firmware version loaded into the unit can be verified using the
following steps. The version number can also be read through the
Orion Help menu.
- Turn the calculator OFF and unplug the USB cable.
- Connect the device in Upgrade mode.
- The GUI shows the device's hardware serial number and
the version of the installed firmware.
- If the utility does not show anything, try again from
verification step 1.
Troubleshooting
- The calculator should be OFF during firmware upgrade.
- Battery must be connected during firmware upgrade.
- In the event of failed upgrade, repeat Firmware
Upgrade Procedure from step 1.
- In the event the device is not detected by the PC utility, perform the following
steps:
- Open the device manager.
- Check the status of the device in the HID (human interface device) section by
plugging and unplugging the device.
- If there is still no response, connect the device to another USB port or restart
the PC.
-