Refreshabraille 18 User's Guide

![]()
Copyright 2009-2015
American Printing House
for the Blind, Inc.
All Rights Reserved
![]()
Copyright 2009-2015
American Printing House
for the Blind, Inc.
All Rights Reserved
2015/07/27
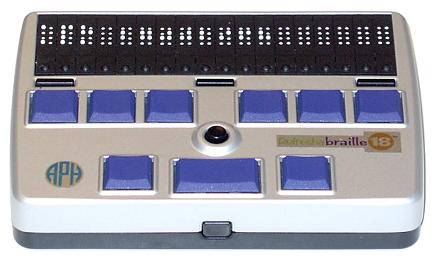
Congratulations. You now possess a unique refreshable braille display that sets a new standard in functionality, flexibility, and portability. Measuring approximately 3X5X1 inches and powered with a state-of-the-art battery and energy management firmware, Refreshabraille 18 is an ideal braille display and keyboard for mobile devices like notebooks, smart phones, and PDAs. It serves as an excellent reading environment for desktop computers as well.
Refreshabraille 18 works with the following configurations and devices:
Refreshabraille 18 features include:
Refreshabraille 18 connects to your mobile device or desktop PC via USB or wireless Bluetooth interface. With your mobile device in your pocket, you control the full functionality and read the screen using the keys, joystick, and braille display of Refreshabraille 18.
Outstanding battery life, of approximately 30 hours on Bluetooth or up to 100 hours on USB, allows total freedom and mobility when using Refreshabraille 18 with portable devices.
Refreshabraille 18 is designed to charge through the USB port on your PC or with an optional USB AC adapter (available for sale through off-site retailers). Because USB chargers are universal, you may use it to charge a variety of devices including Refreshabraille 18. Chances are you already have a charger you can use.
Developed with excellent engineering and attention to quality by Baum to APH specifications, Refreshabraille 18 combines elegant design, reliability, and ease of use, and features a rugged metal case, small size, and extended battery life.
Note: Please contact APH promptly if any items are missing.
This guide represents the complete user documentation for Refreshabraille 18. It is complete and accurate at the date of writing. Additional information may be made available as programs evolve and are created. For the latest version of this documentation and any additional information, see the Refreshabraille 18 website at www.tech.aph.org/rbd_info.htm.
The purpose of this guide is to help the user connect the Refreshabraille 18 with the mobile device of their choice, install any needed communication and display drivers, and configure the software running on that device. In most cases, the screen reader will provide the most current information about the specific commands supported for that software.
The writers of this documentation presuppose the user to have some familiarity with the operating system and the software for the chosen device. The guide does not provide a tutorial on how to perform each step for each device or operating system. Instead, it provides general guidelines. For example, the guide may direct the user to open the main menu on a Symbian smartphone. Given that the keys are in different locations for different phones, it is not practical to describe every phone and its key layout. In another example, the guide provides instructions about accessing the Control Panel or the System Tray for Windows. The writers of this guide presume the user knows the various ways to get to the Control Panel in the version of Windows being used. The guide does not attempt to instruct the user in all the ways to successfully use Windows with keyboard commands.
Note: For the purposes of this guide, the braille dot numbers are used when referencing key combinations (dots 1-8); and where applicable, the corresponding braille letter, letter contraction, symbol, whole-word contraction, or Nemeth number is given in parenthesis.
In addition to this documentation, there is a Refreshabraille 18 listserv where users and the development team discuss various aspects of this versatile new display.
To subscribe to the Refreshabraille 18 email list, send a blank email to [email protected]. A confirmation email is returned to which you must respond before you may write to the list. A welcome message is sent when your confirmation email is received. Once confirmed, the email address to use to write messages is [email protected].
The CD supplied with Refreshabraille 18 contains documentation and software to help you get started using your new display. If you cannot find your CD, you may download the entire contents from a zip file at www.tech.aph.org/rbd.zip. Unzip the contents to a flash card or burn to another CD if necessary.
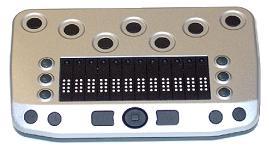
To familiarize yourself with the keys and controls on Refreshabraille 18, place it on a flat surface with the braille cells on the side farthest away from you.
Later in this documentation are instructions about how to flip the orientation so the braille cells are closest to you if you prefer this.
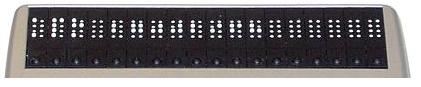
Refreshabraille 18 features 18 eight-dot braille cells. If you are new to refreshable braille displays, you may not be familiar with eight-dot braille. It is similar to six-dot braille with two additional dots below dot 3 and dot 6. These two additional dots are called dot 7 and dot 8, and they are used to indicate capitalization in computer braille (dot 7) or to indicate some attributed text or a cursor. Their exact use depends on the software you use with the display. Check the software documentation for exact usage.

The 18 cursor routing keys are located immediately below the braille cells. Each braille cell has its own router key. These keys work in conjunction with the screen reader or portable device to move the editing cursor to the place in the document that corresponds with what appears on the display. This makes it easy to edit a document because you do not need to synchronize the program cursor with the reading location on the display. The cursor routing keys also activate a menu selection or button in many of the supported screen readers.
With Refreshabraille 18 on a flat surface and the braille cells at the top of the display, the power button is located in the middle of the edge surface facing you.

Hold the button in for 2 seconds to turn the device on or off. The Refreshabraille 18 vibrates once when turned on and twice when turned off.
Press the power button quickly to wake up Refreshabraille 18 from standby.
Hold the power button in for 10 seconds to reset the device.
When first turned on, the braille characters for APH and the unique serial number should show on the display. However, you may customize the name of your device, which makes it easy to identify a specific Refreshabraille 18 when there are more than one in an office or classroom.
The braille input keys are arranged with the six traditional keys in a straight line (from left to right: dots 3, 2, 1, 4, 5, 6). The ability to flip the Refreshabraille 18 display means you can type in either orientation. (See the Orientation section above.)

The space key (or space bar) resides in its traditional position (bottom row, middle) below the six-dot keys. Flanking it to the left and right are the keys to produce dot 7 and dot 8. The configuration for these keys are (from left to right) dot 7, space key, dot 8.

The six braille input keys and two computer braille keys are used to type text. Depending on the application, the dot 7 key is often used as a capital letter modifier, much like pressing shift on a keyboard. The dot 8 key is often used as Enter, but check the documentation for the program or device with which you use the display to see how that software defines the action of the key.
Some eight-dot input displays are arranged so you press the dot 7 and dot 8 keys with the pinky fingers. However, the small width of the Refreshabraille 18 makes it necessary to use your thumbs for these two keys.
The advance bars and aux space bar are located between the braille input keys (dots 1-6) and the braille cell display. The advance bars are on the left and right sides of the unit and the aux space bar is in the middle.
The right advance bar displays the next line of text. The left advance bar reverses or scrolls back to the previous line of text.

The Aux space is used when you have flipped the display orienting the braille cells closest to you, or when using the display in its normal position (with the braille cells away from you) while holding it with your thumbs below the device. Use your index finger to depress the Aux space.
The joystick is located between the braille input keys dot 1 and dot 4. It is a five-position switch, and depending on the software you use with the device, these five different positions usually act like the four arrow keys and select.
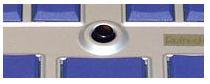
Press on the edge of the joystick to move in the indicated direction like an arrow key.
Press in the joystick button to make a selection.
The center of the joystick is also how Refreshabraille 18 sends the six-dot display keys found on many Baum displays. Normally, these devices have three small buttons on each side of the braille cell display, and combinations of those buttons make different commands for different programs. They are called the display keys, and software documentation usually refers to them as D1 through D6.
Since Refreshabraille 18 does not have these six buttons, it uses the center of the joystick along with the regular braille input keys to reproduce the display keys on other devices. If your screen reader requires the key combination D5 and D6, you produce that on Refreshabraille 18 by pressing and holding in the joystick while you press the braille input keys for dots 5-6.

The mini USB port is located in a recessed cavity in the bottom, left corner of the device. (If the display is flipped with the braille cells closest to you, the port is on the top, right corner). The port is in this protected location to help prevent breaking the connector pins in case the display is dropped.
This connector serves two purposes: 1) It charges the display, and 2) it communicates with a PC or other device to serve as its keyboard and braille screen.
Refreshabraille 18 has a built in rechargeable lithium-ion battery. This battery technology provides one of the best weight to energy ratios available today, does not suffer from the negative "memory effect" characteristic of other battery technologies, and discharges very slowly when not in use.
Note: Please fully charge the display before its first use.
To charge the display from a PC or other device with a USB host port, follow these steps:
Note: To charge the battery with an optional AC adapter that terminates with a mini USB plug, skip steps one and two and plug the battery charger into a wall outlet instead.
Take the opportunity to read the manual while the battery charges for the first time.
Windows PCs ask about installing the drivers for the device. Refreshabraille 18 charges without the drivers, but you may also install them while the battery charges.
When the battery is low, Refreshabraille 18 periodically flashes "Battery Low" on the braille display. Use this signal to recharge the battery.
When the battery becomes extremely low, Refreshabraille 18 turns off automatically.
The battery is estimated to last for several years of constant use. The battery in Refreshabraille 18 is not user replaceable. It must be returned to APH for replacement.
Refreshabraille 18, like a computer's monitor and keyboard, is a device designed to be used with other equipment. It does not operate by itself. Refreshabraille 18 provides the screen and keyboard for that other device. Therefore, you must connect Refreshabraille 18 to the device you wish use. Whether that device is a cell phone, a PDA, or PC, every effort has been made to make the process simple, reliable, and trouble free. Be aware, however, that the device you plan to use must have software running on it that has the ability to communicate with a braille display. In the case of your PC, that software is the screen reader program like JAWS or Window-Eyes. On the Mac, it is the VoiceOver program that comes with the system. For phones and off-the-shelf PDAs, screen reader software like Mobile Speak or Talks is required. Accessible devices like Icon already have software as of version 2.0 that integrates with the display.
There are four steps to the successful use of Refreshabraille 18 with your device.
To install the USB drivers on Windows 7 and Windows 8 follow these steps:
To connect the Refreshabraille 18 display, you must first decide which interface to use. How you do that depends on the device to which you wish to connect and what interface possibilities that device supports. In most cases, you will choose the Bluetooth wireless method of communicating between the two devices. This is especially true if you want to use Refreshabraille 18 with a mobile phone or PDA running a screen reader, or other accessible portable devices.
Most new laptops, netbooks, and even desktop PCs come with a Bluetooth radio, and if your computer does, you may still elect to use the Bluetooth option for its convenience and lack of clutter otherwise caused by extra cables on the desk. Even if your PC does not come with a Bluetooth adapter, you may purchase one at any computer store.
If Bluetooth is not an option, the USB cable serves as an excellent method of interfacing with a host device and offers the advantage that the display is always charged.
The best place to get specific instructions about connecting a braille display like Refreshabraille 18 will be with the software to which you wish to connect. For example, look in the documentation for Mobile Speak Smartphone if you plan to use the display with a smartphone running this screen reader software.
If Refreshabraille 18 is not a specific choice, which may be the case in older versions of screen reader software, you may be able to use Baum as an option. Choose a Baum display that features both braille cells and keys for input, such as the Vario Connect.
The connection process consists of turning on the Bluetooth radio for the computer or phone, scanning for Bluetooth devices in range, selecting that device, and confirming the pairing of the two devices by entering a pairing number. The pairing code for Refreshabraille 18 is 1234.
Note: This pairing process is required only when you first connect Refreshabraille 18 to a new device.
Follow these steps to pair your display using Bluetooth:
Once Refreshabraille 18 is paired with the computer or portable device, you may turn the display and braille support on or off at will. Depending on the screen reader, it will either automatically reconnect to Bluetooth, or you will have to provide a command to let the device know to use Refreshabraille 18 again. for example, on the iPhone you reestablish the connection by unlocking the phone. On Braille+, the act of turning Refreshabraille 18 off or on is enough to let the device know to use (or not use) the braille display. When connected to a Mac via Bluetooth, the act of turning on the display activates it with VoiceOver.
To connect Refreshabraille 18 to a Mac already running VoiceOver, just attach the USB cable. VoiceOver automatically recognizes and starts using the display.
In most cases, connecting Refreshabraille 18 to a PC with USB is simple. The exception is when using Windows 7 and Windows 8. These interfaces require the installation of two drivers: one for the USB and one to make the USB port appear like a com port. The second driver is required because many screen reading programs handle braille displays like a serial device. (See the section Installing USB and Serial Drivers above.)
The com port assignment driver shows the port number it assigns to communicate with the display. You may want to take a note of it now; but if you need to look it up at a later time, go to Device Manager while the display is connected and look in the section for Ports: Com and lpt. One of the com ports is assigned to APH Refreshable Braille Display. You need to use that number when you set up your screen reader.
Once the display is connected to the device you wish to use, configure the software to use Refreshabraille 18.
If you use the JAWS screen reader and it is already installed, the Refreshabraille 18 setup program installs drivers to make the braille display and JAWS work together. If you have not already installed JAWS, install it first, then run the Refreshabraille 18 setup program. If running version 10 or earlier, install the rbd_jfw10.exe program to configure JAWS.
Start JAWS, and open its main screen. For version 11 or later, select the Braille item in the Options menu. Select APH Refreshabraille 18 from the braille display list. For versions earlier than 11, select the Braille option and then select APH Refreshable Braille Display 18, which is what gets added to JAWS when you run the rbd_jfw10.exe program.
To use Refreshabraille 18 with Window-Eyes 7.1 or later, select Refreshabraille 18 from the Select Braille Display option in the File menu.
For versions prior to 7.1, there is no driver for Window-Eyes. However, you may use Refreshabraille 18 by selecting any Baum display with input keys. The Vario Connect and the Braille Connect are two that work.
To select a display, open the Braille Display option in Window-Eyes File menu. Select the display and set the com port number established by the drivers you just installed.
When you connect the display, VoiceOver automatically recognizes the display and starts using it.
To control how VoiceOver treats the display, follow these steps:
To turn on contracted braille, check the Contracted Braille box.
If you have NVDA installed on your PC, it may automatically recognize the Refreshabraille 18, depending on the settings. If it is not recognizing the display, go to the Preferences menu for NVDA and select Braille settings from the list. From the Braille Display drop-down menu, select Baum/HumanWare/APH braille displays and click OK.
To let Mobile Speak know which braille display to use, select Mobile Speak from the Start menu, then select Device Manager from the Mobile Speak menu. Use Vario Connect or Braille Connect as the display name.
After the display is connected to the device and the software on that device knows to use Refreshabraille 18, you may turn braille support on and off.
JAWS turns on braille output when you configure it for the display. To turn off braille support, select No Display from the Options/Braille menu.
Note: For a longer description of any of the following commands, turn JAWS keyboard Help on by pressing Insert + 1 and type the command. Quickly type the command twice to get an even longer description. Press Insert + 1 again to exit JAWS keyboard Help mode.
For command assignments for versions of JAWS earlier than 11, do the following:
The following applies to versions of JAWS 11 or later.
Type Keys mode allows you to type into the computer with the display. When in Type Keys mode, use space with commands that use dots 1 through 6. For example, pressing dots 1-4-5 deletes the current character. In Type Keys mode, hold down space with dots 1-4-5 to issue this command.
| Function | Key(s) |
|---|---|
| Move display to the left | Joystick Left |
| Move display to the right | Joystick Right |
| Move display up one line | Joystick Up |
| Move display down one line | Joystick Down |
| Pan left one braille window | Left Advance Bar |
| Pan right one braille window | Right Advance Bar |
| Top of active window | Joystick Press + Dots 1-2-3 (l) |
| Bottom of active window | Joystick Press + Dots 4-5-6 |
| Route braille to active cursor | Dots 1-2-3-5 (r) |
| Start braille auto advance mode; press cursor router to stop |
Joystick Press |
| Decrease braille auto advance speed | Joystick Press + Dot 3 |
| Increase braille auto advance speed | Joystick Press + Dot 6 |
| Say current line (c) | Dots 1-4 |
| Say current word | Dots 2-5 |
| Say current character (hyphen) | Dots 3-6 |
| Function | Key(s) |
|---|---|
| Previous document window | Dots 1-3 (k) |
| Next document window | Dots 4-6 (italics indicator) |
| Beginning of file | Dots 1-2-3 (l) |
| End of file | Dots 4-5-6 |
| Page Up | Dots 1-2-3-4-5 |
| Page Down | Dots 1-2-4-5-6 (er) |
| Home | Dots 1-2-3-4 (p) |
| End | Dots 1-4-5-6 (th) |
| Up Arrow | Dot 1 (a) |
| Down Arrow | Dot 4 |
| Previous word | Dot 2 |
| Next word | Dot 5 |
| Previous character | Dot 3 |
| Next character | Dot 6 |
| Function | Key(s) |
|---|---|
| Move PC cursor to any cell | Any cursor router |
| Backspace (acts as shift key when typing braille characters) |
Dot 7 |
| Enter | Dot 8 |
| Tab | Dots 4-5 |
| Shift + Tab | Dots 1-2 (b) |
| Delete current character | Dots 1-4-5 (sh) |
| Select all | Dots 1-8 (a + dot 8) |
| Select to top of document | Dots 1-2-3-7-8 (l + dots 7-8) |
| Select to bottom of document | Dots 4-5-6-7-8 |
| Select previous page | Dots 1-2-3-4-5-7-8 (q + dots 7-8) |
| Select next page | Dots 1-2-4-5-6-7-8 (er + dots 7-8) |
| Select to beginning of line | Dots 1-2-3-4-7-8 (p + dots 7-8) |
| Select to end of line | Dots 1-4-5-6-7-8 (th + dots 7-8) |
| Select previous line | Dots 1-7-8 (a + dots 7-8) |
| Select next line | Dots 4-7-8 |
| Select previous word | Dots 2-7-8 |
| Select next word | Dots 5-7-8 |
| Select previous character | Dots 3-7-8 |
| Select next character | Dots 6-7-8 |
| Select block | Dot 7 with any routing key |
| Copy to clipboard | Dots 1-4-8 (c + dot 8) |
| Cut to clipboard | Dots 1-3-4-6-8 (x + dot 8) |
| Paste clipboard | Dots 1-2-3-6-8 (v + dot 8) |
| Undo | Dots 1-3-5-6-8 (z + dot 8) |
| Function | Key(s) |
|---|---|
| Start menu | Dots 1-3-4-7-8 (m + dots 7-8) |
| Toggle menu bar | Dots 1-3-4 (m) |
| Escape | Dots 1-3-5-6 (z) |
| Alt Tab | Dots 2-3-4-5 (t) |
| Minimize all applications | Dots 1-4-5-7-8 (d + dots 7-8) |
| Left mouse click | Any cursor router |
| Right mouse click | Dot 8 + any cursor router |
| Ctrl left mouse click | Space + any cursor router |
| Function | Key(s) |
|---|---|
| Toggle keyboard help | Dots 1-4-5-6 (th) |
| Toggle type keys mode | Space + Dots 1-2-3-4-5-6 (for) |
| Toggle JAWS and PC cursor | Aux Space |
| JAWS cursor | Joystick Press + Dots 2-4-5 (j) |
| PC cursor | Joystick Press + Dots 1-2-3-4 (p) |
| Route JAWS cursor to PC cursor | Joystick Press + Dots 1-4 (italics indicator) |
| Say all to bottom | Dots 1-2-3-4-5-6-7-8 (for + dots 7-8) |
| Toggle grade 2 translation | Dots 1-2-4-5 (g) |
| Toggle grade 2 translation of current word | Joystick Press + Dots 2-4-5-6 (w) |
| Display last flash message | Joystick Press + Dots 1-2-4 (f) |
| JAWS find | Space + Dots 1-2-4 |
| JAWS find next | Dots 2-5-7-8 |
| JAWS find previous | Space + Dots 2-5-7-8 |
| Toggle active cursor follows braille | Joystick Press + Dot 1 (a) |
| Toggle braille follows active cursor | Joystick Press + Dot 4 |
| Cycle through braille modes | Joystick Press + Dots 1-3-4 (m) |
| Display six-dot braille | Joystick Press + Dots 2-3-5 (Nemeth 6) |
| Display eight-dot braille | Joystick Press + Dots 2-3-6 (Nemeth 8) |
| Toggle cursor shape | Joystick Press + Dots 1-4-6 (sh) |
| Restrict braille cursor | Joystick Press + Dots 1-2-3-5 (r) |
| Toggle characters and attributes | Joystick Press + Dots 1-6 (ch) |
| Braille color marking | Joystick Press + Dots 1-4 (c) |
| Select attributes to be displayed | Joystick Pressed + Dots 1-3 (k) |
| Set 8 characters per space | Space + Dots 2-3-6 (Nemeth 8) |
| Set unlimited characters per space | Space + Dots 1-3-6 (u) |
| Toggle 8/unlimited characters per space | Joystick Press + Dots 1-3-4-6 (x) |
| Cycle table reading options | Joystick Press + Dots 2-3-4-5 (Nemeth 7) |
| Cycle table header options | Joystick Press + Dots 1-2-5 (h) |
| Graphics labeler | Joystick Press + Dots 1-2-4-5 (ou) |
| Adjust braille options | Joystick Press + Dots 1-2 (italics indicator) |
| Adjust JAWS options | Joystick Press + Dots 1-2-3-6 (ed) |
| JAWS window | Dots 2-4-5 (j) |
| Run JAWS manager | Dots 2-3-7-8 |
| List of links on page | Dots 2-3-5-6-7-8 (Nemeth 7 + dots 7-8) |
| Show current time | Dots 2-3-4-5-7-8 (t + dots 7-8) |
| Show script file name | Joystick Press + Dots 1-2-3-4-5 (q) |
| Quit JAWS | Dots 2-5-6-7-8 (Nemeth 4 + dots 7-8) |
| Function | Key(s) |
|---|---|
| Ctrl + A–Ctrl + Z | Dot 8 + any letter |
| Alt + A–Alt + Z | Aux Space + any letter |
| Ctrl + Alt + A–Ctrl + Alt + Z | Dot 8 + Aux Space + any letter |
| F1–F10 | Dot 7 + computer braille number 1–0 (0 = F10) |
| Alt + F1–Alt + F10 | Aux Space + computer braille number 1–0) |
| Ctrl + F1–Ctrl + F10 | Dot 8 + computer braille number 1–0 |
| Ctrl + Alt + F1–Ctrl + Alt + F10 | Dot 8 + Aux Space + computer braille number 1–0 |
Connecting Refreshabraille 18 to one of an Apple iOS device provides both great braille feedback and the ability to type and control the device with the Refreshabraille 18 keyboard and joystick.
Apple has made some significant improvements in iOS 8 regarding six-key braille input and translation from braille to print. Now, when Automatic Translation is turned off in VoiceOver, the user can type at any speed without the device freezing and view the word on the braille display. For more information about this update and others, check out the iOS 8 resources below.
Note: For each function in the following tables, hold down the Spacebar on Refreshabraille 18 while pressing the indicated keys.
| Function | Chord |
|---|---|
| Move to previous item | Dot 1 (a) |
| Move to next item | Dot 4 |
| Pan braille left | Dot 2 |
| Pan braille right | Dot 5 |
| Move to the first element | Dots 1-2-3 (l) |
| Move to the last element | Dots 4-5-6 |
| Scroll right one page | Dots 1-3-5 (o) |
| Scroll left one page | Dots 2-4-6 (ow) |
| Move to the status bar | Dots 2-3-4 (s) |
| Select previous rotor setting | Dots 2-3 |
| Select next rotor setting | Dots 5-6 |
| Move to previous item using rotor setting | Dot 3 |
| Move to next item using rotor setting | Dot 6 | Launch the Task Switcher | Dots 1 2 5 twice quickly |
| Scroll up one page | Dots 3 4 5 6 (# sign) |
| Scroll down one page | Dots 1 4 5 6 (th) |
| Go to Notification Center | Dots 4 6 (italics indicator) |
| Go to Control Center | Dots 2 5 (: colon) |
| Function | Chord Command |
|---|---|
| Read all starting at selected item | Dots 1-2-3-5 (r) |
| Read all, starting from the top | Dots 2-4-5-6 (w) |
| Pause or continue speech | Dots 1-2-3-4 (p) |
| Announce page number or rows displayed | Dots 3 4 (st) |
| Function | Chord Command |
|---|---|
| Activate the Back button if present | Dots 1-2 (b) |
| Activate the Delete key | Dots 1-4-5 (d) or Dot 7 chord |
| Activate the Return key | Dots 1-5 (e) or Dot 8 |
| Switch between contracted and uncontracted braille | Dots 1-2-4-5 (g) |
| Activate the Home button (twice quickly to launch the task switcher) | Dots 1-2-5 (h) |
| Toggle speech on and off | Dots 1-3-4 (m) |
| Activate the Tab key | Dots 2-3-4-5 (t) |
| Select text | Dots 3-5-6 (Nemeth 0) |
| Unselect text | Dots 2-3-6 (Nemeth 6) |
| Volume up | Dots 3-4-5 (ar) |
| Volume down | Dots 1-2-6 (gh) |
| Toggle screen curtain on/off | Dots 1-2-3-4-5-6 (for) |
| Select all | Dots 2 3 5 6 (Nemeth 7) |
| Cut | Dots 1 3 4 6 (x) |
| Copy | Dots 1 4 (c) |
| Paste | Dots 1 2 3 6 (v) |
| Undo typing | Dots 1 3 5 6 (z) |
| Redo typing | Dots 2 3 4 6 (the) |
| Activate Eject key | Dots 1 4 6 (sh) |
| Toggle announcement history | Dots 1 3 4 5 (n) |
| Function | Chord Command |
|---|---|
| Move to previous container | Dots 1 7 |
| Move to next container | Dots 4 7 |
To use the display with Android, turn it on before you unlock the phone. Android and BrailleBack make a connection sound to indicate successful communication.
Currently, computer braille is the only available option for input. You may adjust output translation options in Settings/Accessibility/BrailleBack.
Note: In this example, the range of characters beginning with the "@" sign require a press of dot 7 along with the dot 4.
| Back | B | ||
| Home | H | ||
| BrailleBack help | L | ||
| Notifications | N | ||
| Recent Apps | R | Enter | Dots 7-8 |
NVDA turns on braille output when it is configured for the display. To turn off braille support, select No Braille from the Braille Display options in the Braille Settings menu.
In Mobile Speak Smartphone, use Home followed by B.
In Mobile Speak for Symbian, use Edit, Dial.
On Mobile Speak Pocket, press Alt + Tap 1 to turn on and off braille.
In Talks, press Talks, End.
The keys Talks uses are as follows:
| Backspace | K7 |
| Enter | K8 |
| Confirm Selection | Joystick Center |
| Key 2 | D4 |
| Key 1 | D6 |
| Menu Key | D1-D4 (c) |
| Talks Key | D2-D5 (Nemeth 3) |
| Start/Accept Call | D4-D5 |
| End Call | D5-D6 |
| Delete Character Left | D1-D2-D3 (l) |
| Digit 1 | D1-D6 (ch) |
| Digit 2 | D1-D2-D6 (gh) |
| Digit 3 | D1-D4-D6(sh) |
| Digit 4 | D1-D4-D5-D6 (th) |
| Digit 5 | D1-D5-D6 (wh) |
| Digit 6 | D1-D2-D4-D6 (ed) |
| Digit 7 | D1-D2-D4-D5-D6 (er) |
| Digit 8 | D1-D2-D5-D6 (ou) |
| Digit 9 | D2-D4-D6 (ow) |
| Digit 0 | D2-D4-D5-D6 (w) |
| Asterisk | D3-D5 (Nemeth 3) |
| Number Sign | D3-D4-D5-D6 (Nemeth 7) |
| Space | D3-D6 (hyphen) |
Talks uses the following prefixes to help orient you to which portions of the system you are using:
To turn braille support on and off in Window-Eyes, choose "Select Braille Display" from the Window-Eyes File menu. Window-Eyes responds with a dialog listing all its supported displays and the com port for the selected display. Select Refreshabraille and the com port it installed to in order to activate braille support. Select No Display from the list of displays to deactivate braille support.
To discover all the keys Window-Eyes supports, select Hot Keys from the Window-Eyes Braille menu. A dialog appears listing all the functions and the keys to perform each function.
When you turn on Refreshabraille 18, the system menu appears on the braille display. The first line of braille displayed will either be "APH" followed by the unique serial number for the unit or the display name you have assigned to it. In normal use, this is the only portion of the menu you see, because as soon as the connected device sends any data to the display, the menu gets replaced with that data. If, however, you wish to see the rest of the menu options, press the right advance bar. Each press of the advance bar moves to the next menu item, and the reverse bar moves to the previous one. These items include Serial Number, Battery Status, Bluetooth Name, and so on.
There are two ways to exit the system menu. "Menu Off" is the last item in the system menu. Press any of the cursor routing keys below the word "Off" and the menu disappears. You may also use your PC or mobile device to communicate with the display and the system menu will disappear.
Many options in the menu present choices among two or more items. The currently selected option is indicated on the display by the raised dots 7 and 8. To select an option, press one of the cursor routing keys below the option to select.
When you exit the menu, Refreshabraille 18 automatically saves all your setting changes.
To return to the menu, follow these steps:

The first line of the menu shows the name of the braille display. When you first turn on the Refreshabraille 18, the display reads APH and the unique serial number assigned to that device. For example, APH 27002968. The serial number is also what appears as the Bluetooth name for the device. You may edit this name to provide a more personalized greeting.
To edit the name, follow these steps:
The Battery Status option shows the amount of battery power available. The level is expressed as either 1, 2, or 3 full cells, with 3 being the most battery power and 1 the least. When the battery is very low, there will be no full cells.
A USB mode was added to any Refreshabraille 18 manufactured after March 2010. The USB mode requires the user to choose either the serial or HID protocol to communicate between the display and user device via the USB port.
Most earlier screen reader programs require a serial protocol setting. However, if your screen reader supports HID protocol, it could be a better choice. HID does not require additional external drivers; and, if you have the USB mode set to HID, Windows installs the drivers without the CD. If the USB mode is set to serial, Windows requires the CD the first time you connect to your PC so it can find the USB serial drivers.
Standby Time displays the number of minutes Refreshabraille 18 waits with no communication from the connected device before it blanks the display and enters its power saving Standby mode. When in Standby mode, Refreshabraille 18 wakes up when the connected device sends any data to the display.
There is a minus sign to the left of the number (in minutes) and a plus sign to the right of it. Press the cursor routing key associated with the minus to reduce the standby time, and press the router key associated with the plus sign to increase it. Set the standby time to zero to turn off the standby capability.
Automatic Power Off determines the number of hours Refreshabraille 18 waits after entering Standby mode before it completely shuts down. As with the Standby menu option, this menu contains a plus and minus sign. Press the cursor routing key under either of these characters to change the value.
The firmware version number represents the level of software running on the Refreshabraille 18.
The advance bars are located to the left and right of the aux space bar, between the braille input keys and the braille cell display. The two setting choices are listed below:
Serial number displays the serial number for the device. This is a unique number and is not editable. You use the number to keep track of a specific device for maintenance or warranty purposes.
Press any of the cursor routing keys under the word "default" to restore all settings to their defaults.
Press any of the cursor routing keys under the word "off" to exit the menu.
In the System Menu, press the first two and the last two cursor routing keys on the braille display. The display responds by activating each dot of each cell, one after the other, and then clearing them.
To clear the self-test, press the first two and last two cursor routing keys at the same time.
Refreshabraille 18 features the ability to "flip" the display, allowing the user to have the braille cells at the bottom or top of the device. To flip the display and controls, press both the Reverse and Advance bars at the same time. Refreshabraille 18 responds immediately, so you may rotate the device 180 degrees and use it in the new orientation for both reading and input.
When Refreshabraille 18 is oriented with the cells closest to you, the Aux Space may be used as the space key. The Aux Space is located between the two advance bars. However, some users may find it just as convenient to use the space bar which is now located (unconventionally) above the braille dot keys.
Some programs use what they call Display keys on the braille keyboard to perform various functions. These are usually six small round buttons that supplement the things you can do with the normal keys.
Refreshabraille 18 uses a key combination to produce the Display keys. The combination consists of pressing and holding down the center of the joystick while you press the dot numbers of the braille keys. For example, to produce the combination for D2-D3, you would press Center + Dots 2-3.
Refreshabraille 18 is designed so that updating to the latest version is easy. If updates are available, you may download firmware updater software at tech.aph.org/rbd_upd.exe, which contains both the new firmware for the display and the code to install it.
When you click on the download link, the firmware updater will automatically detect your device, detect your firmware version, and update if a newer version is available.
In order to have the firmware updater see your device, it must not be paired with a screen reader, or at least not have it selected as the device in use at the time. For example, if you are using JAWS as your screen reader, JAWS would need to be set to "no selected device."
If your device is in HID mode, the update should work. To update your device in Serial mode, the serial drivers must first be installed.(See the Installing USB and Serial Drivers section of this document.)
Executive Products Inc. sells a carrying case for Refreshabraille 18. See the Executive Products Inc. website for additional information.
Bapin Group, LLC also sells a leather carrying case with a strap. See the Bapin Group website.
Minor things can happen which visibly affect the performance of a braille display but which cannot be called a "real" malfunction. A few examples and helpful hints are described below.
Congratulations on your purchase of the APH 18 cell refreshable braille display. Your purchase includes a warranty against defects in workmanship and materials under normal use for a period of one year from the date of purchase. This warranty does not include any third party hardware or software used in conjunction with this refreshable braille display.
APH will, at no charge, repair or replace (at APH's option) the product during the warranty period so long as the damage or defect is covered. This warranty does not include the following:
Product No. 1-07446-00
Price: $250.00
The initial warranty can be extended for an additional 12 months beyond the one-year limited warranty included with the initial purchase. The extended warranty must be purchased within 90 days of the purchase.
There are no other expressed or implied warranties for Refreshabraille 18, including claims for consequential damages of any kind.
ORDER YOUR EXTENDED WARRANTY within 90 days of your purchase by contacting APH Customer Service. Your order must include the Refreshabraille 18 serial number and date of purchase.
Claims under this Limited Warranty will be governed by the laws of the Commonwealth of Kentucky, USA.
Should you have any questions, please contact APH customer service as follows:
American Printing House for the Blind (APH)
1839 Frankfort Ave.
P.O. Box 6085
Louisville, KY 40206
e-mail - [email protected]
800-223-1839
Braille:
Input keys:
Interfaces:
Battery:
Power Supply:
Certifications:
Mechanical - device:
Mechanical - package:
| ASCII Code | Character | Dot Combination |
|---|---|---|
| 33 | ! | 2-3-4-6 |
| 34 | " | 5 |
| 35 | # | 3-4-5-6 |
| 36 | $ | 1-2-4-6 |
| 37 | % | 1-4-6 |
| 38 | & | 1-2-3-4-6 |
| 39 | ' | 3 |
| 40 | ( | 1-2-3-5-6 |
| 41 | ) | 2-3-4-5-6 |
| 42 | * | 1-6 |
| 43 | + | 3-4-6 |
| 44 | , | 6 |
| 45 | - | 3-6 |
| 46 | . | 4-6 |
| 47 | / | 3-4 |
| 48 | 0 | 3-5-6 |
| 49 | 1 | 2 |
| 50 | 2 | 2-3 |
| 51 | 3 | 2-5 |
| 52 | 4 | 2-5-6 |
| 53 | 5 | 2-6 |
| 54 | 6 | 2-3-5 |
| 55 | 7 | 2-3-5-6 |
| 56 | 8 | 2-3-6 |
| 57 | 9 | 3-5 |
| 58 | : | 1-5-6 |
| 59 | ; | 5-6 |
| 60 | < | 1-2-6 |
| 61 | = | 1-2-3-4-5-6 |
| 62 | > | 3-4-5 |
| 63 | ? | 1-4-5-6 |
| 64 | @ | 4 |
| 65 | A | 1-7 |
| 66 | B | 1-2-7 |
| 67 | C | 1-4-7 |
| 68 | D | 1-4-5-7 |
| 69 | E | 1-5-7 |
| 70 | F | 1-2-4-7 |
| 71 | G | 1-2-4-5-7 |
| 72 | H | 1-2-5-7 |
| 73 | I | 2-4-7 |
| 74 | J | 2-4-5-7 |
| 75 | K | 1-3-7 |
| 76 | L | 1-2-3-7 |
| 77 | M | 1-3-4-7 |
| 78 | N | 1-3-4-5-7 |
| 79 | O | 1-3-5-7 |
| 80 | P | 1-2-3-4-7 |
| 81 | Q | 1-2-3-4-5-7 |
| 82 | R | 1-2-3-5-7 |
| 83 | S | 2-3-4-7 |
| 84 | T | 2-3-4-5-7 |
| 85 | U | 1-3-6-7 |
| 86 | V | 1-2-3-6-7 |
| 87 | W | 2-4-5-6-7 |
| 88 | X | 1-3-4-6-7 |
| 89 | Y | 1-3-4-5-6-7 |
| 90 | Z | 1-3-5-6-7 |
| 91 | [ | 2-4-6 |
| 92 | \ | 1-2-5-6 |
| 93 | ] | 1-2-4-5-6 |
| 94 | ^ | 4-5 |
| 95 | _ | 4-5-6 |
| 96 | ` | 4-7 |
| 97 | a | 1 |
| 98 | b | 1-2 |
| 99 | c | 1-4 |
| 100 | d | 1-4-5 |
| 101 | e | 1-5 |
| 102 | f | 1-2-4 |
| 103 | g | 1-2-4-5 |
| 104 | h | 1-2-5 |
| 105 | i | 2-4 |
| 106 | j | 2-4-5 |
| 107 | k | 1-3 |
| 108 | l | 1-2-3 |
| 109 | m | 1-3-4 |
| 110 | n | 1-3-4-5 |
| 111 | o | 1-3-5 |
| 112 | p | 1-2-3-4 |
| 113 | q | 1-2-3-4-5 |
| 114 | r | 1-2-3-5 |
| 115 | s | 2-3-4 |
| 116 | t | 2-3-4-5 |
| 117 | u | 1-3-6 |
| 118 | v | 1-2-3-6 |
| 119 | w | 2-4-5-6 |
| 120 | x | 1-3-4-6 |
| 121 | y | 1-3-4-5-6 |
| 122 | z | 1-3-5-6 |
| 123 | { | 2-4-6-7 |
| 124 | | | 1-2-5-6-7 |
| 125 | } | 1-2-4-5-6-7 |
| 126 | ~ | 4-5-7 |