Teacher's Pet

User's Manual
Copyright 2000-2011
American Printing House for the Blind, Inc.
2011/2/7
2011/2/7
Teacher's Pet is an accessible test creation and administration program. It is for use by parents or teachers who wish to create accessible drill and practice exercises or tests for blind and visually impaired students.
The program both administers and records test sessions and provides a rich environment for creating or editing the pools of questions that comprise the test or drill document.
Students interact with the program to provide responses, review answers, or browse through the set of questions. Questions include text, graphics, and sounds to help make the test or drill session more interesting. Teachers benefit from the program's student management and record keeping capabilities.
This document uses the "+" to indicate a series of keys that should be pressed together. The notation Alt+F, for example, means to hold down the Alt key, then while that key is still down, press the F key. Once the F is down, release the F and the Alt. You should not type the +; it is merely used to show that two or more keys should be pressed together.
In addition to this documentation for information about Teacher's Pet's operation, you may wish to subscribe to the Teacher's Pet email list. This list lets you speak to other users and directly to the developers of the product and provides you an opportunity to make suggestions and observations that can help the product improve.
To join the Teacher's Pet email list, send a blank email to [email protected] .
To install Teacher's Pet, insert the CD into your CD-ROM drive. Within a few seconds, the disk should start spinning and the Setup program should start. Once Setup starts, follow the instructions displayed on screen. Before you can precede with Setup, you must agree to the End User License Agreement that Setup displays.
If your CD-ROM drive does not automatically start the Setup program, open the My Computer icon on your desktop, open the CD-ROM drive that contains your Teacher's Pet CD, then open the program Setup.exe.
Once Teacher's Pet is installed, you will not need the CD to use the program.
To start Teacher's Pet, find its icon ![]() on the desktop, or go to the Start menu, Programs, Teacher's Pet, and Teacher's Pet.
on the desktop, or go to the Start menu, Programs, Teacher's Pet, and Teacher's Pet.
When Teacher's Pet starts, it begins by using the last document you had opened. If that document were a drill, the program begins presenting the questions for the drill, and the software immediately lets the student know if she gets the answer correct or not. If the last document were a test, those test questions get presented to the student without interactive feedback on answers.
The default is for Teacher's Pet to use Text-To-Speech (TTS) to voice questions and answers. This self-voicing may be turned off from the Options screen. A screen reader may not speak all screen information in a consistent format, thus a screen reader software is not recommended with this program.
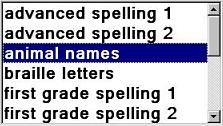
If the previously used document is not available for some reason, Teacher's Pet shows a list of tests and drills and lets the student select the one to use.
Teacher's Pet uses the network user name to identify who is using the program. If you are not on a network, the program uses "Default User" as the name.
If your computer is not set up for a network environment, you may wish to log into the software to identify yourself.
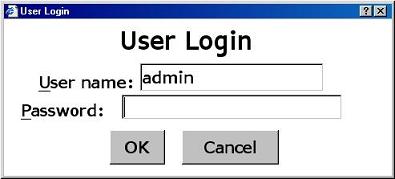
If you wish to log on as another user or as the administrator, press Ctrl+L or click the Login button.

Teacher's Pet ships with several example documents from which you may wish to practice using the program. These documents represent many different types of questions and answers. You will, of course, want to create your own tests as soon as you become familiar with the program's behavior from the student's perspective, but you may wish to use these samples as a means of learning the program first. See Test Management Facilities for complete instructions on creating your own documents.
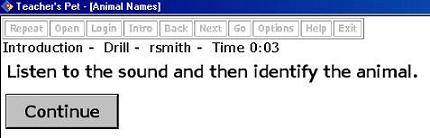
When your student first opens a new drill or test, the program shows an introduction screen. This screen usually contains directions about the test material or provides some background for the questions about to follow.
As with any other question in the pool, the student may press F2 to repeat the instructions.
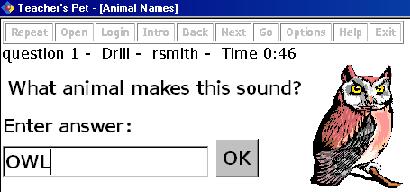
Once the student dismisses the instructions screen, Teacher's Pet begins displaying questions. The order in which these questions get presented depends on how the parent or teacher sets up the test.
When Teacher's Pet shows a question, your student has several choices about how to continue.
The student may choose to answer the question or to move to the next or previous question.

The technique your student uses to answer the question depends on what kind of question is shown.
If the question is of the fill in the blank or the essay type, the student may type the answer and use the standard Windows editing commands.
If the question is multiple choice, the student may type the number or letter of her choice, or she may use the arrow keys to move from answer to answer until she finds the one she wants to use.
If the question is true or false, she may use the arrow keys to select the answer of her choice, or she may type "T" for true or "F" for false.
Pressing Enter submits the answer for evaluation. Once Teacher's Pet evaluates the answer, it either provides feedback to the student (during a practice drill) or keeps track of the answer (in a test situation.)
If the document is a drill, the student gets immediate feedback about whether or not her answer is correct. If the answer is correct, Teacher's Pet congratulates her and displays any additional information about the question that may be available. If there is no additional information available for the question, the program simply moves to the next question in the drill. If the student's answer is incorrect, Teacher's Pet lets her know that fact then restates the question for another possible answer. If she misses the question 3 times (or whatever other number of tries you specify), the program explains the answer to her.
If your student is taking a test, Teacher's Pet provides no feedback until your student finishes the test. Once the student answers the last question in the test, the software shows a completion screen that offers her the chance to review answers before grading the test. The completion screen looks like this:

End of Test
Press Ctrl+Page Up to review your answers or press Enter to grade the test.
If your student needs to review her work, she may use Ctrl+Page Up and Ctrl+Page Down to move through the questions she already answered.
When the student moves to a previously answered question, she may change the answer she already supplied, or, in the case of fill in the blank and essay type questions, she may use the standard Windows editing keys to edit any existing answers.

There is a button bar at the top of the screen that lets the student choose among several options. The button bar items are not in the tab order, so do not interfere with using a question. The keyboard equivalents are discussed below. If you use "admin" as the user, you will get a menu of additional options useful for test management and preparation. These additional features constitute the Test Management Facilities which are discussed later in this manual. Under normal use, the commands that are available are as follows.
The Login button lets a new student or teacher identify themselves to Teacher's Pet.
If the teacher or parent logs on, there are additional options available to facilitate creating and editing tests and drills. Use the special name "admin" to inform Teacher's Pet that you are the teacher or parent.
It is highly recommended that when you, as a teacher or parent, first start the program, you use the admin account to set a password for this special account. If you do not protect this account with a password, anyone who uses the program may log in as admin and gain access to all aspects of the program.
To set a password for any account, see User List later in this document.
Pressing F2 makes the software repeat the question and, if there are choices, those choices.
The Back and Next buttons let the student move from question to question in the test or drill. If the student answers the current item, the program automatically moves to the next item, but the student may wish to use these buttons to skip a question and come back to it later.
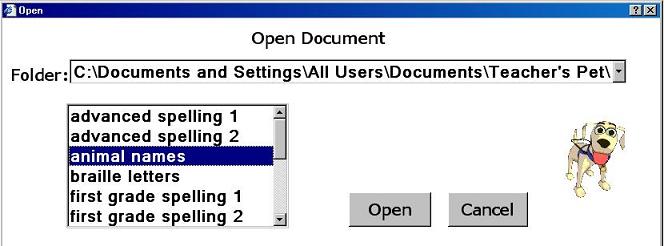
The Open command on the File menu opens a new drill or test. When you or the student selects Open from the File menu or presses Ctrl+O, the software displays a list of available tests. Use the arrow keys to highlight the desired file, and press Enter to open that file.
The Exit command ends the program.
Pressing F1 makes the program display the Teacher's Pet User's Manual. The student may switch from the manual back to the program and back to the manual with Alt+Tab. Press Alt+F4 to close the manual and return to the program.
Teacher's Pet provides the student with the ability to adjust the size of any images associated with a question.
F6 lets the student focus on a particular image in a question. This is useful if there are several images associated with a question. The command also makes the program announce the name of the image.
Pressing F7 enlarges the current image.
F8 reduces the size of the current image.
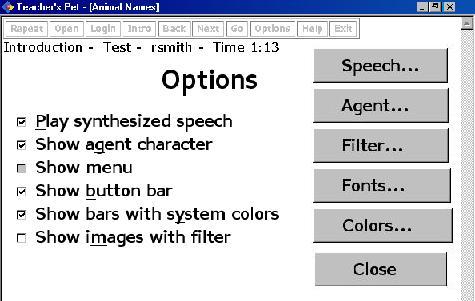
The Options button shows a screen that lets you or the student control several aspects of how Teacher's Pet looks and acts.
When the Play Synthesized Speech button is checked, the software announces the questions and other user interface elements with a speech synthesizer. You may select the exact synthesizer and its parameters with the Speech button.
If a student needs synthesized speech, she may press F12 to turn this option on without going to the Options screen. Similarly, she may press Shift+F12 to turn off the speech without accessing the Options screen.
The Show Button Bar button lets you remove the button bar from the top of the screen. This may be desirable to gain a little additional screen real estate. The hot keys that activate the buttons are still active even if the button bar is not visible.
When this option is checked, the software uses the standard theme or system colors for the button bars.
Teacher's Pet lets the user apply a filter to images in drill and test questions. Normally, a low vision student will want to keep this option checked.
The Speech button displays a dialog that lets the student set the speed and volume of the synthesized speech and lets her select a different voice for the speech.
The Filter button shows a dialog that lets the student adjust the way images get displayed. The screen shows a sample image, so the student may observe the effects of any changes she makes.
The Default button turns off all filtering.
The Rotation control lets the student rotate an image.
The Opacity control lets the student incrementally decrease the image intensity.
The Grayscale control lets the student display the image in black and white.
The X-ray control displays the image inverted in grayscale.
The Mirror control displays the image in reverse.
The Invert control shows an image in opposing colors.
The Fonts button lets the student customize the size and style of font displayed in the questions.
The Colors button shows a dialog that lets the student customize the foreground and background colors of the text on the screen.
While Teacher's Pet is an excellent tool to use as a platform on which a blind or visually impaired student may take tests or use drill and practice exercises, the program's real power shows when it comes to creating and managing tests and drills.
In order to use Teacher's Pet to edit or create new tests, you must let the program know that you have permission to do this. To let Teacher's Pet know you have permission, you should use "admin" as the name for log in.
When you use the "admin" account, Teacher's Pet gives you a host of additional options used to create and edit tests. To use the admin account, follow these steps:
In addition to the standard options available for anyone taking a test, you have additional options when you use the admin account.
The first thing you notice about the document management and student data facilities is that Teacher's Pet now shows a menu at the top of the screen.

You may turn the menu off by pressing Ctrl+M. To turn the menu back on once you have turned it off, press Ctrl+M again.
To create a new question pool document, select New from the File menu or press Ctrl+N.
When you select New from the File menu or Properties on the File menu, you see a screen that lets you define aspects of the question pool that effect the entire document.
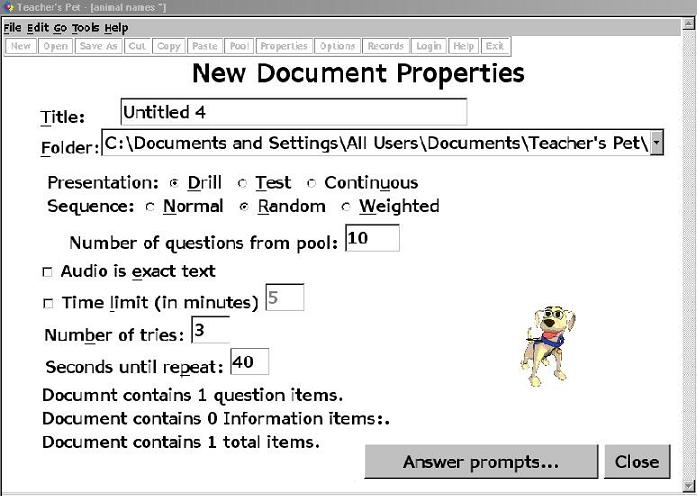
The first task to complete when creating a new document is giving that document a name.
Providing a title for your document gives you a way to both label and refer to your set of questions. Giving your document a meaningful name helps manage your documents, especially when you have more than a few of them.
Names like "2nd Grade Spelling, Week 1" or "6th Grade Geography, Lesson 2" make good names that both remind you about what the document contains and gives the student a clear means of identifying which drill or test to use. This name shows up in the Open dialog.
Test or drill names can be up to 255 characters long, but note only about 75 characters will show up on the title bar when the student takes the test or drill.
The folder is where the document is created. The default location is a shared document folder named Teacher's Pet. You can change the default location, and this new location will be used by the program for future documents. The document title is used to name a folder that contains the document and any images or audio added to the questions.
The type of document you choose here dictates how the document behaves when a student opens it.
If your document is a drill, Teacher's Pet provides the student with immediate feedback about her answer as soon as she presses the Enter key to confirm her answer. If the answer the student supplies is correct, Teacher's Pet shows the student an explanation of the answer, then, once she presses Enter, moves on to the next question. If, on the other hand, the student's answer is incorrect, Teacher's Pet informs her that her answer is incorrect. The program repeats this behavior for the number of times you specify in Number of tries, then if the answer is still incorrect, shows the explanation, and moves on to the next question.
If the presentation is a test, the program provides no feedback until the test is complete or until the student runs out of time to complete the test.
If the presentation is continuous, Teacher's Pet announces the question, waits for a few seconds equal to the amount of time you specify in Seconds Until Repeat, then either repeats the question or tells the answer as indicated in Number of tries.
The document sequence, normal, random, or weighted, determines how Teacher's Pet selects the order of the questions from the pool.
If the sequence is normal, all the questions are presented in the order they appear in the document.
If the sequence setting is random, Teacher's Pet presents the questions in random order.
If the sequence setting is weighted, Teacher's Pet orders the questions in response to how well the student answers. If she gets two questions right, the program attempts to find a more difficult question to present. If, on the other hand, she gets two successive questions wrong, the program tries to find less difficult questions to present.
You rate the question's difficulty in the Weight setting for each question.
Often you have dozens of questions, yet you wish to present only a subset of the entire pool. The Number of Questions from Pool setting gives you the control to select the number of questions to present. Note this setting applies only to random and weighted sequences. The Normal sequence setting presents all the questions in the pool.
Normally, Teacher's Pet announces the question with a synthesized voice. If there is audio that accompanies the question, the program plays that material once it finishes reading the question. If you want to suppress the synthesized voice, however, and play a recording of the question, you may do that.
When you check this box, Teacher's Pet suppresses the synthesized speech in favor of playing a recording of the question that you have supplied. (See Narrate Question for more information on making your own recordings.
You may limit the amount of time a student has to complete a drill or test presentation. When you check this option, the amount of time in minutes box becomes available and you can enter a number in minutes. The default value is 5 minutes.
When you set a time limit on a test or drill, the software informs the student that her time expired when this time limit is reached.
When the student uses a drill or continuous document presentation, Teacher's Pet lets her try an answer more than once if you wish. The number of times Teacher's Pet repeats the question is set with this value. A drill accepts answers up to this number. A continuous presentation repeats the question only this many times before giving the answer and moving on to the next question. The default value is three tries.
By default, Teacher's Pet repeats the question every 40 seconds if there is no activity from the student. To change this behavior, change this number.
This number is also used in the Continuous presentation. When using a continuous type document, Teacher's Pet repeats the question after this amount of time passes for as many times as you specified.
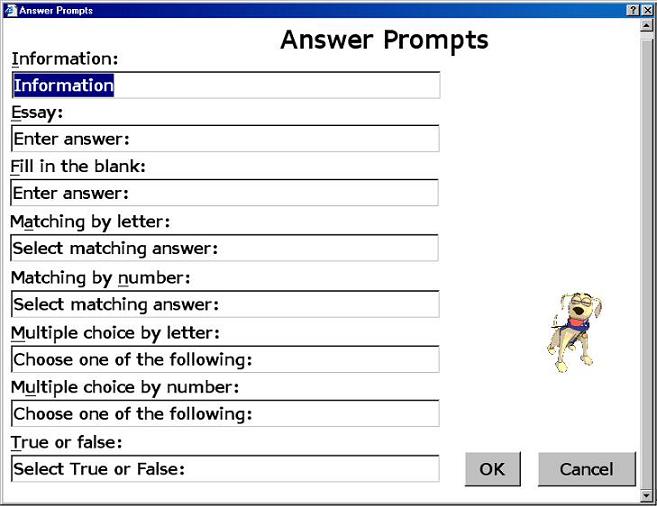
Depending on the type of question you select for each question, Teacher's Pet provides the student with a line of text for instructional purposes. The Answer prompts button opens a screen that lists the question types and the related prompt text.
Teacher's Pet lets you define what the prompt should be for each type of question. If you don't enter your own text into these eight fields, the program uses the following text for each type:
| Type | Default Prompts |
|---|---|
| Information | Information |
| Essay | Enter answer |
| Fill in the blank | Enter answer |
| Matching by letter | Select matching answer |
| Matching by number | Select matching answer |
| Multiple choice by letter | Choose one of the following |
| Multiple choice by number | Choose one of the following |
| True or False | Select True or False |
When you complete all the fields in the Properties screen, use the Close button to close the Properties screen.
When you close the Properties screen, Teacher's Pet displays the Introduction Editing screen. Type instructions for the test or drill here.
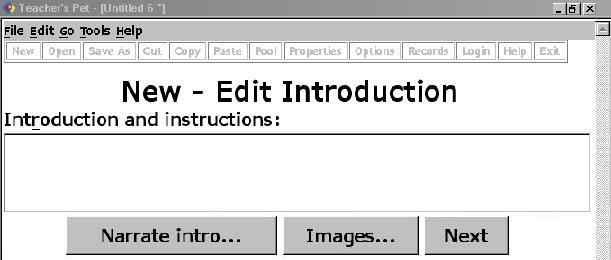
Once you change the information in the properties screen to match how you want the document to behave, it is time to start adding questions and answers to your document.
The Question Pool screen shows a list of the questions in your document and offers buttons for adding questions, editing a question, inserting a question, deleting a question, and previewing the question's presentation.
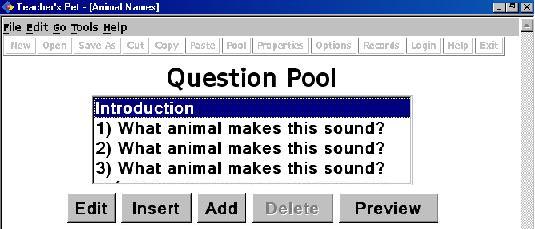
When you select Add, Insert, or Edit from the Question Pool screen, Teacher's Pet lets you enter the information about the question.
Enter the question to ask in this field. There is no practical limit to how long a question may be, so feel free to express yourself here.
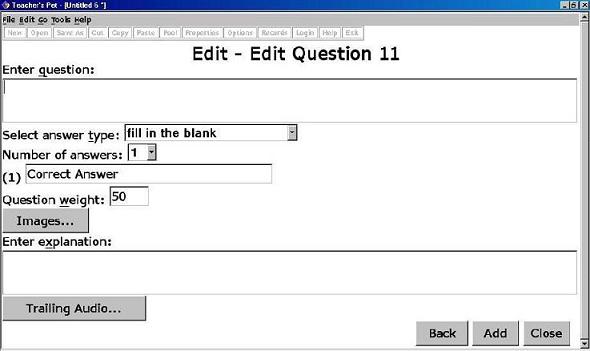
If you need to preface a question with a passage of text or an explanation of some kind, that should be entered here as well. The text in this field can be as long as you need it to be.
If you checked the Audio is Exact Text button on the Properties screen, the software displays a Narrate Question button. Pressing this button shows a screen from which you may record your question or import an existing audio file. You should record the exact text of the question you wrote in the Question edit field. If you want a sound to accompany the synthesized speech, you may do so with the Trailing Audio button.
To locate an existing audio or image file, click the import button to open a dialog box that shows your computer files. Navigate to where a file is located to select it. Common places to find audio is in My Music and images is in My Pictures.
Teacher's Pet accepts several types of questions. They are:
Once you select the question type, Teacher's Pet provides the means to enter the choices and answers for that type. If the question type is multiple choice, you must enter the text to be displayed for each possible choice.
Teacher's Pet cannot evaluate essay responses. It is the teacher's responsibility to evaluate such responses.
Note: With the exception of essay responses, Teacher's Pet evaluates your students' responses and grades the test. It is, therefore, important that Teacher's Pet knows the correct answer to your questions.
As mentioned, it is impossible for Teacher's Pet to evaluate essay type responses. It is simple, however, to indicate the correct answers for multiple choice and true or false questions.
Fill in the blank answers are another story. You must be very careful about how to indicate correct responses for fill in the blank, because you want your student to be able to express herself in a natural way. It is, therefore, important for you to think of every possible correct response to a question. You might, for example, have a question like:
Who was the first president of the United States?
You might include the following as possible correct answers:
Many test and drill questions may benefit with the aid of a visual.
The Images button shows a Import Images screen that helps you include pictures to go with any or all of your test questions.
When you select the Add button from the Import Images screen, the software copies the image to which you point and adds it to the folder that contains the current set of questions.
The Trailing Audio button shows a screen that lets you record, playback, and edit sounds to accompany the text of your questions.
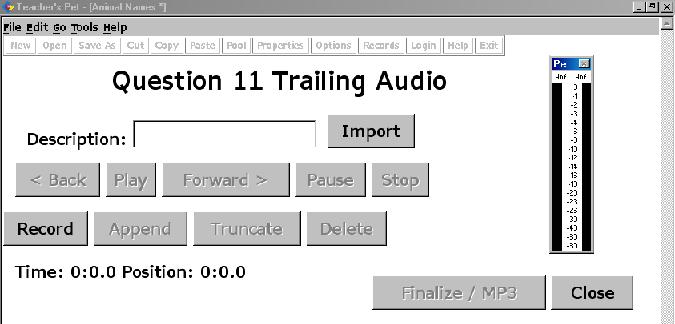
These sounds can either be a recording that replaces the synthesized voice, or it can be a sound that should be played in addition to the synthesized speech. You may use the Properties screen to check the "Audio is Exact Text" button if you would like to replace the synthesized speech with your own voice. Generally, however, you use the audio to add additional sounds to a question that gets spoken with the synthesized speech.
When you make a recording with Teacher's Pet, the software assigns your recording a name and stores it in the same folder as your document. If you decide to use recordings from other sources, it is very helpful to place the recording in the same folder as the test document. This greatly aids the process of moving a test document.
Once you tell Teacher's Pet what the correct answer to your question is, you may optionally use the Explanation area to provide the student with additional information about the correct answer.
If you have supplied an additional explanation about the correct answer, Teacher's Pet pauses at the end of each question (after the student answers) and displays this explanation.
When you have a question that needs editing or you discover that your students have additional fill in the blank responses that should be considered correct, you can edit the question. To edit a question, select Edit Question from the Edit menu or click the Edit button from the Pool List screen to edit the currently selected question.
When you choose Edit Question, Teacher's Pet shows you a screen that looks exactly like the screen you used to enter the original information about the question. Instead of offering blank areas for you to enter the information, Teacher's Pet shows the screen with the fields filled in with the information from the current question. You may change or edit any of these fields of information.
The Tools menu provides additional tools that you may use to manage students and test results.
The File menu contains additional tools to manage your documents.
The User List option on the Tools menu lets you add students, delete students, and set passwords for any account.
The program automatically adds new users if they are logged into your network. If the student is not using a network or if all students use the same account, you must use the User List dialog to add each student to the program's database.
To add a new user, type the user's name in the User Name field, then click the Add button. If you would also like to assign a password to the student's account, you may do that, too. The Old Password field will indicate by dots whether you have already assigned a password to the currently displayed account. Note that the program does not have a default password for the admin account, so it starts out blank.
To assign a password to an account, highlight the name of the account, then type the password in the New Password field. Teacher's Pet requires that you type the password in the Confirm Password field, too, to insure that you did not make a typing error while entering the password. Once you type the password in the New Password field and repeat it in the Confirm Password field of the dialog, press the Update Password to assign the new password.
In normal circumstances, the only password that you definitely need to assign is that of the admin account. If you do not assign a password to the admin account, any student may log in as admin and gain information about answers to questions and other student records.
You may remove a user's account. To remove an account, highlight the account's name and press the Delete button.
The Set Defaults button is a quick and easy way to remove all users from the Teacher's Pet database. This may be useful at the end of a semester as you prepare for a new group of students.
Teacher's Pet's record keeping abilities let you examine the results of each student's test or drill session.
When you select Records from the Tools menu, the software shows a list of all users and provides controls to view or delete records.
In addition to listing each user's name, the program contains a special item in the user list called All. Use this item to see all users at once.
To view a student's records, highlight the student's name, then press the View button.
Teacher's Pet shows a list of each test or drill the student used. This list includes the date and time, the percentage correct, and the total time the student spent taking the test or drill.
To examine the record of a specific test or drill, highlight the item and press the Details button. The software shows a list of each question along with the student's response to that question.
Use the Delete Item button to clear the test or drill from the user's list.
Use the Close button to Close the View screen and return to the Records screen.
The Records screen lets you clear all the records belonging to a specific student or all the records belonging to all students. To clear a specific student's records' highlight the student's name and press the Delete button. To clear all records, highlight All then press the Delete button.
The Advanced option in the Tools menu provides additional tools that let you control the test environment.
The Add Folder button lets you add places the software looks for its document files.
To remove a folder from the list of folders the program uses, highlight the folder's name, and press the Remove Folder button.
When the Check for Updates Automatically button is checked, the program attempts to determine if you are using the latest version of the program each time you start it.
In keeping with APH's commitment to provide you, our customer, with the most high-quality, up-to-date software, this program contains the ability to determine if you are using the newest version. To check for updates to this software, select the Check for Updates option from the Help menu. When you select this option, the program compares the version of the software you have on your PC with what APH has stored on its server and lets you know if there is an update available. Note that for this option to function, you must be connected to the internet.
Once the software contacts the APH web server, the program either tells you that you already have the latest version or it informs you that there is an update available and offers to download and install the update for you.
The Validate option on the Tools menu checks the current document to insure its validity. This validation includes checking to insure that all sounds and images are included and accessible to the program.
The Delete option on the File menu lets you completely erase the complete document. This command shows a list of documents and lets you highlight the one to delete. The current document is not available for delete.
The Print option on the File menu prints the current question.
The Print Document option on the File menu prints the entire document of questions. You may see a flicker while the document is prepared for printing.
Backspace
| Command | Key | Purpose |
|---|---|---|
| Backspace | erases the character left of the caret. | |
| Delete | Delete | deletes the character at the caret. |
| Left | Left Arrow | moves the caret one character to the left. |
| Word Left | Ctrl+Left Arrow | moves the caret to the previous word. |
| Right | Right Arrow | moves the caret one character to the right. |
| Word Right | Ctrl+Right Arrow | moves the caret to the next word. |
| Beginning of line | Home | moves the caret to the beginning of the line. |
| Top | Ctrl+Home | moves the caret to the beginning. |
| End of Line | End | moves the caret to the end of the line. |
| End | Ctrl+End | moves the caret to the end of your text. |
| Global keys | |
|---|---|
| Help | F1 |
| Review current screen item with TTS | F2 |
| Review current text with TTS | Ctrl+/ |
| Display Options screen | Ctrl+T |
| Turn speech (TTS) on | F12 |
| Turn speech (TTS) off | Shift+F12 |
| Menu (admin) | |
| File menu | Alt+F |
| Edit menu | Alt+E |
| Go menu | Alt+G |
| Tools menu | Alt+T |
| Help menu | Alt+H |
| Question Pool (admin) | |
| Create new data set | Ctrl+N |
| Add question | Ctrl+D |
| Edit question | Ctrl+E |
| Delete question | Ctrl+Del |
IMPORTANT - READ CAREFULLY: This End-User License Agreement (the "Agreement") is a legal contract between you (either an individual or a single entity) and American Printing House for the Blind ("APH") relating to the software product with which this End-User Agreement has been provided (the "Software"). As used in this Agreement, Software shall include computer software and, as applicable, associated media, printed materials, and electronic documentation.
BY CLICKING THE "ACCEPT" BUTTON BELOW OR PRESSING [ALT+A], OR BY INSTALLING, COPYING, OR OTHERWISE USING THE SOFTWARE, YOU AGREE TO BE BOUND BY THE TERMS OF THIS AGREEMENT. IF YOU DO NOT AGREE TO THE TERMS OF THIS AGREEMENT, DO NOT INSTALL OR USE THE SOFTWARE.
You are entitled to receive a full refund of amounts paid for the Software within 30 days of your purchase of the Software by requesting a refund in writing, returning the Software (and all related materials) to APH in resalable condition and providing to APH proof of purchase of the Software.
Following acceptance of this Agreement, APH grants you the nonexclusive right to install and use one copy of the Software in accordance with the terms of this Agreement.
You may install the single copy on one hard disk or other storage device for one computer, and you may access and use the Software at that location so long as only one copy of the Software is in operation. If you are an entity rather than an individual, you may authorize employees, students or others served by your organization to use the Software, but only one person at a time may use the Software on one computer at a time. The primary user of the computer on which the Software is installed may make a second copy for backup/emergency recovery purposes for his or her exclusive use on a backup or portable computer, so long as each copy of the Software is used on only one computer at a time.
You may store, install and access this version of the Software through an internal network, if you obtain and pay for a license for the number of users that will access the Software through the network at the same time. In a lab setting, you must purchase a license for the number of computers on which the Software is installed.
You may not rent, lease, sublease, sublicense or lend the Software. You may not copy the CD-ROM media. If an update to the Software becomes available and you obtain it for no additional charge, you may not also use prior version(s) of the Software.
You agree to not modify, reverse engineer, decompile or disassemble the Software or create derivative works from the Software. APH may provide you with support services related to the Software ("Support Services"). Use of Support Services is governed by APH policies and programs, which may change from time to time. Any supplemental software code provided to you as part of the Support Services will be considered part of the Software and subject to the terms and conditions of this Agreement. With respect to technical information you provide to APH [as part of the registration of your license to the Software or] in connection with the Support Services, APH may use such information for its business purposes, including for product support and development.
You may permanently transfer all of your rights (including all updates) under this Agreement, provided that you retain no copies, you transfer all of the Software (including all component parts, the media and printed materials, any upgrades,, you notify APH of the transfer and the name and address of the recipient, and the recipient agrees to the terms of this Agreement.
Without prejudice to any other rights, APH may terminate this Agreement if you fail to comply with the terms and conditions of this Agreement. In such event, you must, at the option of APH, either return to APH or destroy all copies of the Software and all of its component parts.
This Agreement will be governed by the laws of the Commonwealth of Kentucky.
All title and copyrights in and to the Software (including, without limitation, any images, photographs, animations, video, audio, music or text incorporated into the Software), the accompanying media and printed materials, and any copies of the Software are owned by APH or its licensors. The Software is protected by copyright laws and international treaty provisions. Therefore, you must treat the Software like any other copyrighted material, except that you may copy the software portion of the product onto a computer hard disk for installation purposes provided that it is used as specified, and is subject to, the provisions of this Agreement. All copyright notices must appear on any copy of the Software and may not be altered. You may not replicate any materials that accompany the Software.
Should you decide to transmit to APH by any means or by any media any materials or other information (including, without limitation, ideas, concepts or techniques for new or improved services and products), whether as information, feedback, data, questions, comments, suggestions or the like, you agree such submissions are unrestricted and will be deemed non- confidential and you automatically grant APH and its assigns a non-exclusive, royalty-free, worldwide, perpetual, irrevocable license, with the right to sublicense, to use, copy, transmit, distribute, create derivative works of, display and perform the same.
APH warrants, for the benefit of the original end user alone, for a period of 90 days from the date of shipment by APH (referred to as the "Warranty Period") that the media on which the Software is contained is free from defects in material and workmanship. APH further warrants, for your benefit alone, that during the Warranty Period the Software will perform substantially in accordance with the functional specifications of the Software as set forth in the documentation provided with the Software. If, during the Warranty Period, a defect covered by the foregoing warranty appears, you may return the Software, accompanied by the APH invoice provided with the Software, for either replacement, or if elected by APH, refund of amounts paid under this Agreement. You agree that the foregoing constitutes your sole and exclusive remedy for breach by APH of any of the warranties or other agreements made under this Agreement.
EXCEPT FOR THE WARRANTIES SET FORTH ABOVE, THE SOFTWARE IS PROVIDED "AS IS" AND APH DISCLAIMS ANY AND ALL OTHER WARRANTIES, WHETHER EXPRESS OR IMPLIED, INCLUDING, WITHOUT LIMITATION, ANY IMPLIED WARRANTIES OF MERCHANTABILITY OR FITNESS FOR A PARTICULAR PURPOSE.
ANY LIABILITY OF APH FOR A DEFECTIVE COPY OF THE SOFTWARE WILL BE LIMITED EXCLUSIVELY TO REPLACEMENT OF YOUR COPY OF THE SOFTWARE WITH ANOTHER COPY OR REFUND OF THE INITIAL LICENSE FEE APH RECEIVED FROM YOU FOR THE DEFECTIVE COPY OF THE PRODUCT. IN NO EVENT WILL APH (OR ITS SUPPLIERS) BE LIABLE TO YOU FOR ANY CONSEQUENTIAL, INCIDENTAL OR SPECIAL DAMAGES, INCLUDING ANY LOST PROFITS OR LOST TIME, EVEN IF APH HAS BEEN ADVISED OF THE POSSIBILITY OF SUCH DAMAGES, OR FOR ANY CLAIM BY ANY THIRD PARTY.
Some states or jurisdictions do not allow the exclusion or limitation of incidental, consequential or special damages, or the exclusion of implied warranties or limitations on how long a given warranty may last, so the above limitations may not apply to you.
If you have any questions concerning the Software or this Agreement, you may write: