Money Talks
User's Manual

Copyright 2004 - 2010
American Printing House for the Blind, Inc.
2010/01/04
2010/01/04
Money Talks is an accessible banking account management program. It offers the user a simple and effective means of maintaining accurate information for a variety of account types. The program includes the ability to download and use electronic banking information to reconcile accounts, automatic category memorization and reuse, recurring transactions, and reports on a number of aspects of the accounts. The program supports controlling the layout and font size for low vision users and is self-voicing. It may also be used in conjunction with a screen reading program.
Money Talks maximizes flexibility by providing a means of embossing the check register or printing it in large print, printing checks in a variety of formats, and remembering the workspace the user last used with the program.
Money Talks requires a system that meets the following minimum requirements:
PC compatible computer running at least Windows 98, ME, 2000, XP, Vista, Windows 7, or later
Internet Explorer 5.5 or later
15 MB disk space
CD-ROM drive
Sound card and speakers
This document contains the entire documentation to this software. It is current and accurate as of the date of this writing. There may be additional information at www.aph.org/tech.
This documentation presumes that you have a basic knowledge of using Windows commands to operate various parts of common controls in Windows. This documentation, for example, does not tell you that pressing the Escape key dismisses a dialog or even what a dialog is.
If you are uncomfortable with Windows commands, it is recommended that you consult a tutorial that explains the basics of using keyboard commands to control the Windows environment. One such tutorial is APH's Verbal View of Windows XP.
This documentation is provided in both Hyper Text Markup Language (html) and Digital Talking Book (DTB) formats. By default, you may access the DTB format by using the Help command from the program's menu or by pressing the F1 key. When you use help in this way, a program called Book Wizard is used to display the manual. If you prefer the manual in html, use the help command in the Start menu under Programs or uninstall the Book Wizard application. In either case, you may exit the Help application with the normal Alt+F4 command or switch between the program and its help with the normal Alt+Tab command.
This documentation represents multiple key combination commands by separating the individual keys with a plus (+) sign. The command, for example, to open the File menu is performed by holding down the Alt key; then while Alt is still down, you press F. That command is shown as Alt+F.
There is an email list associated with this program. The list provides you a way to stay informed about advancements to this program and a way to provide feedback and suggestions directly to the software's developers.
To join the Money Talks email list, send an email to [email protected] and put the word subscribe in the subject line of the message.
To install this program, insert the CD into your CD-ROM drive. Within a few seconds, the disc should start spinning and the Setup program should start. If your CD-ROM drive does not automatically start the Setup program, press Ctrl+Esc (or press the Windows key), then press the letter "R" to open the Run dialog. At the Run dialog, type d:\setup and press Enter. You may need to replace the "d:" with the actual letter of your CD-ROM drive. If you don't know the letter of your CD-ROM drive, open the My Computer icon on your desktop, open the CD-ROM drive that contains your program CD, then open the program Setup.
Once Setup starts, follow the instructions displayed on screen. Before you can proceed with Setup, you must agree to the End User License Agreement. Once the software is installed, you will not need the CD to use the program.
If you have ordered this software on CD, there will also be a button on the initial install screen to install high quality speech. It does not matter if you use this before or after installing the program, but if you do not already have AT&T Natural Voices installed on your system, you will want to use this button to install that speech.
To start the software, find its icon on the desktop, or go to the Start menu and open the Programs folder. Use the arrow keys to find the program's name and press Enter.
When you start Money Talks for the first time, the program opens a new account and displays the Account Properties dialog.
The program lets you keep as many accounts as you wish open at once, and you may use the standard Windows commands (Ctrl+Tab) to move among the documents.

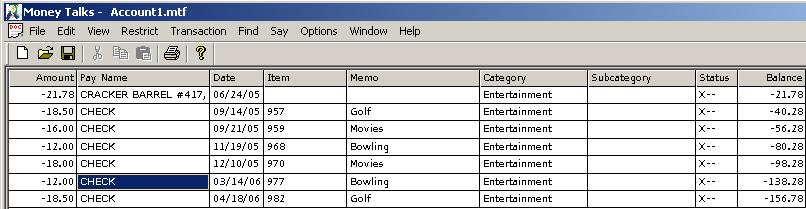
Money Talks displays each account as a register. The register contains a transaction on each line. Each transaction contains several columns of information. These include the payer or Payee, amount, type, date, memo, category and sub category.
You may use Left Arrow and Right Arrow to move from one column to another. If you have the Self Voicing option enabled, the software speaks the contents of the cell followed by the title of the column in which that cell exists.
Use Up Arrow and Down Arrow to move from one transaction to another. When you move to another transaction, Money Talks keeps your cursor in the same column, and the software reads the contents of that cell as you move. As you use the Up Arrow and Down Arrow, the program speaks the contents of the current cell followed by two additional bits of information. That information is the name of the payer or payee and the amount of the transaction. Note that if you are in the Payee or Amount column when you use Up Arrow and Down Arrow, the software adds only the one other bit of relevant information. So, if you are in the Balance column as you move to a new transaction, you hear the new balance, the payer or payee, and the amount of the transaction to which you move.
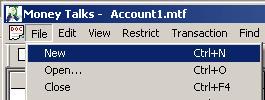
To create a new account, select New from the File menu or use the New Account command.
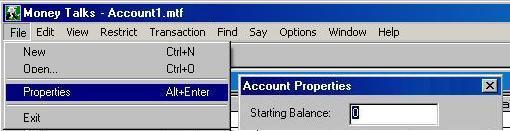
Each account you create contains certain characteristics known as the account's properties. These characteristics include information specific to that account. Most properties are optional, but they may help you keep track of information for that account.
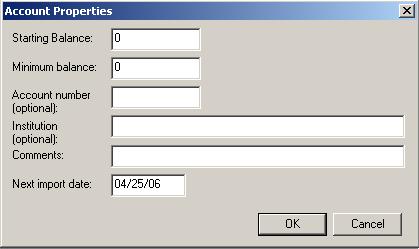
When you create a new account, Money Talks displays the Account Properties dialog.
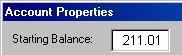
Each account you create must contain a starting balance. The technique you use to determine that starting balance depends on how you had previously kept your financial records and when you would like to begin recording activity.
If you have been using paper statements, you may wish to begin using Money Talks The next time you receive a statement from your bank. Use the ending balance amount from your last bank statement as the starting balance. Then begin recording transactions that clear from that date on.
If you are importing transactions from another financial program, use the running balance from the first exported transaction plus the amount of that first transaction as the starting balance for the new Money Talks account.
If you had not already been keeping records with another financial program, you may still be able to obtain historical data by downloading account activity from your bank's web site. To use this technique, follow these steps:
1. Download your bank information in CSV or QIF format. (CSV means Comma Separated Values, and QIF meanrs Quicken Interchange Format.

2. Create a new Money Talks account with a starting balance of 0. (You will adjust this amount later.)
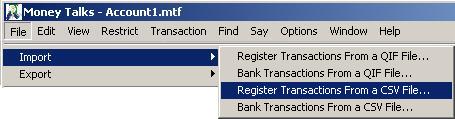
3. Import the CSV or QIF file into the register of your new account. (Use File/Import/Register.)

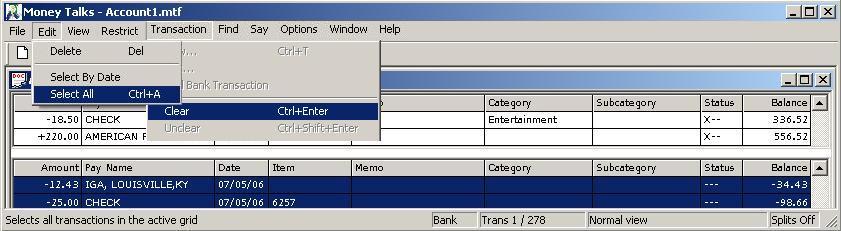
4. Clear all the transactions you just imported. (You may do this by pressing Ctrl+A to select all then Ctrl+Enter to clear the selected transactions.)
5. Determine the actual opening balance of your new account by subtracting the final running balance in the Money Talks register from the bank's current balance.
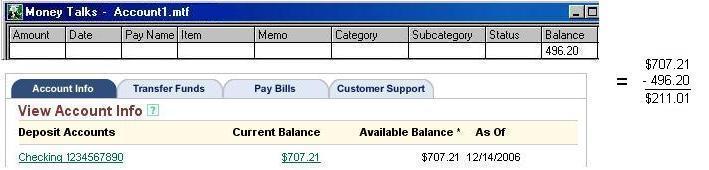
6. Put that starting balance into the Starting Balance field of the account's properties, accessed with Alt+Enter.
In addition to the other methods discussed to obtain your starting balance and begin using Money Talks, you may use your bank's phone access service and obtain your current balance as the starting balance. If you do that, begin recording transactions after the last transaction from which you obtained your balance.
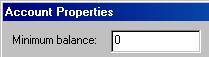
Money Talks uses the Minimum Balance field to provide warnings to you when your balance reaches the specified limit. For a checking account, you may leave this at 0 or, if your bank offers free checking by maintaining a certain balance, use that balance in this field.
For credit card accounts, use your credit limit as the minimum balance. Be sure to use a negative value when entering credit card limits. (After all, as you make purchases on your credit card, you use negative values, and when you make payments to the credit card, you use positive values.)
If the running balance in your register falls below the value set for the minimum balance of the account, Money Talks alerts you with the Balance Alert sound and displays a message in the status line when you move to that transaction in the register. Money Talks plays yet another sound if you move to a transaction that is cleared and falls below the minimum balance.
Put the account number in this field.

Record the name of the bank that holds this account in this field.


The comments field may hold any additional information you wish to record about the account.
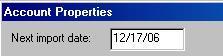
This field contains a date that Money Talks uses to filter duplicated transactions when you import into the register. Any date before the one specified in this field gets filtered, so transactions that have already been entered into the register will not appear in your register multiple times.
When you import bank transactions or register transactions, Money Talks updates this date to the day after the latest date in the imported file, so the next time you import, only new transactions get imported.
One of the first things you need to decide is when you will begin recording transactions with Money Talks. This decision depends on several factors including the methods you currently use and how you wish to maintain your records. If you have been using another, less accessible money management program, you may wish to export the data from that program. If you have been keeping records on paper, you may wish to start with today's date or when you get your next bank statement.
If you had been using another financial program, you may wish to export the data from that program and import it into Money Talks. Money Talks uses one of two methods for obtaining data from other programs. These are the Quicken Interchange Format (QIF) and Comma Separated Value (CSV) file types.
To export the data from the other program, look on that program's File menu. There will usually be an Export option there. If there is not, check the program's documentation for more information.
When you export data from another program, such as Quicken, insure that you export only one account at a time. Quicken gives you the option to export all accounts, but Money Talks only imports into the account open when you issue the Import command. You must, therefore, export only one account at a time from Quicken.
Once you have exported a file from the other program, start Money Talks and open the new account. Set that account's starting balance as discussed earlier. Next, go to the File menu and select Import/Register from the menu.
CSV files are a way for programs to transfer tabular data between one another. Money Talks imports a CSV file into either the register or bank grid if it can find a valid column header in the file.
To import a CSV file, you must load the file into WordPad and change the column names to match the column names used by Money Talks. This is necessary because CSV files are not standardized and can contain almost any type of data. Money Talks recognizes the following column names in a CSV file:
Of these column names, only Amount, Pay Name, and Date are required.
For example, imagine you have a CSV file with the following header:
Transaction Number,Date,Description,Check Number,Memo,Amount
You could import the file into Money Talks by changing the header to the following:
Transaction Number,Date,Pay Name,Item,Memo,Amount
Here, we would use the description as the pay name, the check number as the item, and allow the Date, Memo, and Amount Fields to be interpreted as they are. The Transaction Number field would be ignored, since it doesn't apply to Money Talks.
After changing the header in the CSV file with WordPad, remember to save the file.
To import the file, select the Import submenu from the File menu, then select either Register Transactions from a CSV File, or Bank Transactions from a CSV file.
If you find a CSV file with the letter X in a column indicating that the transaction is cleared, use the name Status for this column. Money Talks only respects the letter X or an empty column as a transaction status, with X indicating the cleared condition. Note that split and recurring transactions cannot be represented in CSV files.
Money Talks exports the register to a CSV file. Simply choose the Export submenu from the File menu, then choose CSV file. The CSV file contains all of the columns listed in the section on importing CSV files.
When you import transactions from another program, each transaction appears in Money Talks' register. One of the first things you may wish to do is clear all the transactions that have cleared your bank.
Once you create an account, keeping your financial information up to date is easy with Money Talks. Simply add a transaction for each time you add money to your account or remove money from that account. Then, clear the transactions as your bank clears them.
A transaction is an entry that either adds money to an account or removes money from an account. Money Talks represents each transaction as a line in your register. There are two ways to add a transaction to the account's register. You may either manually add the transaction with the New Transaction or Duplicate Transaction command, or you may import transactions from your bank's online files or from another program's files.
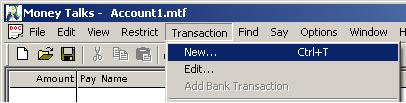
To manually add a transaction to your account, select New from the Transaction menu or press Ctrl+T. You generally add new transactions when you write a check, make a purchase with your bank card, or when you document an automatic payment that gets deducted from your account.
When you select the New Transaction command, Money Talks shows the Transaction dialog. Since you generally have more debit transactions than credit transactions, the program assumes you want to make a debit transaction and places your cursor in the Payee field ready for you to type the name of the person or company to which you are paying. If the transaction you wish to record is a credit rather than a debit, simply press Shift+Tab to move back to the Transaction Type control and select Credit.
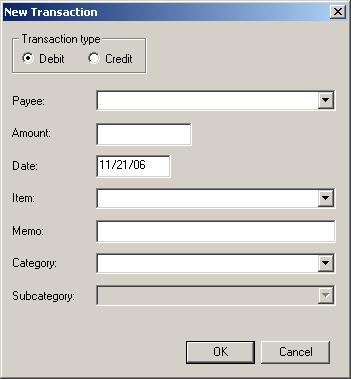
Once you fill out the information in the New Transaction dialog, that transaction appears in your register.
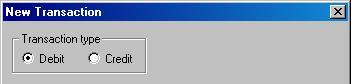
The Credit/Debit control lets you decide what kind of transaction you wish to record. When you change from Debit to Credit, some labels in the rest of the dialog adjust themselves to make more sense for credit transactions.

The Payee/Payer field of the New Transaction dialog is the place where you type the name of the person or company to which you write the check or to whom you authorize to debit your bank card. If the transaction is of the Credit type, this field's name is Payer to reflect the fact that you receive money from this person or company.
Money Talks remembers the names and categories of the transactions you make, so you may recall the information about a payee easily. Each time you import a transaction or type a new Payee or Payer, item, category, or subcategory into the New Transaction dialog, the program automatically adds that information to its remembered list and makes it available for future use.
Once you type a letter or two in the Payee, Item, Category, or Subcategory fields, you may use Down Arrow to recall a list of entries that begin with that letter or letters.

Alternatively, you may press down arrow without typing any letters to obtain a complete list of all the matches for that particular field. When you find the entry of interest, press Tab to accept that selection and move to the next field in the New Transaction dialog.

When you match a previous Payer or Payee, Money Talks fills in the additional fields in the New transaction dialog with the information from the last transaction of that payer or payee. These additional fields include amount, category, and subcategory.

As you move through memorized names or categories in a list, you may delete individual items from that list with Ctrl+D.
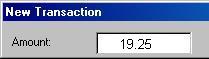
The Amount field of the Transaction dialog is where you enter the amount of the debit or credit.

The Item control of the Transaction dialog lets you record what kind of transaction took place. The Item field may contain information like ATM for automatic Teller Machine, or it may contain a check number. As with the Payer/Payee, category, and subcategory fields, you may select from a list of previously used items.
One of the items that may appear in the Item field is a check number.
Money Talks automatically offers the next check number when you press the Down Arrow, but you may enter a number other than the one provided.
You may use other items in the Item field. Examples include EFT for Electronic Fund Transfer, Automatic Deduction, and Debit Card.
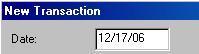
The Date control takes the date of the transaction. Money Talks provides today's date as a default value, but you may type another date if you wish. Once you use an alternate date, the program continues to reuse the last date you used until you restart the program. This makes it easy to enter several transactions that may occur on a date other than today's.

The memo field lets you record any additional information about the transaction that you wish to remember.

Categories and sub categories help organize your finances by grouping similar transactions. You may use categories and sub categories to gauge expenses in a number of areas. Some common examples include utilities, taxes, dining, groceries, travel, and household expenses.
To select from the category list, press Down Arrow until you get to the category you desire. Press enter to select the category. You may also use Down Arrow in the Subcategory field to access the sub categories applicable to the selected category.
As you add new categories, Money Talks automatically adds those new categories to its category list.
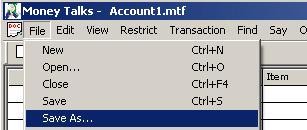
Use the Save As option on the File menu to save an account file and provide that file with a name other than its default. You may, for instance, wish to name your primary checking account with a name like Primary Checking or your savings account with a name like Savings.
When you write a check or use your debit card, you should record the transaction at your earliest convenience. That transaction is, however, not complete until your bank processes it. This bank processing is called clearing.
Clearing a transaction, in Money Talks terms, means marking the transaction as confirmed that the bank has processed it.
There are a number of ways to clear a transaction, and the method you use depends on a number of factors including your personal taste, the services your bank offers, and your access to those services.
Many banks offer a service that lets you call an automated service that provides information about your checking or savings account. Such services provide the current balance and any transactions that have cleared. Many people use such a service to keep their accounts reconciled with the bank on an on-going basis.
Money Talks provides enhanced capabilities that make keeping your register current much easier than is possible by any other method. One such capability is the program's ability to move to a transaction by typing a part of that transaction. This feature works by letting you highlight a particular cell then type matching text into that cell. If, for example, you were on the phone and you heard that a transaction was $52.41, you would type 52.41 in the amount field. When you do, the program moves to that transaction, so you may then use the Clear Transaction command. Don't forget to press Escape after you find the transaction, so you return to the full register view where you will be ready to find the next cleared transaction.
If your bank supports downloading your transactions, you may use an internet connection to log into your bank's web site and obtain a file that you may use to keep your register updated. Money Talks uses Quicken Interchange Format (QIF) files to import data from your bank into the program. Once you have downloaded this file, you may use Money Talks' Import option on the File menu to bring that data into the program. When you do, the transactions appear on the Bank Grid
When you download a QIF file from your bank, use Money Talks' Import command to bring that information into the program. Select Import from the File menu, then select Bank Transactionsf from a QIF File from the Import menu. This puts the transactions from the bank into the bank grid.
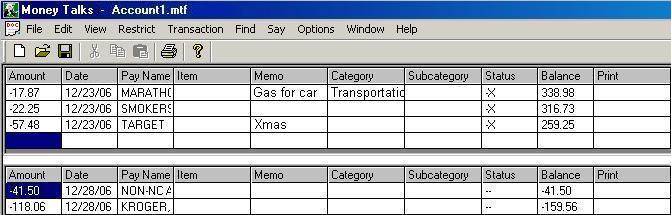
When you import bank data in the form of a QIF file, Money Talks creates a new grid in which all the bank transactions are shown. The bank grid looks and acts exactly like the register grid, except that you cannot edit the transactions in the bank grid. Use the bank grid to reconcile the appropriate transactions.
To move between the register and the bank grids, press Tab.
Your bank sends a statement each month listing the transactions that cleared during the month along with the previous balance and the new balance as of the last transaction. This was the traditional means of reconciling a checking account until the advent of phone and internet services. It is still possible to use this technique, and Money Talks makes the process somewhat less cumbersome. While the software cannot do much about your ability to read the print on the paper, it can make the process of finding and marking transactions uncomplicated.
If you use this method of reconciling your account, press the Say Cleared Balance key at the beginning of the process to insure that it matches what the bank states as your beginning balance. As you clear each transaction, the program announces the new cleared balance. When you have cleared all the transactions shown on the bank statement, your cleared balance should match the bank's ending balance statement.
To reconcile your account with the transactions that have cleared the bank, follow these simple steps:
Open the appropriate account
If using imported data, move to the bank grid
Highlight the transaction to clear
Clear the Transaction
When you highlight a transaction in the bank grid, the program tries to find a matching transaction in your register. Money Talks uses three levels of confidence to decide which transactions match, and the program gives you audible and visual feedback expressing its confidence about the match.
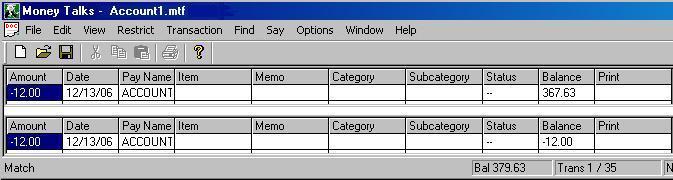
As you move from transaction to transaction in the bank grid, the program tries to match the bank transaction with a transaction in your register. If a match occurs, the program plays the match sound, highlights the matching transaction in the register, and waits for your command to clear the transaction.
Money Talks defines a match as a transaction with the same amount but with a date within 10 days of the date in the register.
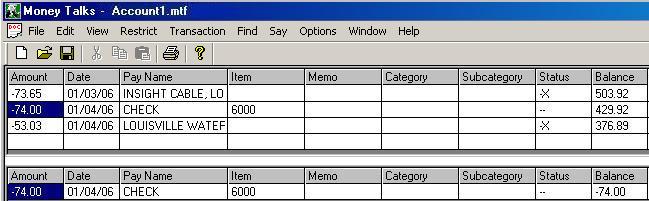
Before clearing the transaction, you may wish to switch to the register (TAB) to insure the transaction about to be cleared is the one you think it is. When you clear the transaction, it gets removed from the bank grid, and Money Talks places an X in the Status column of the register to indicate that the transaction has been cleared.

There may be instances where a bank transaction does not appear in your register. This can happen if you forgot to record a transaction, you incorrectly recorded a transaction, or, in rare instances, the bank makes a mistake about a transaction. When the program cannot match a transaction, it highlights a blank transaction in the register and makes a buzzing sound to alert you that the transaction does not appear in your register. The words "No Matches Found" also appear in the status line. If you realize you forgot to record the transaction and elect to clear it, the program moves the transaction from the bank grid to your account register.
If you made a mistake recording a transaction, there are two ways to handle the situation. You may move back to the register and edit the transaction to make it accurate. Once you edit the transaction, move back to the bank grid, and the program should be able to make a match. Alternately, you may point to a transaction in the register, switch back to the bank grid, then clear the transaction. In this case, the program alters the register transaction to match the bank grid transaction that you cleared. Think, for instance, of the time you recorded a 200 ATM withdrawal, then when you get the transaction from the bank, you find it was actually 201.50, because there was a $1.50 charge for using that machine. In such a case, you may highlight the $200 transaction, return to the bank grid, and clear it to turn that $200 into $201.50. In an effort to help prevent accidental alteration of a transaction in the register, Money Talks warns you before it changes a transaction.
It is important to remember that Money Talks alters the highlighted item in the register to match the bank information when you clear a transaction from the bank grid. This is what lets you move back to the register, find a transaction, then move back to the bank grid and clear that highlighted transaction. You may, however, use the Add Bank Transaction in the context menu to move the bank transaction to a new, blank register item, no matter which transaction in the register is highlighted.
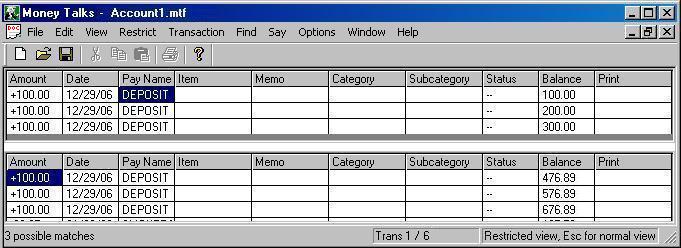
Sometimes, there are multiple matches to a transaction. Think of the instance where you have three $100 deposits on the same day. In this case, Money Talks shows the three matches and lets you select the appropriate transaction.
Money Talks shows the multiple matches by restricting the register view to only those transactions that are possible matches. Use the arrows to highlight the appropriate transaction, switch back to the bank grid, and clear the transaction.
Note that while viewing restricted multiple matches, you may press Escape to expand the view back to the full register that displays all transactions. This may be useful in case you wish to look around for other possible matches that may not be displayed in the restricted view.
No matter your technique for finding out which transactions the bank clears, use Up Arrow or Down Arrow to move to the transaction of interest.
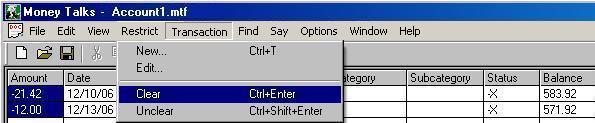
Once you move to the transaction you wish to clear, press the Clear Transaction command. When you do, Money Talks announces the new cleared balance and places an X in the Status column of the transaction. If you clear a transaction in the bank grid, the program also removes that transaction from the bank grid.
There are three ways to clear a transaction or a group of transactions that have been selected:
If you ever find that you must unclear a transaction, for whatever reason, use the Unclear Transaction command.
As with the Clear command, there are three ways to unclear a transaction or a group of transactions:

To edit a transaction, highlight the transaction, and move to the column to edit. Next, press Enter. When you press Enter, Money Talks displays either the Edit Transaction dialog or the Split Transaction dialog. You may make any changes you wish. Note, however, that you may not change the amount field of a split transaction. If you wish to alter the amount of a split transaction, clear the splits first.
Once you edit the information, press Enter to confirm your changes. You may also press Esc to cancel any changes you may have made.
Occasionally, you may find transactions you wish to duplicate. This may occur when you withdraw money from the ATM or on other transactions that recur for which you have not already set up recurrances. (Note that Money Talks will not permit you to duplicate a recurring transaction.) Candidates for duplicated transactions would be very similar to other transactions with only minor changes in some of the fields. To duplicate the details of a transaction and create a new transaction:
If you press OK in the Duplicate Transaction dialog, Money Talks creates a new transaction with the information you edited in the dialog. It makes the new transaction uncleared even if the original transaction was already cleared. If the original transaction contains a split, it also clears the split.

Use the File menu's Save command or press the Save command to save your account information to disc.
In addition to the self-voicing aspects of the program and its friendliness to screen access programs, Money Talks takes advantage of the speech capabilities of your computer by announcing interesting aspects about your registers and accounts.
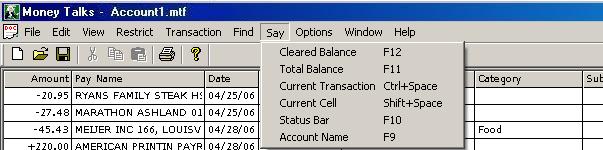
The Say Balance command makes the program announce the cleared amount.
The Say Total Balance command makes Money Talks announce the balance of all the transactions in your register.
The Say Status Line command announces the contents of the status line.
The Say Account Name command announces the name of the current account.
The Say Cell command announces the contents of the current cell.
Pressing Ctrl+Space makes Money Talks announce the current transaction. Note that JAWS users should press Insert+3 before pressing this command if JAWS is running.
Money Talks provides several commands that help make obtaining information, navigating through your transactions, and finding transactions easy.
The Fonts dialog (on the View menu) lets you adjust the type and size of the font Money Talks uses to display the register. Low vision users may wish to increase the size of the font and eliminate unnecessary columns from the display to provide as much information per transaction as is feasible with a particular font size.
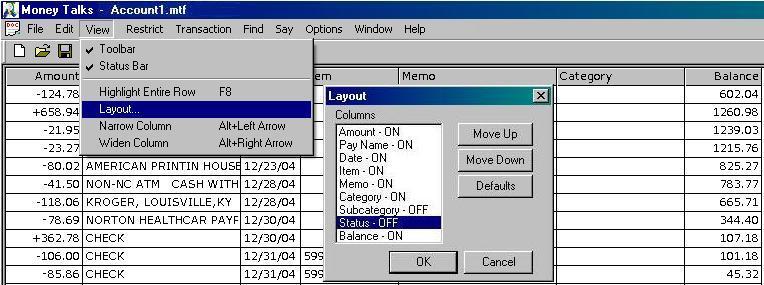
Money Talks lets you customize the layout of the register screen. You may hide or rearrange the columns in the register. As you hide columns, the program expands the width of the remaining columns to provide the best view for low vision users.
To open the Column Layout dialog, select Column Layout from the View menu.
The Column Layout dialog shows each available column and its current status in a list box. To toggle the status of a column, press Space. When a column is on, it appears in the register. When the column is off, it does not appear in the register. You may still gain access to the information in hidden columns by using the Edit Transaction command.
Along with the list box that shows each column and its status, the Column Layout dialog contains Move Up and Move Down buttons. Use these buttons to move columns to the desired position.
Use the Defaults button to return the columns' status and order to their original position.
The Narrow Column and Widen Column commands let you change the width of each of the columns in the register. This may be desirable if you use an extremely large or small font and you want to fit more or less information into the column. Note that even if you cannot see all the information in a column, that information is still there.
In addition to using the normal mouse commands for widening and narrowing columns, Money Talks lets you use the keyboard. To use the keyboard, move to the column you wish to resize, then use the Alt+Left Arrow to make the column more narrow and use Alt+Right Arrow to make the column wider.
While it is possible to move from column to column (with the arrow keys) in the register , Money Talks also lets you move directly to any column. Use the table below for each key.
| Shift+A | Amount |
| Shift+P | Pay Name |
| Shift+D | Date |
| Shift+I | Item |
| Shift+M | Memo |
| Shift+C | Category |
| Shift+S | Subcategory |
| Shift+X | Status |
| Shift+B | Balance |
You may use the Text command on the Find menu to find text that appears in any column of the register. When you select the Text command, Money Talks displays the Find Text dialog. Type the phrase or word to find, then click the Back or Next buttons to indicate the direction of the search. When Money Talks finds the text, the program highlights the transaction that contains the text for which you searched.
Once you type a word or phrase to find, you may use the Find Previous and Find Next commands to highlight the next occurrence of that text in the register.
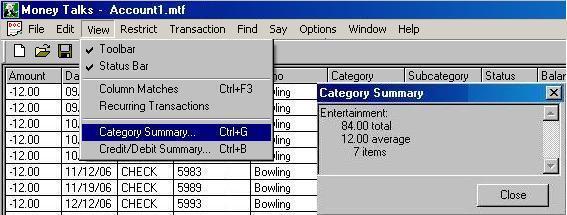
The View menu/Category Summary option shows a dialog that summarizes the category and sub category transactions. The dialog shows each category's total, number of items in that category, the highest and lowest item in that category, and the average amount for the category. If the category contains sub categories, the dialog shows this information for those sub categories as well.
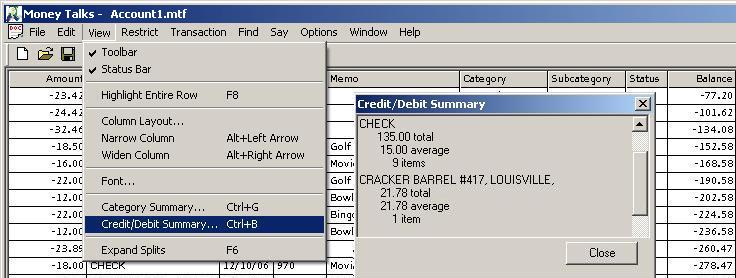
The Credit/Debit summary screen shows transactions grouped by the Payer or Payee. For each payer or payee, the dialog shows a summary of the transactions including the number, amount, highest, lowest, and average for that payer or payee.
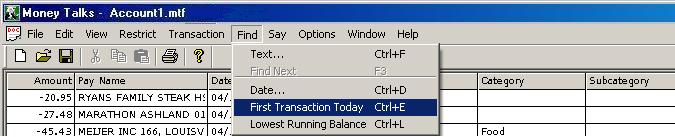
Use the Today command to move to the first transaction that occurs on today's date. If there are no transactions on today's date, the program moves to the first transaction after today. If there are no transactions after today, the program highlights the last transaction in the register.
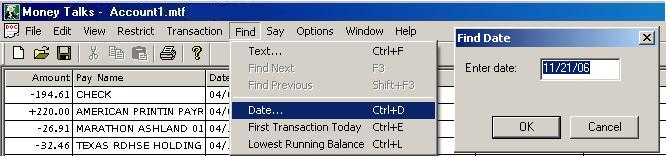
Selecting Date from the Find menu or pressing the Find Date command makes the program prompt you for a date to find. Once you type a date and press Enter, the program moves to the first transaction appearing on the selected date. If there are no transactions on the specified date, the program beeps to let you know there is no transaction on that date, then it moves to the first transaction after the date you specified.
Money Talks remembers the last date for which you searched, so the next time you access the Find Date dialog, the program offers you that date.
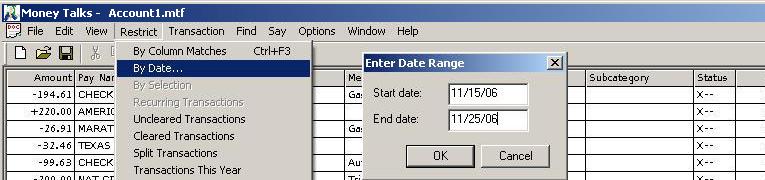
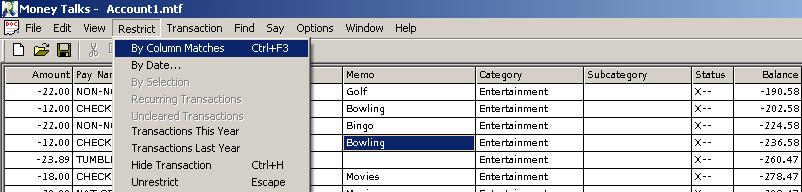
The By Date option on the Restrict menu lets you restrict the visible transactions to a date range. When you select the By Date command, Money Talks shows a dialog that lets you specify the starting and ending dates. Once you enter this information, the program shows only those transactions that fall between the dates you desire. You may additionally restrict the view to include only specific transactions that fall within this date range by using other restricting commands.
Press Escape to return to the full view of your transactions.
To restrict transactions to one of these common time periods, select the appropriate choice from the Restriction menu.
Sometimes, you may wish to select a group of transactions for use with a particular tool. Once transactions are selected, you may clear, unclear, delete, show credit/debit or category summaries, print, or emboss the selected transactions.
To select a group of transactions, hold down Shift while using another navigation command (like Up Arrow and Down Arrow or Page Up and Page Down.) Money Talks highlights the selected transactions.
In addition to selecting with the navigation keys, you may use the Select by Date command on the Edit menu to select a range of transactions between two dates or you may use the Select All (Ctrl+A) command to select all transactions. Remember, however, that if the register view is restricted and you select all transactions, Money Talks actually selects only all the transactions in the restricted view, so if you intend to select all transactions in the register, you may wish to press Escape first to return the register to the full view.
To clear a selection, press one of the navigation commands without holding down the Shift key.
The By Selection item in the Restrict menu lets you restrict the register view to the selection. (The selection is the range of transactions that you marked by holding down the shift key while using Up Arrow or Down Arrow.)
When you finish working with the restricted view, press Escape to return to the full register view.
This command restricts the view to show only the transactions that occured this year.
This command restricts the view to only those transactions with last year's date.
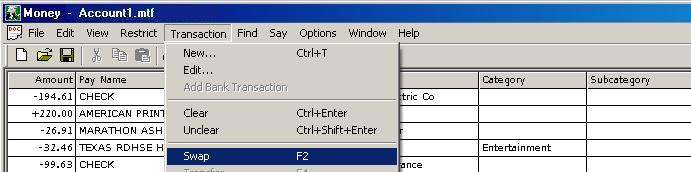
Normally, Money Talks arranges your transactions by date. The transactions that occur on the same date get arranged by the order in which they were entered into the program. You may, however, arrange transactions with the same date by using the Swap Transactions command. To swap transactions, point to the first transaction and press the Swap Transaction command. When you do, the program swaps the position of the current transaction and the transaction that follows the current one.

The Find menu lets you locate transactions that have not yet cleared.
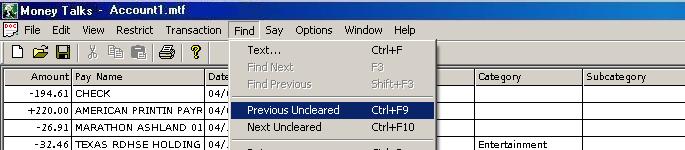
Use the Previous Uncleared and Next Uncleared commands to move to the next transaction in either direction that has not yet cleared. If you try to move in a direction where there are no more uncleared transactions, the program beeps to let you know there are no more transactions in that direction that are uncleared.
In addition to Ctrl+F9 and Ctrl+F10 to move to the previous and next uncleared transaction, you may also use Alt+Up Arrow and Alt+Down Arrow to access these commands. This may actually be easier to remember; unfortunately, the Alt+Up Arrow and Alt+Down Arrow commands do not work properly if you are running the JAWS screen access program.
The Delete Transaction command removes a transaction or a range of transactions from the register. Money Talks prompts you to confirm the action by displaying a dialog. This dialog shows the number of transactions that will be deleted if you confirm the action.
Money Talks lets you select a range of transactions by date. This feature is useful when you wish to print a report on transactions that occured between two dates or when you wish to print a portion of the register. When you pick the Select by Date command, Money Talks shows a dialog that lets you specify the starting and ending dates. Money Talks highlights all the transactions in that date range.
Many times, you may write a check that actually contains payments to multiple categories. The Split option on the Transaction menu lets you divide a transaction into several categories.
To split a transaction, create a new transaction as you would normally do, assigning the total amount of the transaction to the amount field. Next, highlight the new transaction and select Split from the Transaction menu. The Split Transaction dialog appears.
When you first open the Split Transaction dialog, the program assigns your entire transaction to one item called the remainder. To assign parts of the transaction to different categories, enter the amount of the part of the split you wish, then assign a category to the amount. You may optionally assign sub categories and memos to the split item as well.
Once you assign an amount to a split and provide a category for that item, the program shows the new split item you assigned and the amount of the remainder of the transaction. You may continue the process of splitting until there is no remainder, or you may leave a remainder amount if you do not wish to assign the remainder to a category.
When you split a transaction, Money Talks indicates the fact by putting "S" in the Status column of the register for that transaction.
Normally, split transactions show up as a single transaction in the register view with the amount equal to the total of all the split parts. You may, however, expand splits so that each part of a split transaction is shown as a line in the register.
When you expand splits, Money Talks hides the original transaction that contains the total of all the split items and shows each split item as its own transaction. The software places "D" in the Status column to indicate to you that the transaction represents the details of a split.
There are two ways to edit a split. You may press Enter while in the amount column, or you may select Split from the Transaction menu. If you press Enter while in another column besides the amount, the program displays the Edit Transaction dialog instead where you may change the Payee, Type, Memo, and category fields.
When you edit a split transaction, Money Talks opens the Split Transaction dialog to let you add additional categories, remove split items, or change the way the total transaction is split. If you remove all the splits from a transaction, that transaction reverts to a non-split state. Removing all the splits, in fact, is the only way you may change the amount of the original transaction.
To close the view of the expanded splits and show the one transaction that contains all the split items, use the View menu's Expand Splits item. Selecting Expand Splits when it is checked unchecks the option and collapses all the splits of a transaction into one master transaction.
When using the Expand Splits view, you may not clear or unclear one of the splits in a transaction. To clear or unclear a split transaction, you must collapse the expanded view.
You may restrict the register view so it shows only split transactions. To show only splits in the register, select Split from the Restrict menu, or press S while in the status column of any transaction.
Remember to press Escape when you finish viewing split transactions to instruct the program to show all transactions.
Many of the transactions in your account recur at a fixed frequency. You may, for example, receive a paycheck once a week or twice a month, and you may have a mortgage payment and utility bills that recur on a monthly basis.
Money Talks makes it easy to make recurring transactions automatically appear in your account's register.
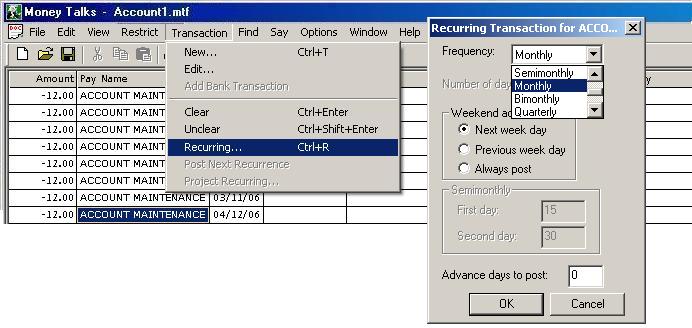
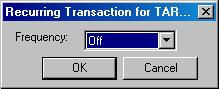
To mark a transaction as recurring, highlight the transaction and select Recurring from the Transaction menu. Money Talks displays the Recurring Settings dialog. This dialog lets you specify the frequency and the amount of advanced time (in days) when the transaction should appear in your register. In addition, the dialog lets you decide what happens if that day falls on a weekend.
The Frequency setting lets you specify when the next transaction gets added to your register.
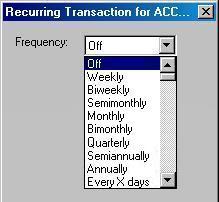
Use the Off setting to turn off the recurring transaction.
The Weekly selection adds a new transaction every 7 days.
The Biweekly selection adds a transaction every other week (14 days).
The Semimonthly selection lets you select two days a month on which the transaction posts. If either of the days falls on a weekend, Money Talks posts the transaction on the day indicated by your Weekend Action choice.
The Monthly selection adds the transaction on the specified day each month.
The Bimonthly setting adds the transaction on the same day every other month.
The Quarterly setting adds the transaction on the same day every third month.
The Semiannually selection adds the transaction on the same day of the month every six months.
The Annual setting adds the transaction on the same day each year.
The Every X Days selection lets you specify a number of days where a recurring transaction should occur.

The Weekend Action control lets you decide what should happen with transactions that recur on a weekend.
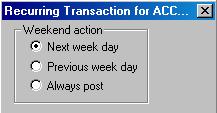
Checking the Next Week Day button makes the recurring transaction move to the first day of the week if the transaction occurs on a weekend.
Checking the Previous Week Day button makes the recurring transaction post on the last day of the previous week if that transaction occurs on a weekend.
Checking the Always Post button makes the transaction post on the specified day even if that day falls on the weekend.
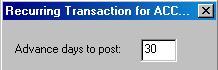
Enter the number that represents how many days ahead of the scheduled post date you wish the transaction to appear in your register. The number of days you specify for this setting depends on the frequency you select for the transaction and how far ahead of the transaction's due date you want to be notified. Annual recurrences, for example, will probably deserve a little further notice than weekly or monthly recurring transactions.
Money Talks adds any eligible recurring transaction to your register when you open the account. This usually occurs when you first open the program, but if you did not have the account open the last time you used Money Talks, it will not automatically open it again when you start the program. Simply open the account to post the recurring transactions.
When adding new recurring transactions to your register, the program makes a sound and restricts the view to those newly posted transactions. This alerts you about the posting and gives you a chance to examine the transactions. Press Escape to open the view to the full register.

When Money Talks adds a recurring transaction to your register, it uses the information from the last transaction in the Payee/Payer, Amount, Item, Category, and Subcategory fields. Usually, this is what you want, but there may be some recurring transactions with amounts that differ from time to time. Think of the utility bills. It is rare that the electric bill will be the same from month to month. In such cases, the program uses the amount from the last month's transaction . It is up to you to correct the amount on the newly posted transaction when you receive the actual bill.

When a transaction is set to recur, Money Talks indicates the fact by adding the letter R in the Status column of the register. It is important to realize that only those transactions marked with R in the status column get treated as recurring. Once a recurring transaction posts, that transaction is no longer considered recurring, but the new one that just posted is now the new, recurring transaction. You may verify this by examining the status column for the old and new recurring transaction. You will see that once the transaction posts, Money Talks removes the R from the old transaction's status column and places it in the new one's.
There are two ways to cancel a recurring transaction. You may delete the transaction when it next appears in your register, or you may select Recurring and set the Frequency to Off.
Sometimes, you may receive a bill before the recurring transaction for that bill posts to your register. It is this situation that the Post Next Recurrence command covers. When this situation occurs, highlight last month's recurring transaction, then use the Post Next Recurrence command to make that transaction post immediately. You may then, of course, edit the amount of that new transaction to reflect the current bill's amount.
If you find you use the Post Next Recurrence command frequently, consider increasing the Advance Days to Post setting for that transaction.
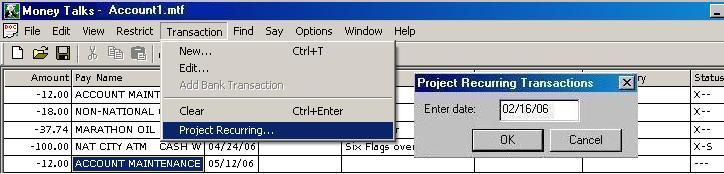
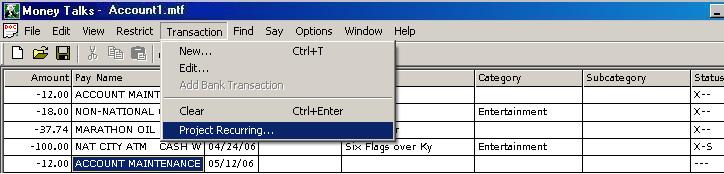
While recurring transactions provide a great means of giving you a heads up on debits and credits to your account, there are times when you would like to project your transactions to examine your financial status at some point in the future. The Project Recurring option on the Transaction menu provides a means to project out to a specified date. When you select this option, Money Talks displays the Project Recurring dialog. The Project Recurring dialog lets you enter a date to which you wish to project.
Once you project to a date, Money Talks posts all the recurring transactions as if today's date were your projection date. This means that every transaction that would have posted on that date gets posted. This may be useful for examining your status on a certain date, but you may not want to save the file with those transactions posted.
Recall that when the projected transactions get posted, Money Talks restricts the view to only the newly posted items, so you may wish to press Escape to expand the view to all transactions. This lets you examine the effects of recurring transactions with respect to your total financial picture in that account.
Some people prefer using the Project Recurring command to post recurring transactions on demand. In other words, you may wish to set the Advance Days to Post setting in the Recurring Transaction dialog to 0. This makes the transaction show up only on its post date. Then, if you wish to see how your financial situation looks out to the end of the month, you may use the Project Recurring command for that purpose.
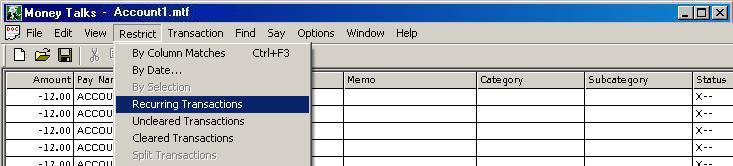
Once you set up several recurring transactions, the problem of keeping up with and managing recurring transactions becomes evident. Use the Restrict Recurring command to restrict the register to only recurring transactions.
To list your recurring transactions, select Recurring from the Restrict menu, or move to the status column of any transaction and press the letter R.
Press Escape to return to the full view of the register.
In addition to the other flexible ways Money Talks lets you restrict the register view, the program lets you focus on cleared or uncleared transactions. You may restrict the view to cleared or uncleared transactions in one of two ways. The Restrict menu contains a menu item for both cleared transactions and uncleared transactions that makes Money Talks display only those transactions. In addition, you may move to the status columb of any transaction and press either X to restrict the view to cleared transactions or U for uncleared transactions.
Remember to press Escape to return to the full view of your register.
There may be times when you want to temporarily hide one or more transactions from the register. Think, for example, of a situation where you search on the memo field to find all your dining transactions in an attempt to discover how much you spent in a certain time frame on dining out. Now, say a few transactions matched dining in the memo field that were not actually dining establishments. You may press Ctrl+H or pick Hide Transaction from the Restrict menu to tuck that transaction away for the moment. Of course, when you press Escape, these hidden transactions appear back in your register.
There are three ways to hide a transaction or a group of selected transactions. You may either select Hide from the Restrict menu, press the hot key Ctrl+H, or you may move to the status column and press the letter h.
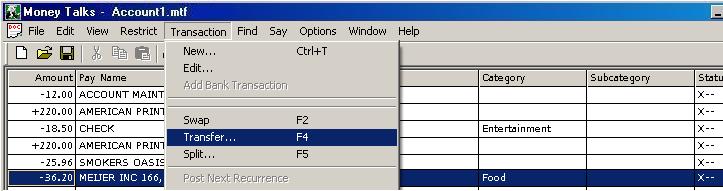
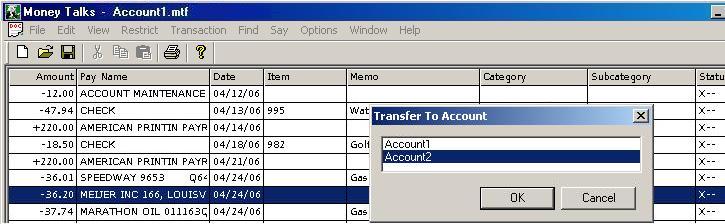
Money Talks lets you treat a transaction as a transfer to another account. To transfer a transaction, highlight that transaction and select Transfer from the Transaction menu.
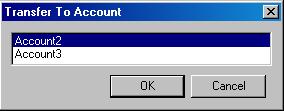
When you select Transfer, the program shows a list of the other accounts you have open and lets you select one of them. When you select that account, the program adds a new transaction to that account with the following characteristics:
The transaction contains the date, amount, item, and memo and category fields set to the same as the original transaction.
The Payee/Payer field is set to the words "Trans From " and the name of the account from which the transaction originated.
The transaction's sign is swapped, so if you transfer $500 from checking to savings, it appears as a positive amount in the savings account.
When you make a transfer, you end up with two transactions, one in the account from which the transaction originated and one in the account to which the transfer goes. Once the transfer is made, the two transactions are not related in any way; if you delete one of them, the other is not effected.
It is often desirable to limit what shows up in the register windows to specific transactions. This may be useful when comparing bills over a period of time.
There are two ways to restrict the view to specific categories.
To restrict the view to transactions to a specific payee, move to the Payee column and begin typing the search term. As you type, the program restricts the view to include only those transactions with payees that match the letters you type.
Moving to the amount column and typing the amount of an uncleared transaction proves to be an efficient means of finding those transactions that should match your bank's data. Use + to find deposits and just type the amount to find debits.
When your view is restricted, Money Talks uses the Balance column to show only the transactions in the restricted view, so you may use the numbers to get totals for the transactions of interest.
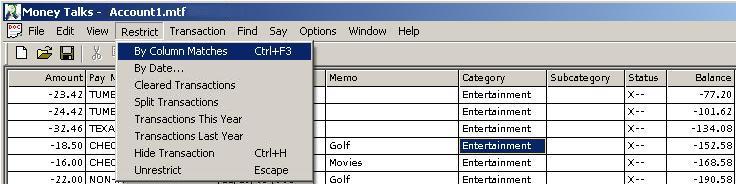
In addition to finding matches to text you type, you may match the exact text of a column in the register. To find an exact match, move to the column of interest and press the Match column command or select Column Matches from the Restrict menu.
Once you have restricted the view to show only the transactions of interest, you may further restrict the view to include transactions that match yet another criteria. To further restrict the view, move to another column and type the text to find in that column. Think, for instance, of moving to the Category column and finding the category utilities. Once your view is restricted to only the transactions that match that category, move to the Payee field and type the name of a specific utility, like "Bell South," to show only those transactions with "utility" in the category column and "Bell South" in the Payee column.
In addition to finding transactions that match more than one search, you may use the Or operator to find transactions that meet one or more criteria. To use the Or operator, type the | symbol and type the text to find. If you pause typing or press Enter, Money Talks displays the results.
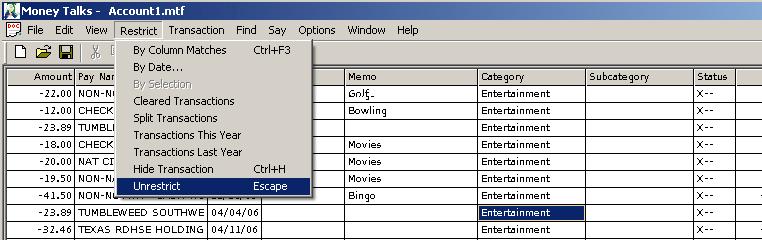
To turn off the restricted view and return to a full view of all transactions, press Escape. Money Talks expands the register view to include all transactions and leaves your cursor on the current transaction.
The Lowest Running Balance command on the Find menu does one of two things:
If there is only one transaction selected, which is most commonly the case, the command moves to the transaction with the lowest running balance between the current transaction and the end of the document. If there is more than one transaction selected, the command moves to the transaction with the lowest running balance in the selection. Of course, this clears the selection.

The Options menu provides several tools to help the software behave to your preferences.
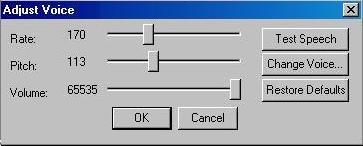
The Adjust Voice option displays a dialog that lets you adjust the built-in speech. You may select different voices or adjust the speed, volume, and pitch of the voice.

Normally, Money Talks uses its own speech to provide feedback if you are not using a screen access program. If you are using a screen access program, Money Talks uses the speech or braille feedback from your screen reader.
The Self Voicing option actually performs three functions. It turns on the self-voicing feature, it turns off the feature, and it sets the program to test for the presence of a screen reader that is running and use that speech if it is available. You may press Ctrl+F12 to cycle through these three choices.
When the option gets turned on, the program announces, "Voice On." When it gets switched off, the software says, "Voice Off." It announces "Voice Off with Screen Reader" when you press it a third time.
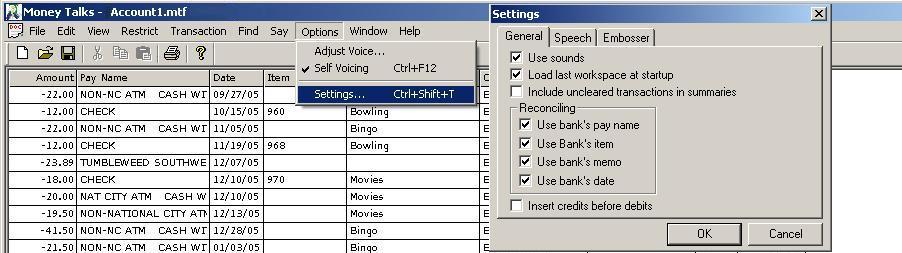
The Settings selection on the Options menu provides additional settings to help control how you prefer using Money Talks.
Normally, Money Talks plays sounds to queue you to certain events. If you prefer not to use sounds, uncheck this control.
When this option is selected, as it is by default, Money Talks opens all the accounts you had open when you last used the program. Normally, loading your last workspace is what you want, but if you prefer not to reopen your accounts, uncheck this control.
Normally, Money Talks includes only cleared transactions in the Category Summary and Credit/Debit Summary reports that you may generate from the View menu. If you prefer to include all transactions, weather or not the item is marked as cleared, check this box.
These controls let you decide how Money Talks uses the data your bank provides when you import transactions through QIF files. If you check the Use Bank Name, the program replaces what you had previously entered into your register when the transaction clears for the name on the transaction. If you prefer to keep the name you entered and ignore what the bank's data indicates, uncheck this box. You may use similar rules to decide how to handle data in the Item, Date, and Memo fields of the transaction.
Normally, Money Talks places debits before credits in your register that occur on the same day. If, however, you wish to list credits first, you may check this box.
Note that this setting does not effect existing transactions; it applies only to any new transactions that you may enter or import.
Normally when you use the self-voicing features of the program, Money Talks announces the contents of the cell then the name of the heading for that cell when you press the Left Arrow or Right Arrow keys. You may adjust this behavior with the Speak Headings control. The options are Never, Before Cell, and After Cell.
In addition to control of what speech feedback you get when using the Left Arrow and Right Arrow, Money Talks lets you control what feedback you get when using the Up Arrow and Down Arrow keys while in the register. Selecting Cell provides speech feedback with the contents of the currant cell and the amount (if different from the current cell.) Selecting Line makes the program announce the contents of the entire line when you move from line to line. Money Talks provides a shortcut key to select these items. That key is F8.
The Embosser tab of the Settings dialog lets you set up your embosser for embossing the register.
The Left Margin control lets you decide how much space to leave at the left side of the page for each line in the register. You may select between 0 and 2 spaces. If you do not wish to leave space for binder holes in the page, you may wish to set the left margin to 0.
The Line Length control lets you select between 34 and 42 characters per line. If you are using 8 X 11 paper, you will want to use 34 characters per line. If you are using 11 1/2 X 11 paper, use 42 characters per line.
The Lines per Page setting lets you choose between 25 and 27 lines per page. When using the 25 lines per page setting, the software leaves a top and bottom margin of one line on the page.
Money Talks lets you print individual checks and print part or all of the register. The program supports nearly any kind of check and it lets you taler its check printing capabilities by providing a Calibrate dialog that lets you position where each field of a check's data gets placed.
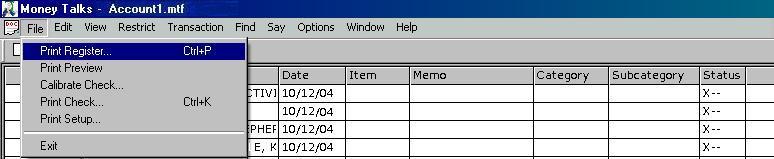
To print the register , use the File menu's Print Register command. You may alter the amount of information you print and the size and style of print by using the View menu's Column Layout command and Font option.
The Print Register command respects the register currently displayed on your screen.
If you would like to limit the register to a subset of the entire register, select the portion of the register of interest with one of the selection commands, then use the Print Register command. Recall that you may hold down Shift while using navigation commands like up and down arrow or Page Up and Page Down to make a selection. You may also use the Select by Date command on the Edit menu to specify the date range to select.
In addition to selecting a portion of the register to print, you may use the restrict commands to limit what Money Talks prints. The difference between using select and register is most readily seen by what happens to the Balance column of the portion of the register. When you restrict the view with the restriction commands, Money Talks treats the balance as a sum of the transactions in the restricted view. The selection, on the other hand, continues to show the actual balance for each transaction.
If you want the balance to reflect only the transactions in the portion of the register of interest, use one of the restricting techniques. To show the actual balance, use selection commands to limit the register.

The Print Check command (on the File menu) lets you print the check currently highlighted in the register.
Before printing a check for the first time, it may be necessary to calibrate the check printing process. You calibrate the placement of what gets printed where on a check with the Calibrate Check command.
Money Talks lets you put standard wallet sized checks into the envelope slot on your printer, but you may need the services of a sighted person to help set up the process the first time you attempt to print checks. You will want, for example, to confirm the orientation of the check once it is printed, so you will know where to sign it. Pay particular attention to which side of the check faces up. Some printers eject the printed check in a downward facing orientation so it is possible to stack multiple pages and have them collated. Once you know the orientation, it is no problem to flip the check over and sign the face in the proper position.
It may be necessary, depending on your specific printer, to specify landscape when printing your checks.
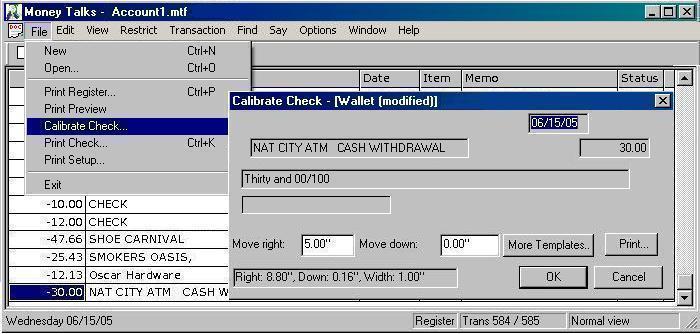
The Calibrate Check command lets you make adjustments to where Money Talks puts the individual fields in a check on the check itself. While the program comes with reasonable defaults for printing normal, wallet-sized, business, and large print checks, there may still be some need for minor adjustments. You may, for instance, be using a printer that does not support an envelope slot.
If your printer does not have an envelope slot, it is very doubtful that you will be able to make standard, wallet-sized checks go through the printer without hanging or jamming the printer. If your printer does not support an envelope slot, it is suggested that you use large "voucher" checks that have one check on a 8 1/2 X 11 inch page such as those available from Quicken at www.quicken.com.
To use the Calibrate Check command, highlight the transaction of the check you wish to print. (It may actually print correctly the first time.) Next, insert your check into the envelope slot of the printer if your printer has one. If it does not have an envelope slot, put the sheet of paper with the check into the paper tray. The orientation of the check in either case is dependent of the specific printer. Generally, the will go in face up with the right side of the check closest to the printer in those printers with envelope slots.
Use the More Templates button to select the check that most closely matches the kind of checks you use.
Use the Print button to print the check and have your sighted assistant observe how far off each of the fields is from where that field is actually supposed to appear on the check. If everything prints in the correct place, you are finished with the calibration process, and you have a check that is properly printed. All you need to do is sign the check and drop it in the mail.
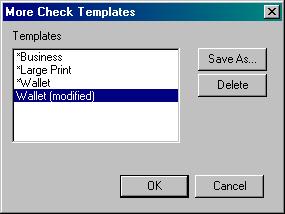
The More Templates button on the Calibrate dialog provides a list a check sizes from which to choose. When you first calibrate, you should select a size that most closely matches your checks, then make minor adjustments from that. If you change something about one of the default templates, Money Talks saves that template with a name that uses the original name along with the word "Modified." You may, however, name your newly modified template with any reasonable name you choose by using the Save As button in the More Templates dialog.
Once you select a check template that most closely matches your checks, press the OK button to return to the Calibrate dialog.
Money Talks saves your modified templates in a folder under documents and settings under your logon name\application data\aph\money talks\templates, so you may copy that file from computer to computer or use the Backup and Restore commands if you need to use it on more than one machine.

If all the fields need to be moved in a direction, use the offset controls in the Calibrate Check dialog to indicate that direction. If, for example, everything on the check needs to be moved down by .5 inches, add .5 inches to the value in the Move Down control. At the same time, if all the fields are printed too far to the right by .25 inches, subtract .25 inches from the Move Right control.
If one or more fields need to move, move to that field on the dialog and either drag the box that field indicates in the desired direction, or use the Shift+Arrow keys to move the field in the indicated direction. Shift+Down, for example, moves the field down by 1/16 inches with each press of the key combination.
In addition to moving the position of each field, you may need to expand or narrow the width of the column. Narrowing the width of a column may become particularly important when large fonts are used. If, for example, you have a memo with 25 characters and you are using a particularly large font, you will want to narrow the memo field so the program can cut off the part of the memo that would make it print too far to the right on the check.

The Emboss Register command on the File menu lets you emboss all or part of your register.
Before embossing your register for the first time, you should use the Embosser tab of the Settings dialog to set up margins and line length parameters for the embosser and type of paper you use.
The Emboss Register command works very much like the Print Register command. You may, in other words, select portions of the register to emboss or restrict the view of the register.

The Help menu provides functions such as access to the documentation, checking for program updates, and obtaining information about the program's version number.

Use the Help Topics option to open the user's manual for the product.
In keeping with APH's commitment to provide you, our customer, with the most high-quality, up-to-date software, this program contains the ability to determine if you are using the newest version. To check for updates to this software, select the Check for Update option from the Help menu. When you select this option, the program compares the version of the software you have on your PC with what APH has stored on its server and lets you know if there is an update available. Note that for this option to function, you must be connected to the internet.
Once the software contacts the APH web server, the program either tells you that you already have the latest version or it informs you that there is an update available and offers to download and install the update for you.
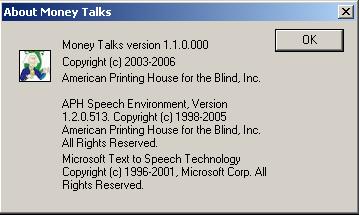
The About Money Talks option displays copyright and version information for the program.
Money Talks keeps each account in its own file and assigns that file an extension of .mtf. By default, the program saves those files in a Money Talks folder in your documents folder on an XP or Vista machine. If you do not change the location of these files, you may backup the registers with the normal Windows backup and restore utilities found in the start menu under programs/accessories/system tools. The drawback to using the Windows backup utility to preserve all your personal documents is that the backups may be larger than you prefer.
Money Talks offers its own backup and restore function. This procedure backs up all the registers you have saved in the Money Talks folder, category names and pay names, and any templates you have created for the purpose of printing checks.
To backup your financial information, select Backup Files from the File menu. The program prompts you for the location of the backup. It is normally a good idea to back your files up to some kind of external media like a floppy drive or thumb drive. Whatever the case, select the location or provide the path to where you want the backups stored and press OK. The next time you use the Backup Files option, Money Talks remembers where you stored the backups last time and offers that path as your new default. To backup to that location again, just press OK.
To restore a set of files, select Restore Files from the file menu. The program asks for the location of the backed up files and restores them to the Money Talks folder in your documents.
If you change the default location of the files, you should make arrangements to make your own backups of these important files. This may be something as simple as locating the files with Explorer and copying them to a CD or thumb drive. You should perform such backups as frequently as is required to avoid inconvenience or disaster. If you only update your register on a monthly basis, a once-a-month backup procedure is more than enough. If, on the other hand, you change the registers on a daily basis, you may prefer to backup one or more times per day.
IMPORTANT - READ CAREFULLY: This End-User License Agreement (the "Agreement") is a legal contract between you (either an individual or a single entity) and American Printing House for the Blind ("APH") relating to the software product with which this End-User Agreement has been provided (the "Software"). As used in this Agreement, Software shall include computer software and, as applicable, associated media, printed materials, and electronic documentation.
BY CLICKING THE "ACCEPT" BUTTON BELOW OR PRESSING ALT+A], OR BY INSTALLING, COPYING, OR OTHERWISE USING THE SOFTWARE, YOU AGREE TO BE BOUND BY THE TERMS OF THIS AGREEMENT. IF YOU DO NOT AGREE TO THE TERMS OF THIS AGREEMENT, DO NOT INSTALL OR USE THE SOFTWARE.
You are entitled to receive a full refund of amounts paid for the Software within 30 days of your purchase of the Software by requesting a refund in writing, returning the Software (and all related materials) to APH in resalable condition and providing to APH proof of purchase of the Software.
Following acceptance of this Agreement, APH grants you the nonexclusive right to install and use one copy of the Software in accordance with the terms of this Agreement.
You may install the single copy on one hard disk or other storage device for one computer, and you may access and use the Software at that location so long as only one copy of the Software is in operation. If you are an entity rather than an individual, you may authorize employees, students or others served by your organization to use the Software, but only one person at a time may use the Software on one computer at a time. The primary user of the computer on which the Software is installed may make a second copy for backup/emergency recovery purposes for his or her exclusive use on a backup or portable computer, so long as each copy of the Software is used on only one computer at a time.
You may store, install and access this version of the Software through an internal network, if you obtain and pay for a license for the number of users that will access the Software through the network at the same time. In a lab setting, you must purchase a license for the number of computers on which the Software is installed.
You may not rent, lease, sublease, sublicense or lend the Software. You may not copy the CD-ROM media. If an update to the Software becomes available and you obtain it for no additional charge, you may not also use prior version(s) of the Software.
You agree to not modify, reverse engineer, decompile or disassemble the Software or create derivative works from the Software. APH may provide you with support services related to the Software ("Support Services"). Use of Support Services is governed by APH policies and programs, which may change from time to time. Any supplemental software code provided to you as part of the Support Services will be considered part of the Software and subject to the terms and conditions of this Agreement. With respect to technical information you provide to APH [as part of the registration of your license to the Software or] in connection with the Support Services, APH may use such information for its business purposes, including for product support and development.
You may permanently transfer all of your rights (including all updates) under this Agreement, provided that you retain no copies, you transfer all of the Software (including all component parts, the media and printed materials, any upgrades,, you notify APH of the transfer and the name and address of the recipient, and the recipient agrees to the terms of this Agreement.
Without prejudice to any other rights, APH may terminate this Agreement if you fail to comply with the terms and conditions of this Agreement. In such event, you must, at the option of APH, either return to APH or destroy all copies of the Software and all of its component parts.
This Agreement will be governed by the laws of the Commonwealth of Kentucky.
All title and copyrights in and to the Software (including, without limitation, any images, photographs, animations, video, audio, music or text incorporated into the Software), the accompanying media and printed materials, and any copies of the Software are owned by APH or its licensors. The Software is protected by copyright laws and international treaty provisions. Therefore, you must treat the Software like any other copyrighted material, except that you may copy the software portion of the product onto a computer hard disk for installation purposes provided that it is used as specified, and is subject to, the provisions of this Agreement. All copyright notices must appear on any copy of the Software and may not be altered. You may not replicate any materials that accompany the Software.
Should you decide to transmit to APH by any means or by any media any materials or other information (including, without limitation, ideas, concepts or techniques for new or improved services and products), whether as information, feedback, data, questions, comments, suggestions or the like, you agree such submissions are unrestricted and will be deemed non- confidential and you automatically grant APH and its assigns a non-exclusive, royalty-free, worldwide, perpetual, irrevocable license, with the right to sublicense, to use, copy, transmit, distribute, create derivative works of, display and perform the same.
APH warrants, for the benefit of the original end user alone, for a period of 90 days from the date of shipment by APH (referred to as the "Warranty Period") that the media on which the Software is contained is free from defects in material and workmanship. APH further warrants, for your benefit alone, that during the Warranty Period the Software will perform substantially in accordance with the functional specifications of the Software as set forth in the documentation provided with the Software. If, during the Warranty Period, a defect covered by the foregoing warranty appears, you may return the Software, accompanied by the APH invoice provided with the Software, for either replacement, or if elected by APH, refund of amounts paid under this Agreement. You agree that the foregoing constitutes your sole and exclusive remedy for breach by APH of any of the warranties or other agreements made under this Agreement.
EXCEPT FOR THE WARRANTIES SET FORTH ABOVE, THE SOFTWARE IS PROVIDED "AS IS" AND APH DISCLAIMS ANY AND ALL OTHER WARRANTIES, WHETHER EXPRESS OR IMPLIED, INCLUDING, WITHOUT LIMITATION, ANY IMPLIED WARRANTIES OF MERCHANTABILITY OR FITNESS FOR A PARTICULAR PURPOSE.
ANY LIABILITY OF APH FOR A DEFECTIVE COPY OF THE SOFTWARE WILL BE LIMITED EXCLUSIVELY TO REPLACEMENT OF YOUR COPY OF THE SOFTWARE WITH ANOTHER COPY OR REFUND OF THE INITIAL LICENSE FEE APH RECEIVED FROM YOU FOR THE DEFECTIVE COPY OF THE PRODUCT. IN NO EVENT WILL APH (OR ITS SUPPLIERS) BE LIABLE TO YOU FOR ANY CONSEQUENTIAL, INCIDENTAL OR SPECIAL DAMAGES, INCLUDING ANY LOST PROFITS OR LOST TIME, EVEN IF APH HAS BEEN ADVISED OF THE POSSIBILITY OF SUCH DAMAGES, OR FOR ANY CLAIM BY ANY THIRD PARTY.
Some states or jurisdictions do not allow the exclusion or limitation of incidental, consequential or special damages, or the exclusion of implied warranties or limitations on how long a given warranty may last, so the above limitations may not apply to you.
If you have any questions concerning the Software or this Agreement, you may write:
Attn: Customer Relations