![]()
![]()
Copyright 2020
American Printing House for the Blind, Inc.
July 9, 2020
We need your feedback about the Indoor feature of the Nearby Explorer app. We ask you to try out the Indoor feature, then complete the Indoor Wayfinding Feedback Survey. The information you provide will assist us in making a better indoor wayfinding product and improve indoor navigation for you. The Indoor feature can be used at the locations in the table below or you can visit any of them virtually.
| Building | Location |
|---|---|
| Frazier History Museum | 829 W. Main St., Louisville, KY 40202 |
| 21c Museum Hotel | 700 W. Main St., Louisville, KY 40202 |
| Muhammad Ali Center | 144 N. 6th St., Louisville, KY 40202 |
| Portland State University Millar Library 1F | 1875 SW Park Ave., Portland, OR 97201 |
| Actors Theatre | 316 W. Main St., Louisville, KY 40202 |
| Walgreens Store #2924 | 2368 Frankfort Ave., Louisville, KY 40206 |
| Envision (5F) | 610 N. Main St., Wichita, KS 67203 |
| Kentucky Derby Museum | 704 Central Ave., Louisville, KY 40208 |
| Louisville Metro Hall | 527 W. Jefferson St., Louisville, KY 40202 |
| Louisville City Hall | 601 W. Jefferson St., Louisville, KY 40202 |
| KFC YUM! Center | 1 Arena Plaza, Louisville, KY |
| JCTC John T. Smith Library | 622 South 1st St., Louisville, KY |
| Kentucky International Convention Center | 221 S. 4th St., Louisville, KY 40202 |
| JCTC Chestnut Hall | 110 West Chestnut St., Louisville, KY 40202 |
| JCTC Health Sciences Hall | 110 West Chestnut St., Louisville, KY 40202 |
| Kentucky Museum of Arts and Crafts | 715 W. Main St., Louisville, KY 40202 |
| University of Louisville—BACB Building | 201 E. Shipp Street Walk, Louisville, KY 40208 |
| Slugger Field | 401 E. Main St., Louisville, KY 40202 |
| LFPL Main Library | 301 York St., Louisville, KY |
| Kentucky School for the Blind—Scoggan Building | 1867 Frankfort Ave., Louisville, KY 40206 |
| Kentucky School for the Blind—McDaniel Building | 1867 Frankfort Ave., Louisville, KY 40206 |
| University of Louisville—SAC Building | 2100 S. Floyd St., Louisville, KY 40208 |
| ATIA 2018 (Caribe Royale Orlando) | 8101 World Center Dr., Orlando, FL 32821 |
| American Printing House for the Blind | 1839 Frankfort Ave., Louisville, KY 40208 |
| LFPL Crescent Hill Public Library | 2762 Frankfort Ave, Louisville, KY 40206 |
| LouieLab and C/NET Smart Apartment | 745 W. Main St., Louisville, KY 40202 |
| Visually Impaired Preschool Services (VIPS) | 1906 Goldsmith Lane, Louisville, KY 40218 |
| McDowell Center | 8412 Westport Rd., Louisville, KY 40242 |
| Kentucky Center for the Arts | 501 W. Main St., Louisville, KY 40202 |
| Louisville International Airport (SDF) | 600 Terminal Dr., Louisville, KY 40209 |
| Hyatt Regency Louisville | 311 S. 4th St., Louisville, KY 40202 |
| Region IV Education Service Center | 7145 W. Tidwell Rd., Houston, TX 77092 |
| Kentucky Science Center | 727 W. Main St., Louisville, KY 40202 |
Survival and success depend on good orientation skills. This is an especially challenging fact for people who are blind, because they must use only auditory and tactile cues to determine their position in relation to other objects or places.
For thousands of years, people used landmarks and line-of-sight to return home after a long day on the hunt, but these techniques became less effective the further they traveled. Eventually, explorers discovered consistent heavenly bodies that could aid with orientation. For example, early sailors kept a constellation to the left side of the ship to help with navigation. They could use this technique to reliably travel hundreds of miles.
Within the last few centuries, specialized instruments have been developed to aid in positional calculations. Lewis and Clark used such tools to map the Louisiana Purchase. Nevertheless, it took several hours and an intimate knowledge of the instruments and techniques to take a measurement. Then, when the trip was complete, others calculated the measurements to determine the actual position of each measurement.
With the introduction of the Global Positioning System (GPS) in the last few decades, the power to quickly and accurately determine your place on earth (with no training) is available to anyone. When combined with an accessible interface, and customizable and current information about points of interest (POIs), the tools provide a compelling picture of the vicinity and its characteristics.
The tools provided by Nearby Explorer (Nearby) make independent travel for blind pedestrians and passengers efficient, informative, and fun. Knowledge of your surroundings empowers you to explore, discover, and enjoy your own neighborhood and beyond with poise and confidence.
The information that Nearby Explorer provides helps the blind traveler stay oriented. It shows surrounding and approaching streets, businesses, institutions, and public facilities, and offers continually updating distance and directional information to the nearest or selected location.
Nearby provides a sense of the surrounding streets and their relationship to the user's current position. Additionally, it enables the blind passenger in a vehicle to aid the driver with directions and suggestions.
This video overview demonstrates some of the features available on Nearby Explorer. These features are also listed below:
This manual describes two versions of the Nearby Explorer app: Online and Full. The full version includes NAVTEQ® maps for the United States and Canada. The online version does not include NAVTEQ maps and relies on a network connection for use outdoors. Where differences in functionality occur, the documentation indicates this with (full version). When there are updates or corrections, you may find the latest version of the manual at https://tech.aph.org/ne. You may also find this address useful in the event you wish to read the manual with your desktop computer. The manual is also available as a download in the following formats:
There is also an email list dedicated to the use of this app. Many knowledgeable users and developers are on the list, and it is a great place to make suggestions, provide tips, and ask questions. To subscribe to the list, send a blank email message to [email protected].
Adventurous users may wish to test upcoming features. To get more information, join the beta list by sending a blank email to [email protected].
While it is tempting to assume that location based software, such as Nearby Explorer, solves all the navigation and orientation barriers faced by blind travelers, there are a number of conditions that must be considered. To better appreciate these benefits and limitations, it is useful to obtain a basic understanding of how the technology works.
There are several components in play. Two of the most important are GPS and maps.
The mobile device (phone or tablet) uses a global positioning system (GPS) receiver to read signals sent from an array of satellites designed for this purpose. The receiver uses these signals to pinpoint a position on earth and assign lateral and longitudinal coordinates to that position. In general, a good consumer-grade receiver can render accuracy to within a few yards of a person's actual position under optimal conditions. More realistically, you can expect to achieve accuracy (most of the time) good enough to determine on which side of the street you are traveling.
Some of the conditions that adversely affect accuracy with reading satellite signals include the following:
The latitude and longitude coordinates do not mean much to most users, so they must be combined with maps that contain more familiar landmarks such as streets and places. Nearby Explorer comes equipped with maps that cover the United States and Canada.
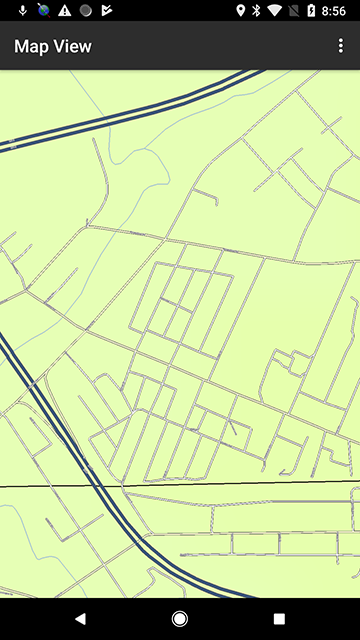
Figure 1. Street map in Nearby Explorer
There are several factors about the map data that are useful to understand to make the most effective use of the software.
You must pay attention to your environment. The data given from Nearby Explorer are suggestions, not absolute facts. The present conditions and immediate environment must always take precedence over Nearby's suggestions.
There is a TV commercial where the driver of an automobile crashes into a wall after his GPS says, "Turn right" only after a pause to be followed by "in one hundred yards." While the commercial may seem comical, paying attention to your environment is a serious matter.
Nearby Explorer requires the following:
The steps in this manual refer to devices by which you navigate through lists and options using arrow keys. If your device does not have arrow keys, use the normal procedures for touching appropriate list items or scrolling through the list.
Nearby Explorer Online requires a device running Android 4.1 or later and a device with a GPS chip and the ability to connect to a cellular network.
Nearby Explorer requires the GPS chip to be turned on. Turn the GPS chip off only if you never or rarely use any GPS services. When not in use, its power consumption is minimal.
To turn the chip on or off, follow these steps, which will vary from device to device, or by Android version:
When the GPS chip is in use, such as when using Nearby Explorer, battery consumption is significantly increased. It is necessary, in fact, to plug in the device if using it on a long trip where the GPS is in use for more than several hours at a time.
It is recommended that you purchase a charger adapter that plugs into the auxiliary (aux) power in an automobile. These chargers have a slot to plug in the USB host end of the charging cable. If aux power is not available and you use the GPS for more than 6 hours, you may use an aux charger that contains its own batteries.
To pause the GPS power consumption, press Back until Nearby Explorer closes, or select Pause to shut down the GPS chip.
Using an external GPS receiver can improve accuracy and reduce battery consumption. The disadvantage, of course, is having to keep up with, carry, and charge another device.
To use an external GPS receiver on Android devices, you must "trick" Android into using something other than the device's internal receiver. This is accomplished with the use of a program to read a receiver and put its values in a mock location for the operating system.
There are three steps to set up the use of an external receiver:
If you use Android 4.0 or later, the steps to use an external GPS receiver are slightly different:
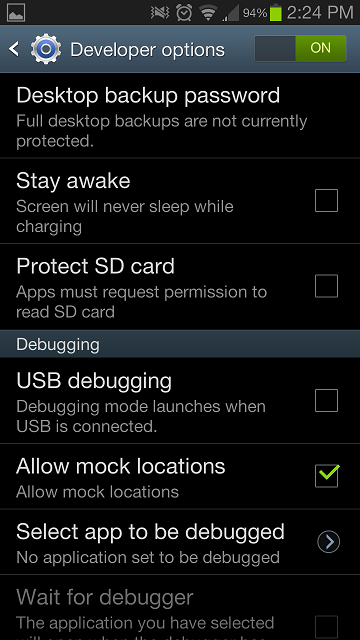
Figure 2. Developer Options menu in Nearby Explorer
Once Bluetooth is on, pair the receiver to your device as follows:
Once you complete this initial setup, use an app to read the GPS receiver and put its location readings in the Mock Locations area. Go to the Google PlayTM store and search for External GPS Provider. One such app that works great for this purpose is called Bluetooth GPS.
Setting up the app for use with your receiver depends on the app you use. In Bluetooth GPS, specify the receiver you wish to use from the option on the main screen. You will only need to do this procedure once, unless you choose to switch to another receiver at a later time. Also, be sure to tell your provider to use the Fused Provider, as this is what Nearby Explorer is expecting. The Fused Provider setting in Blue GPS is available in Settings.
Once setup is completed, to start using the GPS receiver (1) turn on the receiver and (2) start Bluetooth GPS or other Bluetooth GPS provider software and select the option to connect to the receiver.
If you are using the Braille Plus 18, Nearby Explorer is already installed. Most other users will install Nearby Explorer from the Google PlayTM store.
If you do not install Nearby Explorer from the Google PlayTM store, you will need to allow Non-Market Applications to be installed. To do this, follow these steps:
When you start Nearby Explorer for the first time, it displays licensing information that should be read carefully. If you understand and agree with the terms, select the OK button to continue.
If the full version of the app detects it has no map data, Nearby checks to ensure there is a Wi-Fi connection and downloads the maps.
If your phone contains more than one Secure Digital (SD) card, Nearby Explorer displays a dialog asking you to choose the SD card on which to install the maps.
You may use the app while maps download, but only limited functionality is available until the download is completed.
When you start the application, Nearby Explorer displays the Nearby screen and waits for positioning information from the GPS. If this is the first time the GPS chip in your device is used since the last reset, it may take several minutes to acquire a valid signal. The process to obtain a signal is called a "fix" as in fixing your position. The initial fix time is aided by using cell network information to obtain a general location. While the network method to fix your position is fast, it is not as accurate as the fix obtained from satellites.
If your device does not obtain a satellite fix, there are some alternatives you may employ to improve the chances of acquiring a good signal.
Once the GPS receiver obtains a fix, subsequent starts occur much more quickly.
The Nearby screen provides information about your current position. You use it in one of two ways:
Figure 3. The Settings menu in Nearby Explorer
The items you check depend on how you wish to use the program.
Nearby Explorer remembers the checked items, so when you close and then open the app again, your previously selected items are still checked.
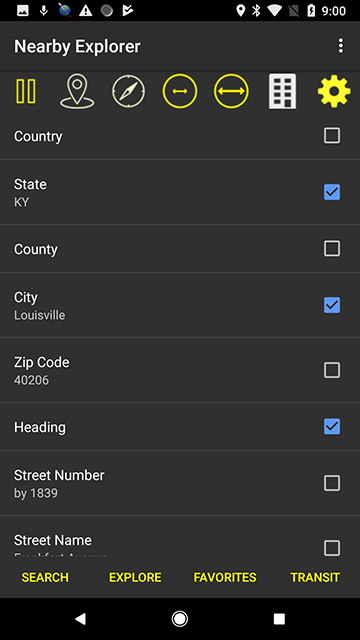
Figure 4. Nearby Explorer app menu
While walking in an unfamiliar area, it is useful to check the street address, street name, and possibly the nearest point of interest (POI) and the distance to the nearest POI. However, if you are riding in a car, it may be too much to have street numbers announced, and it is almost certainly too much to have distances to POIs announced.
You will likely want information that changes very infrequently to be checked. For example, City, County, State, and Provider are items that change so infrequently that you may wish to have them selected at all times.
It is important to keep "chatter" to a minimum. Since most of the information from the Nearby screen is time sensitive, it is not useful to have too much verbal communication. By the time you hear it, it would no longer be relevant.
To stop using Nearby Explorer, select Back to exit the program.
In addition to checking the items to monitor by pressing Select, you may hold Select to show a menu of options related to the Nearby screen. These options allow you to bookmark positions, start guidance, and perform other actions on the current position. Each option is explained in relative sections below.
You may also select the list item, Show/Hide, to customize what appears on the main screen.
As the program starts, Nearby attempts to obtain good satellite reception to accurately fix your position. During the recovery process, the text to speech (TTS) may sound like your position is changing. This is especially apparent if you have the Heading, Street Address, and Street Name boxes selected. As the fix becomes more accurate, Nearby announces the changing addresses. This process usually takes only a moment or two. If the process is bothersome, use Up Arrow or Down Arrow to silence the speech until the position stabilizes.
The following sections explain the options on the Nearby screen. Some options, such as State or City, are self-explanatory and are not covered with a separate section.
When the Heading item on the Nearby screen is checked, Nearby Explorer announces the heading and continually updates it as you move. This heading is derived by comparing the location of the last reading with the position of the current reading. This means that in order to get a heading from GPS, you must be moving.
The Heading tells you the direction in which you are moving. Nearby Explorer uses that information to determine which streets you are approaching. When you stop moving, the heading becomes blank.
In addition to obtaining heading information from the GPS, it is possible to use the compass to announce the direction you are facing (full version only.)
To use the compass to obtain a direction, hold the device vertically and point the camera in the desired direction, as if you were using the device to take a picture. Nearby Explorer responds by giving a confirmation tone and announcing the direction as obtained from the device's compass.
In addition to the direction, the compass announces a list of streets that intersect a line (representing the street on which you are traveling) in the direction you point the device. To enable this feature, check the Street checkbox on the Nearby screen.
As you point the device in another direction, the compass speech function silences, vibrates, and then announces the new information about direction and streets.
To stop using the compass for heading information, move the device so it is no longer oriented vertically. Nearby responds with another confirmation tone and proceeds to obtain the heading information from the GPS.
Note: All other functions of Nearby Explorer remain active, even when you start another program.
To enable or disable the compass, use the Compass button on the toolbar.
The compass can be effected by magnets or large metal objects. When the compass data becomes invalid, Nearby Explorer responds with "Shake" to indicate that it may be necessary to shake the device to reset the compass. Normally, moving away from metal objects is enough to reset the compass. When it resets, Nearby announces, "Compass OK" or "Compass Fair."
There are three ways to express the heading or the direction you face: cardinal, clock face, and degrees.
To select the display option for headings, press and hold the Heading option on the Nearby screen, then select Display Options from the context menu that appears.
The cardinal heading is expressed as one of the following eight possibilities:
If you select Clock Face as the display preference, Nearby Explorer still announces the cardinal position, but it adds the clock face value to the direction as well.
Directly north is 12:00; directly south is 6:00, and so on.
Selecting Degrees as the display option adds the exact degree to the cardinal announcement.
The Street Number option on the Nearby screen provides the closest house number of the current position. As you move, the number changes to reflect the new, closest address.
Nearby Explorer normally calculates street addresses by dividing a block into equal segments and assigning a number to each segment. There are cases where this approach can report a number that is one or two houses away from the actual address. Take the example of a large business that occupies an entire block. While its published address might be 900 Main Street, as you walk down the block, Nearby Explorer gladly reports 900, 902, 904, all the way to the end of block and the official last number.
Nearby Explorer offers two alternative methods of obtaining a street address that can be more reliable than the estimation method it normally employs. These selection alternatives are Google and OpenStreetMap (OSM). To use the Google alternative, you need a network connection. To use one of the alternative methods, select Address Provider on the Settings screen, then choose either Google or OSM. To return to using onboard addresses, select NAVTEQ as the address provider.
Sometimes, you can get more precise street numbers by using an alternate provider. Nearby Explorer offers the following providers:
The Street Name option displays the street on which the user is currently traveling. If this item is selected, the name of the street is announced when you turn onto another street or when you enter a cross street.
When approaching a cross street, depending on the accuracy of the GPS signal, Nearby announces the name of the cross street as you enter the street. Inaccurate signals may make it announce the cross street either before or after you enter or leave the street crossing.
To constantly update your street address while walking, check both the Street Number and Street Name boxes. As you walk, Nearby announces the street address but not the street name (because the street name is not changing). With both boxes checked, when you approach and pass a cross street, the app announces the name of the street and the closest house number on that street. Often, Nearby announces an address from each side of the cross street as you pass it. The first is the closest house number on the side of the street on which you are traveling. As you cross, the app announces the second number which is the closest house number on the far side of the street.
As you turn onto another street, Nearby Explorer announces the name of that street as soon as it recognizes the new coordinates. This usually occurs within a few seconds of the turn.
The street number and name announcements are two of the best ways to obtain the most detailed information about your location. When combined with a Nearby Places address, which is also approximated, you can easily determine on which side of the street you are traveling and on which side the desired destination is located.
Note: Poor GPS reception can result in misinformation, such as addresses located on the wrong side of the street. If this happens, avoid setting any Favorites until you obtain a better signal, and keep in mind the inaccuracies.
If you are not near a street, Nearby Explorer appends a distance and direction to the nearest address. For example, if you turn south into a parking lot at 100 Main Street and move away from the street, the program adds a message, such as "29 yards north," to the street name announcement. In this way, as you move south away from Main Street, the program announces the address as "Main Street 29 yards north." This additional information about the distance and direction is useful to determine the route back to the road network in a park, parking lot, or other open area.
Occasionally, even though you are on a street, the program may announce the street name as if you were away from the street. This usually occurs from a poor satellite signal and ordinarily corrects itself unless atmospheric conditions are extremely poor.
If you do not want to know how far away from the street you really are, you may turn this off by holding the Street option on the Nearby screen and unselecting the Off-Road option on the context menu that appears.
In many US cities, the city is divided into quadrants with a street separating the north quadrant from the south and a street separating the east quadrant from the west. Any street that is west of the east/west line often contains "W" in the name to indicate that it is west of the dividing line between east and west. Similarly, streets east of the east/west line often contain "E" in the name. The addresses begin at the east/west line and increase as they move away from it in either direction. Thus, if the east/west dividing line is Main Street, and Maple Street intersects Main, the addresses west of Main would start with 100 and increase as you move west. 400 W. Maple Street is west of 300 W. Maple Street. Similarly, the addresses east of Main increase as you move east, so 200 E. Maple Street is east of 100 E. Maple Street.
Often a block starts with an address such as 100 or 200 and increases to 99 before the next block begins, so addresses on a typical block range from numbers such as 100 to 199 or 200 to 299. Of course, if a street is particularly long, the street numbers might be a range of five digit numbers such as 26800 to 26899.
Even-numbered addresses are on one side of the street, and odd numbers are on the other side. Usually, 200 is straight across the street from 201. In most cases, the even-numbered addresses fall on the south and west sides of a street, and the odd-numbered addresses fall on the north and east sides.
Interstates and highways indicate their prevailing direction by their route number. All the even-numbered interstates and highways generally travel from east to west, and odd-numbered interstates and highways go from north to south.
Even numbered interstates (east/west) are numbered smallest to largest, starting in the south and increasing to 100 as you move north. For example, Interstate 10 is the southernmost interstate. It runs from New Orleans to Los Angeles. I-20 is north of I-10 and runs from Kent, Texas to Florence, South Carolina.
Odd numbered interstates (north/south) are numbered lowest to highest starting from the west coast and increasing as you move east. I-5 is on the west coast, and I-95 is on the east coast.
When a city has an interstate that routes traffic circuitously around the heart of the city, the interstate is given a three-digit number in the 200, 400, or 600 range. It derives its number from the interstate that it branches from. In Dallas, for example, the LBJ Freeway is numbered I-635 because it loops around Dallas branching from I-35.
Interstates are marked with mile markers, one every mile. Mile markers on an interstate begin at the border of each new state. They start with zero at the southern border and increase as you move north for odd numbered or north/south interstates. They start with zero at the western border of the state increasing as you move east for the even numbered or east/west routes.
If an interstate does not start at the state's border, the mile markers begin numbering at the start of the interstate.
The exits on an interstate are indicated by the mile marker. Exit 5 is always located between mile marker 5 and 6. If there are two or more exits within a mile, their designation includes both the mile marker and a suffix letter. If there were three exits at marker 5, they would be labeled 5A, 5B, and 5C.
When you see exits in the map data, they are treated like streets, but the street name is the exit number. Therefore, it is not uncommon to have streets entering and exiting the interstate with names such as 8 or 8A.
Interstates are named with "I-" followed by the interstate number. I-40 E refers to the eastbound lanes of Interstate 40.
US highways are labeled with the prefix "US-" followed by the route number. US-67 refers to US Highway, Route 67.
State highways are named with the state abbreviation followed by the highway number as in IN-62 for Indiana Highway 62.
County roads are labeled with "County Road" or some abbreviation such as "CR" followed by the number of the road as in CR 1429.
Normally, you would expect that the street address of a location on an interstate would be the mile marker number. Nearby Explorer currently contains a bug that returns a street number for interstates that are close to the street numbers of nearby streets.
The Approaching option on the Nearby screen lets Nearby Explorer describe the upcoming intersections as you approach.
The app describes the next intersection as soon as you pass the current one.
If the street is a cross street, Nearby says the street name and "ahead." If Nearby recognizes the street as only to the right or left, it adds "right side" or "left side" to the announcement of the street name.
In addition to announcing the side of the street, Nearby also estimates and provides the distance to that intersection. As you approach the street, the distance is updated to reflect your changing position.
If you do not want to hear the progressive, distance updates, follow these steps:
The Guidance setting displays the next maneuver to take (in the directions) when you set a place as a destination in the full version. As an example, it might say, "In 30 yards north, turn left on Main Street."
To set a place as a Destination, follow these steps:
Each time you set a destination, Nearby Explorer adds it to its list of recent destinations. The program remembers the last 20 places to which you requested guidance. When you add the 21st item, the oldest destination gets bumped off the list.
When using the guidance function, keep in mind that streets are marked at their center line. Therefore, when Nearby Explorer says, "Turn left on Maple in 30 yards," you will need to take into consideration the width of the street.
When you acquire a list of Favorites or search results, you may obtain directions to that location or receive guidance as you travel there. These directions and guidance are optimized for either pedestrian or vehicle travel. To select pedestrian directions, select Pedestrian from the Route Settings menu.
Route settings customize the kinds of routes and directions Nearby Explorer creates. The routing engine used in both Android versions (full and online) is Valhalla and is on by default.
To change how Nearby calculates the route, select Route Settings from the Settings menu.
The route settings include route optimizations for fastest time, shortest distance, or least turns (main roads) and check boxes to let you specify if you want to use highways, unpaved roads, toll roads, and ferries in the route calculations.
To receive a list of directions, tap the POI. From the menu that appears, choose List Directions. Nearby Explorer displays a list of directions. Each step provides the direction and distance to the next procedure in the route.
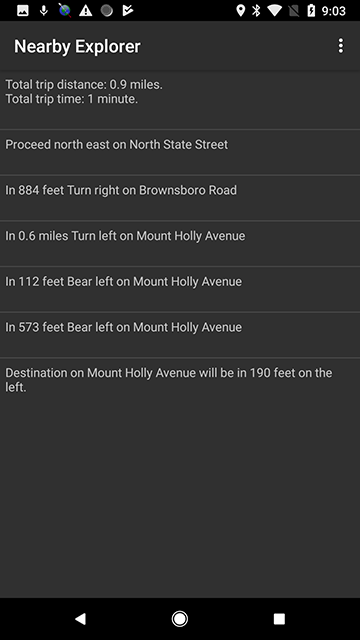
Figure 5. List of directions to a POI
For guidance while you travel to the POI, choose Turn-By-Turn Guidance from the menu. The app responds by adding the first step of the directions in the Nearby screen's Guidance field. It also updates the Guidance field, so the next maneuver is announced as you move. The information in the Guidance field always contains the current distance and direction to the next maneuver.
To switch to or from Pedestrian mode while using the Guidance feature follow these steps:
If there are other route settings to change, adjust them here as well. Nearby Explorer automatically recalculates the route based on the new settings.
To display a list of remaining directions to the destination while using the Guidance feature, long press the Guidance item and choose List Directions.
If you set a Destination to a location that is not on the road network, Nearby Explorer guides you to the nearest address in the network. From that point on, Nearby will only provide a distance and direction to the POI. However, since there are no roads, and paths are not included, it can only give you a "crow's flight" estimate of the POI's location in space. In other words, if you set a Destination for the middle of a large field or parking lot, Guidance can only direct you to the nearest street address. From then on, Nearby provides only the distance and direction to help pinpoint the location.
The Nearby Places item on the Nearby screen indicates the closest POI to your current location. If you check the Nearby Position checkbox, the app also announces the distance and direction to that POI and continually updates the information as you approach and then leave that location. These POIs include nearby places, favorites, and transit stops in supported cities.
If you do not have a network connection, Nearby Explorer uses the POIs in the NAVTEQ maps (full version) or OpenStreetMap to identify nearby places. If you have a data connection, the app uses Google Places™ business listings instead. These services can provide POIs in interesting and useful ways. See Description and Blind Description Fields in OpenStreetMap, for more information.
Google Places provides as many as 20 place results for each search request. Therefore, it can provide different, more general, or more meaningful results by changing the radius of the search. Google Places allows a radius of up to approximately 30 miles.
By default, Nearby Explorer shows the single nearest place and updates the distance and direction to it as you move. To show more or less places around your current location, use the context menu and pick "Maximum Places Per Location" to set the number of places to report from one to eight.
If you live in a city for which Nearby Explorer supports a public transit feed, one of the kinds of places the app reports is transit stop information. The report includes the time, direction, and route name of the next bus or train. These live transit reports are active only when moving less than 10 miles per hour.
To control which type of information Nearby Explorer reports, long press the Nearby item on the main screen. At the top of the context menu, there are three items: Show Nearby Places, Show Transit Stop Information, and Show Favorites. You may select any or all of these options.
The Description and Blind Description fields display information from OpenStreetMap. While these descriptions are relatively rare at this time, they are used either to complement a POI or to give information about a point on the map that is not a POI. Note that you must have the search provider set to OpenStreetMap for these fields to be populated.
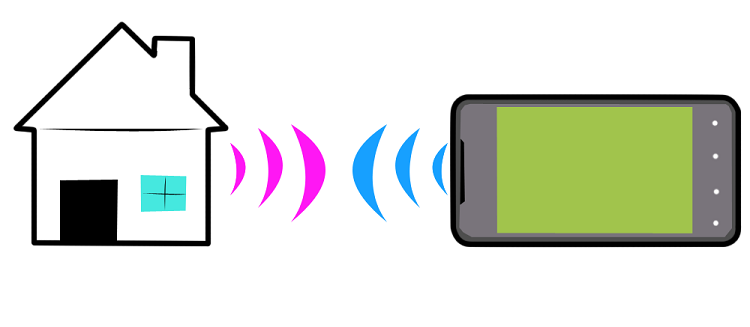
Figure 6. How geobeam works
Since your device knows both your current location and the location of POIs around you, it is possible to use the device's compass to point at features in the environment and receive feedback about that feature. The feedback is received as a vibration (haptic feedback), a sound (tone), and an announcement (speech) with the name and distance of the POI. The vibration, in particular, makes pinpointing places both intuitive and easy. Think of this feedback as a beam (we call it geobeam) emitting from the end of the device which you can use to point directly to features in the environment. As long as you maintain the direction, the vibration continues. You can use this vibration to guide you to the point.
Caution: There may be obstructions between you and the POI. Nearby Explorer cannot know about certain environmental barriers that may exist between you and the point. You must use traditional mobility techniques to ensure the path is safe or to follow a safe path to the point.
The tone also conveys information about the distance of the object to which you point. The higher the pitch, the closer you are to that point. Note that the speech also announces the distance, but the tone can be used to quickly get an idea about which objects are closest as you scan the environment. Note, too, that the tone is important for those devices, like the Nexus 7 tablet, that do not have a haptic feedback feature.
There are two ways to position your device to use geobeam. For both positions, the pointer end of the device is considered to be the top edge of the device when used in a typical portrait orientation.
The first position is the normal geobeam operating position. It is achieved by holding the device as though you were shaking hands with someone. In this position, the pointer end should be pointing directly away from you and the screen should be facing to the left.
As you move your device into this position, Nearby Explorer makes a sound indicating that Geobeam is active. When you move it out of geobeam position, Nearby makes another sound to indicate this as well.
Point the end of the device in different directions while maintaining its orientation. When the end of the device points to a POI, Nearby makes a sound, vibrates, and announces the name of the place and its distance.
To engage geobeam in the second position, hold the device out in front of you, (as though you were handing it to someone), pointing the business end in the direction of the POI. The screen should be facing skyward.
In the second position, Nearby lets you know about the closest POI when you point to it. If you have a destination or a watch set, use the device in this position to find the destination or watch point.
When using the geobeam, be sure to take notice of these characteristics:
To turn geobeam off, use its control on the toolbar. Doing so lets you position the phone without getting feedback about nearby places.
If geobeam does not behave as you expect, you may select the Use Old Style Orientation Sensor option in the Settings dialog to help fine tune the behavior.
In addition to the name of the item or location, Nearby Explorer can provide the address of the nearest place. The address is a useful tool in determining information, such as which side of the street a place is located or if that a place resides on a different street than the one on which you are located. On the other hand, it also adds lots of "chattering," especially when traveling by vehicle. Nearby Explorer tries to minimize the chatter by providing the address in a shorthand form. If the place is on the same street on which you are traveling, the app announces only the number on that street. If the place resides on another street, Nearby Explorer announces only that street name.
To set whether or not to announce the address along with the name of the place, follow these steps:
Remember that the addresses to places are approximate. You cannot count on the reported address to be exact. The onboard NAVTEQ maps do not contain the actual address. You may try changing the address provider to Google or OpenStreetMap (OSM) to see if those report more accurately in your area. Go to Settings / Address Provider and select Google or OSM.
Normally, Nearby Explorer reports the direction to the nearest place as a compass direction, but you may change this behavior to receive direction as a position on a clock face. To do that, long press Nearby Position and select the Report as Clock Face option.
If you do not have a network connection, Nearby Explorer uses the points of interest in its database to identify nearby places. If you have a data connection, it uses the Google PlacesTM business listings service instead. This service can provide POIs in interesting and useful ways.
The Google PlacesTM business listings service provides as many as 20 place results for each search request. Therefore, it can provide different, more general, or more meaningful results by increasing the radius of the search. Google PlacesTM business listings service allows a radius of up to approximately 30 miles.
By default, Nearby Explorer uses a radius of 175 yards to help identify the nearest place. This radius usually provides adequate information about almost any small business, government facility, or other place in relative proximity. If you are located where there are few businesses or institutions, or if you reduce the radius too much, the number of results can be reduced to none. In this case, Nearby Explorer temporarily increases the radius until something shows up.
To change the radius that Nearby Explorer uses to identify the nearest place or search result, follow these steps:
There are a few ways to adjust the radius. Perhaps the easiest is to put the device into geobeam position. When you do, Nearby Explorer shows a dialog with two buttons—Increase Radius toward the top of the screen, and Decrease Radius near the bottom. Tap the button that represents how you wish to change the radius.
If you have a device with a keyboard, you may use the following technique to change the radius:
If you use a device with no arrow keys, long press the Nearby Position item and select Set Radius from the context menu. Nearby Explorer responds with a menu from which you may select the desired radius.
In addition to using the Nearby Position item with the left and right arrows, or using the context menu, you can use the Search command from the program's menu. When you receive the list of search results, you can use Right Arrow and Left Arrow to increase and decrease the search radius; you may use the buttons on the toolbar, either "Increase Radius" or "Decrease Radius;" or you may choose Radius from the Search menu to select the radius from a menu.
Each time you change the radius, Nearby Explorer announces the new radius and queries for a new set of results from Google PlacesTM business listings. If the results of the new search are different from those of the previous one, and you have the Nearby Places item checked, the app announces the new location that it considers closest based on your new radius. In addition, if you have the Nearby Position item selected, the app announces the distance and direction to that location.
If you are traveling in a vehicle, it makes little sense to use a small radius, especially in a tightly populated area. As you travel, increase the radius based on the environment and your personal preferences.
The Watch function is used to monitor a particular point of interest. It is most effective as a reference and orientation tool. When you monitor a POI, Nearby Explorer always displays the distance and direction to the Watch point from your current position. To set a place as a Watch, follow these steps:
If you have the Watch box checked on the Nearby screen, the app monitors and announces the distance and direction to the place you are watching.
If you set a Watch position, the compass in your device can also be used to point to the Watch point. As you point at the watched position with your screen facing skyward, your device vibrates to let you know where that position is located in real time. For example, you could set the location of your car in a large parking lot as a Watch point and be able to locate it later without difficulty. If you clear the Watch point, by default your device vibrates when pointed at the next closest POI delineated in the Nearby Place item on the main screen. To turn off these vibration signals, clear the checkbox on the Watch item.
If Nearby Explorer detects that the direction you are heading coincides with the direction to a Nearby Place, it tries to simplify the directions by using "ahead" or "behind" instead of a compass direction. For example, if you were traveling north along Main Street and there was a library 100 yards north, Nearby might say, "Library branch 100 yards ahead" instead of "Library branch 100 yards north."
The Latitude and Longitude items in the Nearby screen show the current values of these positions.
Latitudes and longitudes are lines drawn on a map to precisely pinpoint any location on earth. Together, these values are commonly called a lat/long value or a geocoded position.
You do not need to know about latitudes and longitudes to effectively use the software, but they can be useful in some situations. Once you leave the road network, these values still provide relevant positioning information.
Latitudes are equidistant horizontal lines that circle the earth with the zero parallel at the equator and the 90th parallels at the North and South Poles. Much of the U.S. and Canadian border lies on the 49th parallel north (or 49N latitude line). As you move north or south from the equator, the numbers increase, and the position is expressed in degrees with N or S postfixed to the number that represents the value. Some commonly known latitudes are:
Longitudes are vertical lines expressed in degrees as east or west of the prime meridian, which is located close to London at Greenwich, England. The vertical lines start at the prime meridian with zero and go to 180 on the opposite side of the earth. The lines all converge at the North and South Poles; as the lines get closer to the equator, the farther apart they are. As you move east or west, the numbers increase from the zero prime. Boston's longitude is W 70. Some longitude references use a negative sign (-) rather than a W notation to denote longitudes west of the prime. This software uses the W.
The following is a list of common longitudes in the United States; all are west of the prime meridian.
While latitudes and longitudes are expressed as degrees, they are more precisely denoted with minutes and seconds as well. This notation method is called Degree-Minute-Second (DMS).
There are a number of ways to represent latitudes and longitudes. The combination method this software uses expresses degrees and minutes separated by a colon, followed with a period and a fraction of a minute with three digit precision. This amount of precision works out so that each change in the fractional part equates to a few yards.
If the Latitude or Longitude item is checked in the Nearby screen, the app minimizes the amount of speech by announcing only the parts of the number that change. For instance, if you were at longitude W 85:42.815 and you moved a little farther west into W 85:42.816, Nearby announces only "W 816." The W lets you know the number is a longitude, and the "816" lets you know the finer detail. As you continue to travel west, the longitude cycles through to 999 and then to goes to W 85:43.000. When that change occurs, Nearby announces the whole number.
Use Latitude and Longitude announcements in places away from the road network where you may want finer detail than street addresses or when you want to pinpoint locations in open spaces.
To enter a location by its latitude and longitude, follow these steps:
| Format | Example | Explanation |
|---|---|---|
| Combination | N38 139.432 | Combination format uses a letter to represent the direction. The letter is entered first, followed by the digits. |
| Decimal | 38.139.432 | For Decimal format, the latitude must be the first value entered. |
Nearby Explorer adds this new POI as a Favorite and returns you to the Favorites screen.
Depending on how you want to use the program, Nearby Explorer offers some flexibility about how it announces lat/long values and how it allows you move around the map using these precision settings.
By default, the program uses three digits of precision after the decimal to announce changes and permit movement on the map. Three decimal places of precision is equal to a few yards movement, depending on exactly how far you are from the equator. To get notifications about finer movement, increase the precision to four digits after the decimal. This degree of precision amounts to just a few inches. Unfortunately, today's satellite receivers are not accurate enough to use that amount of precision. If you set four digits of precision, and you have the Latitude or Longitude items selected, you will likely experience constantly changing numbers and consistent chatter.
To lessen the frequency of notifications, decrease the precision.
To alter the precision of lat/long tools, follow these steps:
While Nearby Explorer keeps track of your location as you move, it can also provide information about other places while you remain stationary or move about virtually.
The program provides several methods for map exploration, such as using the Virtual Go To option (explained shortly) from the result of the Explore, Search, or Favorites tools or using the Latitude and Longitude movement tools provided on the Nearby screen.
You can also use the touch screen of your device to explore the map. To learn more about map exploration using a touch screen, see Map View.
To virtually shift to another city or state, see Search.
To explore the map using latitude or longitude movements, do the following:
Note: On a touch screen device you will need to go to Map View mode to navigate.
Using the left and right arrow keys on the Latitude and Longitude items on the main screen is a quick way to make a few movements on the map; but if you want to explore in more depth, use Virtual Navigation Mode. When Virtual Navigation Mode is in use, you may use all four arrow keys or the North, South, East, and West buttons to explore the map. As you move, Nearby Explorer notifies you about any of the items checked on the main screen. To turn on Virtual Navigation Mode, (1) hold Select until the context menu appears and (2) check the Virtual Navigation option.
In Virtual Navigation Mode, the buttons and four arrow keys move as follows:
By default, each arrow key press or button click moves 20 yards. You may change the movement distance by following these steps:
Virtual Navigation Mode moves in the exact direction you request by default. However, this can be a problem if you wish to follow a road that does not run exactly north/south or east/west. The Follow Roads (full version) checkbox under the navigation pad makes Nearby Explorer follow the road instead of moving in the precise direction you indicate. This usually works well, but it can sometimes cause Nearby Explorer to assume the incorrect street when navigating through an intersection. Changing the movement distance when near an intersection or specifying a different direction often helps you get back on the correct street in this situation.
If you are using a keyboard with Virtual Navigation Mode, you can change the Follow Roads setting from the Settings screen. Remember that you can press the letter S on your keyboard to quickly access Settings.
To exit Virtual Navigation Mode, turn it off from the context menu for any item, or press Resume on the toolbar.
The Accuracy setting provides a number to be considered as a range. For instance, if the app shows "2 yards" the program is fairly confident that it knows your position within 2 yards. The smaller the number, the more accurate you should consider Nearby Explorer's information.
The Show/Hide Items option on the main screen lets you customize what appears on the screen. All items appear by default, but you may find you rarely ever care about some of them.
To hide items from the main screen, select Show/Hide Items and uncheck any item you wish to omit. Note that if the item is checked on the main screen before you hide it, Nearby Explorer continues to announce status changes to that item, even if it is hidden. Set the status of the announcement by checking or unchecking it on the main screen before you hide that item.
To unhide an item, select Show/Hide Items from the main screen, and check the desired item.
In addition to the places in the on board maps and online place services, you can mark your own places. In Nearby Explorer, these are called Favorites.
Favorites are treated like Nearby Places. As you approach a Favorite, the app announces its name and location.
Favorites have one distinct advantage over POIs in the map data which is that you can mark a position more precisely than the ones provided in the maps. You may, for example, wish to mark the exact position of the front door to a restaurant or business. Remember, the map data often puts addresses just on either side of the center line of a street.
Another advantage of Favorites is you may denote POIs that may not be of interest to anyone else, such as a mailbox, trashcan, or park bench. Once you pinpoint the POI, save it as a Favorite and you will not miss it again.
To set your current location as a Favorite, follow these steps:
It is useful to give favorite places meaningful names that more precisely describe the marked position. When marking the door to a restaurant, for example, use exact wording to distinguish that Favorite from the more general POI in the maps. "Side Door to Wendy's" distinguishes the entrance from the map data's more general "Wendy's" moniker.
To display a list of your Favorites, press Menu to open the program menu and select Favorites.
The Favorites list organizes your Favorites by their distance from your current position, so the closest places are listed first.
Each item in the list shows the name of the Favorite, its distance and direction from your current position, and the nearest address to the location.
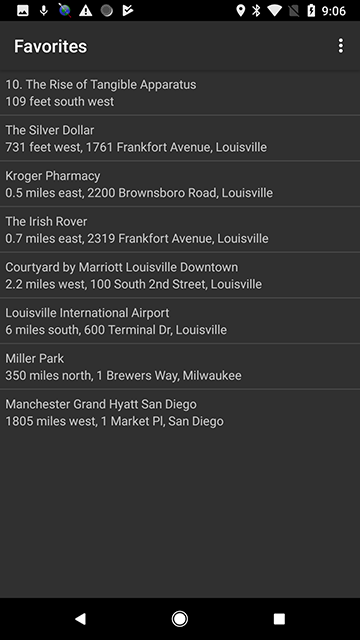
Figure 7. A list of Favorites in Nearby Explorer
To rename a Favorite, follow these steps:
To delete a Favorite, follow these steps:
To fine tune the placement of a favorite to the current position, follow these steps:
Cautionary Note: Remember that when you use any of the menu options to change OpenStreetMap, the changes are worldwide and public. If you only want to save a place for yourself, add it to Favorites. Those places stay on your device until you elect to share them.
To add a point that is not yet in the map, follow these steps:
Move to the location where you want to mark the point. If it is an establishment you are adding, try to get as close to the front door as possible. Sighted users usually match points with satellite imagery, so they can generally get the point pretty close to the intended location. As a blind user, you use the location based on the GPS signal accuracy, so your points may not be quite as accurate as sighted users’. Nearby Explorer adds a “fix me” notation to the map, so if a sighted user sees the point you marked that may be a few feet from the intended location, they can edit the position.
Save your current position as a Favorite. When you save your position as a Favorite, Nearby Explorer prompts you to provide the location a name.
Go to the Favorites and locate the item you just saved and activate it. You don’t have to be at the favorite when you activate it. You only need to be at the location when you create the Favorite.
Once you activate the favorite, select Save to OpenStreetMap from the menu that appears. Nearby Explorer opens the Save activity.
If you have not logged into OpenStreetMap, Nearby Explorer prompts you for your OSM user ID and password. If you have not yet created a user name and password, there is a link you can activate to create one. Nearby Explorer remembers your account information, so you only need to log in once.
Once you log in, Nearby Explorer shows an activity with information to describe the attributes of the point you are creating. It asks for a category, address, phone number, web site, description, and blind description. Fill out as much of this information as accurately as possible. In addition, if the location is an indoor place and you have accurate indoor positioning, you can check the Indoor indicator. You should also indicate on which level of the building the place is located. Note that the main entrance level of the building is 0 rather than 1 - this is an OSM data entry standard.
Many times, an establishment changes hands through the life of the building. When using OpenStreetMap as your search provider, if you visit a location, and you notice the map reports the name of an establishment than was once there but is no longer, you can usually use the existing location and correct the data associated with it. You can also use this potion to add more details about a POI, such as phone number, URL, or descriptive information.
To edit the information associated with an existing point, follow these steps:
Sometimes, you may find places marked in OSM that are clearly not intended to be in a public map. Often, such places get added by novice users. While you have the ability to remove such places from the map, do it with caution. When you remove an item, it removes it for everybody, not just you. so you should only delete items that you know no longer exist.
To remove a place from the map, follow these steps:
Public transportation information rounds out any complete app's feature set for navigation. Nearby Explorer provides two levels of integration into public transportation systems in the following ways:
Which one you use depends on where you are and what you want to do.
The native Nearby Explorer transit interface is dynamic and easy to use, but it only works in about 100 North American cities, and it cannot create routes.
Moovit is an excellent, accessible app for finding public transportation all over the world, and it creates routes, shows schedules, and locates stops. To launch Moovit, use the context menu from any option on the main screen.
Nearby Explorer uses transit feeds for several transit systems to provide interactive information about public transit.
To use the interactive Transit feature in a supported metropolitan area, press Transit from the program's menu. If you are in a metropolitan area with more than one transit system, Nearby displays a menu of the systems available.
If you will always use the same transit system, and you do not want to see the menu each time, (1) highlight the one you prefer, (2) press and hold Select, and (3) choose Set as Default from the context menu that appears. To remove the default, choose Clear Default Transit System from the menu on the initial Transit screen.
Once you choose a transit system, Nearby Explorer's Transit Stop screen displays a list of all the transit stops within 350 yards of your current position, with the closest stop listed first.
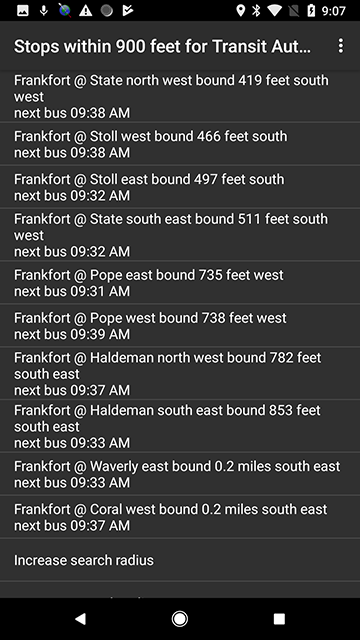
Figure 8. Transit Stop screen in Nearby Explorer
To broaden the search radius, press Right Arrow, or use the Increase Radius option at the bottom of the list.
Each list item contains the following information:
To see a list of all the modes of transport that service a particular stop, select one of the stops. Nearby displays a screen with all the vehicles that service that stop.
The Modes of Transportation are represented by a list of circuits starting with the next circuit. Each line item contains the following information:
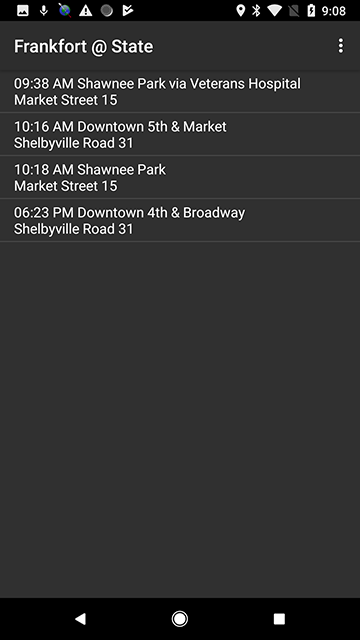
Figure 9. Modes of Transportation screen in Nearby Explorer
To follow a route, select a stop. Nearby responds by showing all the stops on that route.
To see a complete schedule for the selected transportation mode, select a stop. Nearby responds with a menu containing Go To and Schedule. Select Schedule from the menu. The app displays a list of all the times the selected bus or train stops at that location, highlighting the next scheduled stop.
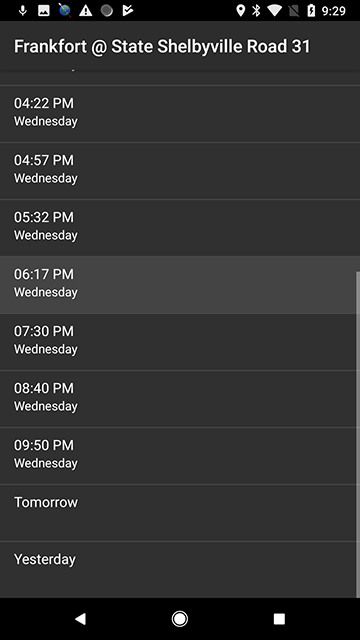
Figure 10. Schedule screen in Nearby Explorer
To move to earlier times, press Up Arrow.
To move to later times, press Down Arrow.
To see a different day, press Right Arrow for the next day or Left Arrow for the previous day or choose the day from one of the buttons at the bottom of the screen.
To identify buses/trains at other stops, press Back to get to the Nearby Stops screen and select another stop.
Nearby Explorer uses an automated system to keep its transit information up-to-date. If an update is available, Nearby downloads the schedule the next time you select Transit while your device has a network connection.
If your local area does not support Google Transit™ trip planning service, see the Google Transit™Page for information about requesting the transit authority in your area to participate.
| St./Dist./Prov. | City/Co. | Transit Line |
|---|---|---|
| AL | Birmingham | |
| AZ | Phoenix | |
| AZ | Tucson | SunTran |
| BC | Nanaimo | BC Transit - RDN Transit System |
| BC | Vancouver | |
| BC | Victoria | BC Transit |
| CA | Bakersfield | |
| CA | Beaumont | |
| CA | Eastern Sierra | |
| CA | Los Angeles | |
| CA | Orange County | |
| CA | Riverside | RTA |
| CA | Sacramento | |
| CA | San Diego | |
| CA | San Francisco | BART |
| CA | San Francisco | SFMTA |
| CA | San Jose | |
| CA | Santa Rosa | CityBus |
| CO | Colorado Springs | |
| CO | Denver | |
| CT | Hartford | Connecticut Transit |
| CT | Meriden | Connecticut Transit |
| CT | New Britain | Connecticut Transit |
| CT | New Haven | Connecticut Transit |
| CT | Shore Line East | Connecticut Transit |
| CT | Stamford | Connecticut Transit |
| CT | Waterbury | Connecticut Transit |
| DE | DART | |
| DC | Washington | |
| FL | Brevard County | SCAT |
| FL | Fort Lauderdale | |
| FL | Jacksonville | |
| FL | Miami | |
| FL | Orlando | |
| FL | Tallahassee | StarMetro |
| FL | Tampa | HART |
| FL | Volusia County | Votran |
| GA | Atlanta | |
| IL | Chicago | |
| IN | Indianapolis | |
| IA | Des Moines | DART |
| KY | Lexington | |
| KY | Louisville | |
| MD | Baltimore | |
| MA | Boston | WRTA |
| MA | Worcester | WRTA |
| MI | Ann Arbor | |
| MI | Detroit | |
| MI | Grand Rapids | The Rapid |
| MI | Lansing | CATA |
| MN | Duluth | DTA |
| MN | Minneapolis | |
| MO | Kansas City | |
| MO | St. Louis | |
| NV | Las Vegas | |
| NJ | NJ Transit Bus, NJ Transit Rail | |
| NY | Albany | CDTA |
| NM | Albuquerque | |
| NM | Buffalo | |
| NY | New York | Manhattan MTA, Brooklyn MTA |
| NC | Cary | GoCary |
| NC | Charlotte | CATS |
| NC | Durham | GoDurham |
| NC | Greensboro | PART |
| NC | Raleigh | GoRaleigh, NCSU Wolfline |
| NC | Research Triangle | GoTriangle |
| NS | Halifax | |
| OH | Cincinnati | |
| OH | Cleveland | |
| OH | Columbus | |
| OH | Lakeshore County | Laketran |
| OH | Cincinnati | |
| OK | Oklahoma City | |
| ON | Hamilton | HSR |
| ON | Kingston | Kingston Transit |
| ON | Ottawa | |
| ON | Toronto | TTC |
| ON | York, Toronto | York Region Transit |
| OR | Eugene | |
| OR | Portland | |
| OR | Salem | |
| PA | Philadelphia | |
| PA | Pittsburgh | Port Authority |
| QC | Montreal | |
| RI | Providence | RIPTA |
| TN | Nashville | MTA |
| TX | Austin | |
| TX | Corpus Christi | |
| TX | Dallas | |
| TX | Fort Worth | |
| TX | Houston | |
| TX | San Antonio | |
| UT | Salt Lake City | UTA |
| VA | Fairfax | Fairfax Connector |
| VA | Hampton | HRT |
| WA | Everett | Everett Transit |
| WA | Olympia | Intercity Transit |
| WA | Pierce County | Pierce Transit |
| WA | Seattle | King County Metro, Sound Transit |
| WI | Madison | |
| WI | Milwaukee |
Nearby Explorer assists you with finding businesses, institutions, addresses, and places that relate to a specific topic.
Once you find a business, you can do one of several things, depending upon the information available for that location. These things include receiving directions or guidance, adding it to your Favorites, traveling to it virtually on the map, or even visiting the business's webpage.
There are Search Provider toolbar buttons at the top of the screen that let you select among Google Places, OpenStreetMap, and onboard NAVTEQ maps (full version). This function provides more timely and accurate information about places than what may be provided with the onboard maps. It also provides search results based on a search radius that behaves in interesting and useful ways. Read more about the way the search radius effects Places in the Adjust Nearest Place Behavior section of this documentation.
Nearby Explorer can search within approximately a 30 mile radius of your actual or virtual position. To initiate a search with another location than your own, first search for a city and state and then search for the place of interest.
To search for POIs in another city or state, you must switch to that city first (full version). To do this, follow these steps:
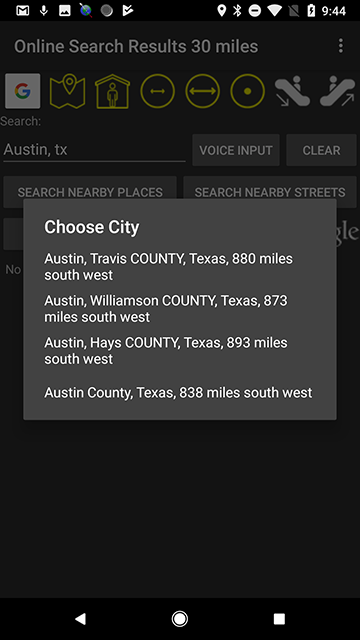
Figure 11. A list of matching cities and counties for Austin, Texas
Nearby responds by displaying a list of matching cities and the county in which that city is located. Each item in the list also indicates that city's distance and direction from your current location. Choose the city of interest and press Select.
The app responds with a City Action menu containing either Go To or Search.
To move the virtual position to that city and return to the Nearby screen, choose Go To.
To display search results from that city, choose Search.
To search the map for other cities, streets, or POIs, choose Search from the Nearby Explorer menu or press the Search selection. Nearby responds by displaying a Search Results activity screen that includes an edit box, three buttons, and a list of POIs around you.
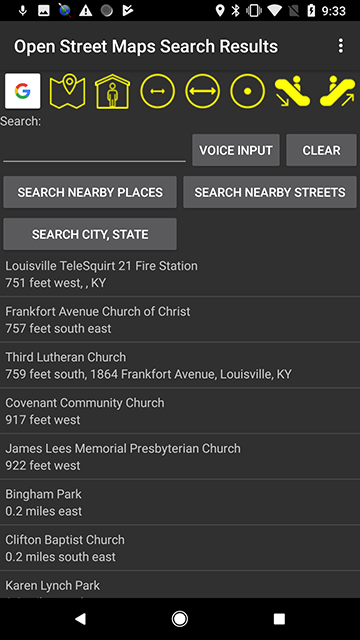
Figure 12. A list of POIs on the Search screen
The types of items that appear in this list depend on your network connection, the search radius setting, your location, any terms you have typed, and any categories you have specified.
These POIs are arranged so the closest one appears at the top of the list. Each list item shows the name of the place, its category, and its distance and direction from your current or virtual position.
If you have a network connection, the list item also includes the POI's address as obtained from Google PlacesTM business listings.
To show places related to a term you type, follow these steps:
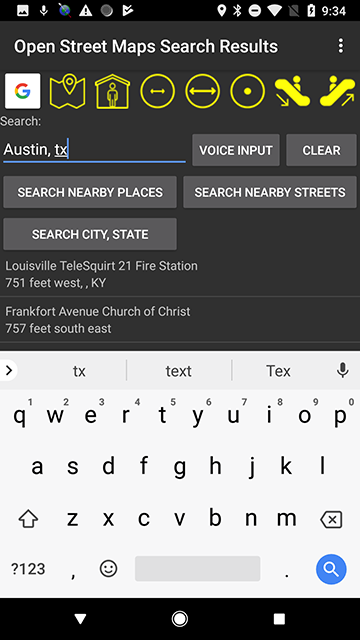
Figure 13. The edit box in the Search menu
Nearby Explorer automatically increases the search radius to approximately 30 miles when you provide a specific term to find.
If you have a network connection, Nearby Explorer provides search results from the Google PlacesTM business listings service. The search results screen indicates the presence of a network connection by putting "Online" in the search results title. It also puts the default radius for the search in the title. You may increase and decrease the radius in the search results screen by pressing the right or left arrow keys.
Initially, the list shows all POIs in all categories; however, if you do not have a network connection you may restrict the list to more manageable subsets.
To select categories of search results when no network connection is present (full version), follow these steps:
When you highlight and select a POI, Nearby Explorer displays a menu of actions from which to choose. The menu includes Save to Favorites, Virtual Go To, List Directions, Turn-By-Turn Guidance, and other possible options depending on the information that is available for that POI.
Geocaching is a globally-popular treasure-hunting game. Clues to "caches" come to you in the form of lat/long values provided by a website such as geocaching.com.
The cache is usually a small trinket and a log of the dates when the treasure was found. When you discover the cache, you register the log and replace the trinket with one of similar or greater value.
To enter a location by its latitude and longitude, follow the steps listed in the Latitude and Longitude section of this document.
You can use Nearby to provide you with approximate directions to geocaching POIs. However, in most cases, you must set the POI as a Watch point, and then allow the app to display the distance and direction to that POI once you leave the road network.
Nearby Explorer allows you to explore streets around you either by listing intersections on the current street, or searching for streets in a radial pattern from your current location.
To see the Explore screen, press Menu and choose Explore.
Nearby displays a list of intersections on the current street. It also displays a "Streets" button and a "Go To" button.
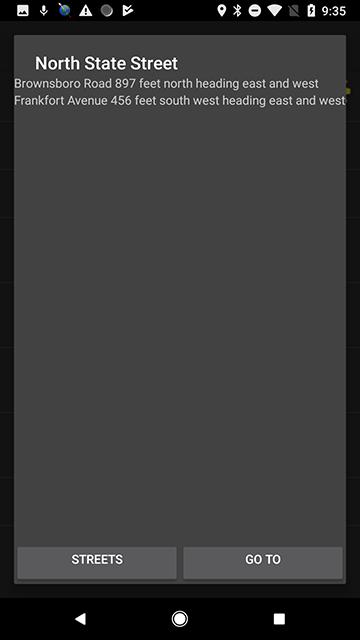
Figure 14. The Explore menu in Nearby Explorer
Each intersection in the list shows the name of the intersecting street, the distance and direction to that intersection, and in which direction the street runs.
If you were on Maple Street between 1st and 2nd Streets and opened the Explore view, you might see a list like the following:
Nearby Explorer highlights the closest intersection to your current location. When you open this view, the cursor will be on the 2nd Street or 3rd Street item depending on which is closest.
To turn onto one of the streets listed, highlight the street and press Select. Nearby displays a new list with all the intersections on the new street. Of course, one of those intersections is the street you were on when you pressed Select, so the list might look like the following:
Since the intersection of 2nd and Maple is closest, Nearby highlights the street "Maple" in the list.
When you get to the desired location, press the Go To button to return to the Nearby screen with your location set to the selected intersection.
The Streets button lets you examine the map by looking at nearby streets without regard for intersections. When you press the Streets button, Nearby shows a list of eight nearby streets, one for each of the following directions:
Each list item contains the street name, the distance, and the direction from the current position.
To go to one of the streets in the list, highlight the street name, and then press Select. Nearby responds by shifting to the selected street and making it the current location. The app then places the approximate address in the title of the screen, and populates the list with the eight streets closest to the new location. Nearby also maintains the list item number, so if you are on the third item in the list when you press Select, the new list is displayed with the third item highlighted. It is possible, therefore, to move continuously in an easterly direction by scrolling down to the street east of the current location, then continuing to press Select to consecutively choose the next street heading east.
The default distance for Streets is 1000 yards. If Nearby does not perceive another street in the indicated direction within the allotted distance, it enables you to move in that direction by the indicated distance.
While moving to nearby streets can be useful, making larger movements on the map can be tedious using this method. The "1 Mile" button changes the street list from streets that are near your current position to streets that are 1 mile from the current position. When you press the 1 Mile button, Nearby changes the list of streets to reflect the new distance selection. It also changes the 1 Mile button to a 10 Mile button. Pressing the 10 Mile button changes the street list to streets that are 10 miles away. When using 10 miles, the button changes back to Intersections. Use the 10 Mile button to make large movements; use the Streets or 1 Mile button to make finer moves.
Nearby Explorer provides indoor orientation in supported venues. When you move into a venue with configured beacons and maps, the app indicates the indoor status by changing the app's title to "Indoor Explorer" and announcing "Indoor Mode" and the level number of the building in which you are traveling and announces the name and position (if desired) of the nearest point of interest on that level. It also makes the Level button active, so you may virtually investigate other floors in the building.
There are two ways to use beacons. This section discusses the mapped method which provides several advantages but is more difficult to install. For a simpler method that can be deployed on an ad hoc basis, see the sections on Beacon and Ad Hoc Beacon Manager.
When using indoor locations, the app switches the Search Provider to OpenStreetMap (OSM). Nearby Explorer automatically downloads the map for the state where you are located when you start the app for the first time.
If you do not want to download OSM data for your state when you start the app, turn off the Allow Indoor Support in the Settings menu.
If you wish to use map data from another state, you must either download the map data manually by selecting the state in the OSM Manager button on the Settings menu or set OSM as the address provider in Settings. If OSM is the address provider, Nearby Explorer automatically downloads the maps as you virtually navigate to other states. To prevent automatic map downloads, turn off the Allow Indoor Mode option in Settings.
The OpenStreetMap Manager lets you select regions to download and lets you determine how often the app should update each region. Find OpenStreetMap Manager in the Settings menu.
When you open the OpenStreetMap Manager, Nearby Explorer shows a list of regions you may select. At the end of the list, Select All, Deselect All, and Options buttons provide additional convenient ways to act on all the regions at once.
In the list, select the regions to download. Use the Options button at the bottom of the screen to set the frequency for updates or other functions for all selected regions. To adjust or uninstall a single region, use the context menu for that region.
In most instances, you won’t want to update a region every day. You only do that if you are working in an area that is receiving initial indoor support. Once the support for that venue is complete, you probably want to change the update schedule to something much less frequent.
The options for each region include:
Once you make adjustments to the areas to download and how often to update the maps, Nearby Explorer takes action on the selections you made when you exit this screen.
When you position the phone for Compass Mode operation, Nearby Explorer announces the direction and points of interest in the direction you point when indoors.
Getting information about all the possibilities in a given direction can provide good overview and orientation clues without having to specifically point at anything.
Geobeam restricts points of interest, favorites, and search results to the floor on which you are located. Point the end of the phone to determine building features and their distance.
To virtually move to other floors, use the Level button on the main screen or in the Search page. Note that the app must be paused for the Level button to be available when in the main screen.
When you use the Search function, Nearby Explorer shows results from the current level of the building. The Level button at the top lets you select other levels to search or lets you select "No Level" for an outdoor search.
To show search results, favorites, and points of interest from outside the building, select the Level button and choos "No Level."
The Map View menu option shows an interactive, touch-responsive accessible map of your current or virtual position. Use it to show a map of your current position or of the area around a search result or Favorite place. The Map View option is only available in the full version.
To use the Map View, first decide if you want a map of your current position or a map of another area. If you want a map of an area other than the current position, use whatever means necessary to get your virtual position where you want it. You can do that by using Navigation Mode, searching, selecting a Favorite, or using the Explore menu option.
When you are ready to show the map, select Map View from the program's main menu.
Use your finger to touch or slide around on any part of the screen to receive feedback about that part of the map. The information you get from touching the map depends on which items you have checked on Nearby Explorer's main screen. So, if you have only City, State, and Street Name checked, you get information about those items only. The types of items you select depend on exactly what you want to do with the map. If you just want to explore, use the normal settings that you use for actual navigation. The Map View provides the same kind of information you would get if you traveled to the part of the map you have touched.
To alter the kinds of things that get announced while in the Map View, press the More Options button and choose Announcement Settings from the resulting menu. Nearby Explorer shows the same list of items to check or uncheck as you see on the main screen. There are two different preference screens—one for views less than five miles and one for views over five miles. (Once the map gets much bigger than that, it is not practical to get information about street names or addresses.)
North is at the top of the screen. South is at the bottom, and east and west are right and left, respectively.
To scroll the map, use the normal two-finger scrolling technique required when you are running TalkBack. That is, touch two fingers on the screen then slide them in the desired direction. For example, to move east touch two fingers in the direction you wish to scroll, then slide. If you want to see more of the map east of your current view, touch eastward toward the right side of the screen, then slide left. Similarly, to move north, touch the top of the screen and slide down. When you scroll, Nearby Explorer announces the new point at the center of the screen.
To show less detail on the map, touch the screen with two fingers, then slowly pinch those two fingers together toward each other. When you release your fingers, Nearby Explorer shows a map with more area, and it announces the new width of the screen. It might say, for instance, "20 miles." This indicates that the distance from the left edge to the right edge of the screen is now set to 20 miles.
To show more detail, place two fingers on the screen, then separate them from each other by sliding them apart. This shows less area on the map.
To follow a street on the map, pause your finger on the street of interest. Nearby Explorer announces, "Set" and vibrates anytime you touch that street.
Nearby Explorer comes with maps for the United States and Canada. However, you may use the Google PlacesTM business listings service to get details about any place on earth.
To virtually travel to places outside the U.S. and Canada, make sure your device has a network connection. Then, set the Address Provider to Google.
As long as you have a network connection, you may move to countries outside the United States or Canada in one of two ways— (1) by scrolling the portion of earth you want into view or (2) by using the Country Search dialog, accessible from the More Options button on the Map View screen.
You may use geobeam to examine the surrounding virtual area, just as if you were there.
If you make or receive a phone call while Nearby Explorer is working, the program mutes the announcements until the phone call is complete.
© 2012 Google Inc. All rights reserved. Google PlacesTM is a trademark of Google Inc.
© 2012 Google Inc. All rights reserved. Google PlayTM is a trademark of Google Inc.
© 2012 Google Inc. All rights reserved. Google TransitTM is a trademark of Google Inc.
The data ("Data") is provided for your personal, internal use only and not for resale. It is protected by copyright, and is subject to the following terms and conditions which are agreed to by you, on the one hand, and American Printing House for the Blind, Inc. and its licensors (including their licensors and suppliers) on the other hand.
The Data for areas of Canada includes information taken with permission from Canadian authorities, including: © Her Majesty the Queen in Right of Canada, © Queen's Printer for Ontario, © Canada Post Corporation, GeoBase®, © Department of Natural Resources Canada. All rights reserved.
NAVTEQ holds a non-exclusive license from the United States Postal Service® to publish and sell ZIP+4® information.
© United States Postal Service ® 2011. Prices are not established, controlled or approved by the United States Postal Service®. The following trademarks and registrations are owned by the USPS: United States Postal Service, USPS, and ZIP+4.
You agree to use this Data together with the Nearby Explorer app for the solely personal, non-commercial purposes for which you were licensed, and not for service bureau, time-sharing or other similar purposes. Accordingly, but subject to the restrictions set forth in the following paragraphs, you may copy this Data only as necessary for your personal use to (i) view it, and (ii) save it, provided that you do not remove any copyright notices that appear and do not modify the Data in any way. You agree not to otherwise reproduce, copy, modify, decompile, disassemble, create any derivative works of, or reverse engineer any portion of this Data, and may not transfer or distribute it in any form, for any purpose, except to the extent permitted by mandatory laws.
Except where you have been specifically licensed to do so by the American Printing House for the Blind, Inc., and without limiting the preceding paragraph, you may not (a) use this Data with any products, systems, or applications installed or otherwise connected to or in communication with vehicles, capable of vehicle navigation, positioning, dispatch, real time route guidance, fleet management or similar applications; or (b) with or in communication with any positioning devices or any mobile or wireless-connected electronic or computer devices, including without limitation cellular phones, palmtop and handheld computers, pagers, and personal digital assistants or PDAs.
By using the Nearby Explorer application, the user is bound by Google's Terms of Service.
A link to the APH Privacy Policy is available at www.aph.org/about/privacy. Be advised that Nearby Explorer app uses Google Maps API. To learn more, go to the Google Privacy Policy webpage.
The Data may contain inaccurate or incomplete information due to the passage of time, changing circumstances, sources used and the nature of collecting comprehensive geographic data, any of which may lead to incorrect results.
This Data is provided to you "as is," and you agree to use it at your own risk. American Printing House for the Blind, Inc. and its licensors (and their licensors and suppliers) make no guarantees, representations or warranties of any kind, express or implied, arising by law or otherwise, including but not limited to, content, quality, accuracy, completeness, effectiveness, reliability, fitness for a particular purpose, usefulness, use or results to be obtained from this Data, or that the Data or server will be uninterrupted or error-free.
Disclaimer of Warranty: American Printing House for the Blind, Inc. AND ITS LICENSORS (INCLUDING THEIR LICENSORS AND SUPPLIERS) DISCLAIM ANY WARRANTIES, EXPRESS OR IMPLIED, OF QUALITY, PERFORMANCE, MERCHANTABILITY, FITNESS FOR A PARTICULAR PURPOSE OR NON-INFRINGEMENT. Some States, Territories and Countries do not allow certain warranty exclusions, so to that extent the above exclusion may not apply to you.
Disclaimer of Liability: American Printing House for the Blind, Inc. AND ITS LICENSORS (INCLUDING THEIR LICENSORS AND SUPPLIERS) SHALL NOT BE LIABLE TO YOU: IN RESPECT OF ANY CLAIM, DEMAND OR ACTION, IRRESPECTIVE OF THE NATURE OF THE CAUSE OF THE CLAIM, DEMAND OR ACTION ALLEGING ANY LOSS, INJURY OR DAMAGES, DIRECT OR INDIRECT, WHICH MAY RESULT FROM THE USE OR POSSESSION OF THE INFORMATION; OR FOR ANY LOSS OF PROFIT, REVENUE, CONTRACTS OR SAVINGS, OR ANY OTHER DIRECT, INDIRECT, INCIDENTAL, SPECIAL OR CONSEQUENTIAL DAMAGES ARISING OUT OF YOUR USE OF OR INABILITY TO USE THIS INFORMATION, ANY DEFECT IN THE INFORMATION, OR THE BREACH OF THESE TERMS OR CONDITIONS, WHETHER IN AN ACTION IN CONTRACT OR TORT OR BASED ON A WARRANTY, EVEN IF American Printing House for the Blind, Inc. OR ITS LICENSORS HAVE BEEN ADVISED OF THE POSSIBILITY OF SUCH DAMAGES. Some States, Territories and Countries do not allow certain liability exclusions or damages limitations, so to that extent the above may not apply to you.
You agree not to export from anywhere any part of the Data provided to you or any direct product thereof except in compliance with, and with all licenses and approvals required under, applicable export laws, rules and regulations.
These terms and conditions constitute the entire agreement between American Printing House for the Blind, Inc. (and its licensors, including their licensors and suppliers) and you pertaining to the subject matter hereof, and supersedes in their entirety any and all written or oral agreements previously existing between us with respect to such subject matter.
The above terms and conditions shall be governed by the laws of the State of Illinois, without giving effect to (i) its conflict of laws provisions, or (ii) the United Nations Convention for Contracts for the International Sale of Goods, which is explicitly excluded. You agree to submit to the jurisdiction of the State of Illinois for any and all disputes, claims and actions arising from or in connection with the Data provided to you hereunder.
If the Data is being acquired by or on behalf of the United States government or any other entity seeking or applying rights similar to those customarily claimed by the United States government, this Data is a "commercial item" as that term is defined at 48 C.F.R. ("FAR") 2.101, is licensed in accordance with these End-User Terms, and each copy of Data delivered or otherwise furnished shall be marked and embedded as appropriate with the following "Notice of Use," and shall be treated in accordance with such Notice:
CONTRACTOR (MANUFACTURER/ SUPPLIER) NAME: NAVTEQ
CONTRACTOR (MANUFACTURER/SUPPLIER) ADDRESS: 425 WEST RANDOLPH STREET,
CHICAGO, ILLINOIS 60606
THIS DATA IS A COMMERCIAL ITEM AS DEFINED IN FAR 2.101 AND IS SUBJECT TO THESE END-USER TERMS UNDER WHICH THIS DATA WAS PROVIDED.
If the Contracting Officer, federal government agency, or any federal official refuses to use the legend provided herein, the Contracting Officer, federal government agency, or any federal official must notify NAVTEQ prior to seeking additional or alternative rights in the Data.