![]()
![]()
Copyright 2020
American Printing House for the Blind, Inc.
July 21, 2020
We need your feedback about the Indoor feature of the Nearby Explorer app. We ask you to try out the Indoor feature, then complete the Indoor Wayfinding Feedback Survey. The information you provide will assist us in making a better indoor wayfinding product and improve indoor navigation for you. The Indoor feature can be used at the locations in the table below or you can visit any of them virtually.
| Building | Location |
|---|---|
| Frazier History Museum | 829 W. Main St., Louisville, KY 40202 |
| 21c Museum Hotel | 700 W. Main St., Louisville, KY 40202 |
| Muhammad Ali Center | 144 N. 6th St., Louisville, KY 40202 |
| Portland State University Millar Library 1F | 1875 SW Park Ave., Portland, OR 97201 |
| Actors Theatre | 316 W. Main St., Louisville, KY 40202 |
| Walgreens Store #2924 | 2368 Frankfort Ave., Louisville, KY 40206 |
| Envision (5F) | 610 N. Main St., Wichita, KS 67203 |
| Kentucky Derby Museum | 704 Central Ave., Louisville, KY 40208 |
| Louisville Metro Hall | 527 W. Jefferson St., Louisville, KY 40202 |
| Louisville City Hall | 601 W. Jefferson St., Louisville, KY 40202 |
| KFC YUM! Center | 1 Arena Plaza, Louisville, KY |
| JCTC John T. Smith Library | 622 South 1st St., Louisville, KY |
| Kentucky International Convention Center | 221 S. 4th St., Louisville, KY 40202 |
| JCTC Chestnut Hall | 110 West Chestnut St., Louisville, KY 40202 |
| JCTC Health Sciences Hall | 110 West Chestnut St., Louisville, KY 40202 |
| Kentucky Museum of Arts and Crafts | 715 W. Main St., Louisville, KY 40202 |
| University of Louisville—BACB Building | 201 E. Shipp Street Walk, Louisville, KY 40208 |
| Slugger Field | 401 E. Main St., Louisville, KY 40202 |
| LFPL Main Library | 301 York St., Louisville, KY |
| Kentucky School for the Blind—Scoggan Building | 1867 Frankfort Ave., Louisville, KY 40206 |
| Kentucky School for the Blind—McDaniel Building | 1867 Frankfort Ave., Louisville, KY 40206 |
| University of Louisville—SAC Building | 2100 S. Floyd St., Louisville, KY 40208 |
| ATIA 2018 (Caribe Royale Orlando) | 8101 World Center Dr., Orlando, FL 32821 |
| American Printing House for the Blind | 1839 Frankfort Ave., Louisville, KY 40208 |
| LFPL Crescent Hill Public Library | 2762 Frankfort Ave, Louisville, KY 40206 |
| LouieLab and C/NET Smart Apartment | 745 W. Main St., Louisville, KY 40202 |
| Visually Impaired Preschool Services (VIPS) | 1906 Goldsmith Lane, Louisville, KY 40218 |
| McDowell Center | 8412 Westport Rd., Louisville, KY 40242 |
| Kentucky Center for the Arts | 501 W. Main St., Louisville, KY 40202 |
| Louisville International Airport (SDF) | 600 Terminal Dr., Louisville, KY 40209 |
| Hyatt Regency Louisville | 311 S. 4th St., Louisville, KY 40202 |
| Region IV Education Service Center | 7145 W. Tidwell Rd., Houston, TX 77092 |
| Kentucky Science Center | 727 W. Main St., Louisville, KY 40202 |
When sighted people use a global positioning system (GPS), their main interests are getting guidance and/or guidance to a destination. Blind users appreciate these features as well, but they generally desire more orientation cues than are available on commercial GPS apps. Nearby Explorer is a GPS app designed to provide these cues along with normal routing and directions. When combined with an accessible interface and customizable, current information about streets and places, the app provides a meaningful picture of the vicinity and its characteristics.
Nearby Explorer works by:
The information Nearby Explorer provides helps you stay oriented. It shows surrounding and approaching streets, businesses, institutions, and public facilities, and offers continually updating distance and directional information to the nearest or selected location. You control the amount and detail.
It provides a sense of the surrounding streets and their relationship to your current position.
It lets you monitor or aid a driver with navigational information.
It lets you virtually explore the map.
This manual describes two versions of the Nearby Explorer app: Online and Full. The full version includes NAVTEQ® maps for North America. The online version does not include NAVTEQ maps and relies on a network connection for use outdoors. Where differences in functionality occur, the documentation indicates this with (full version). The manual is available as a download in the following formats:
There is also an email list dedicated to the use of this app. This is the place to make suggestions, provide tips, and ask questions. To subscribe to the list, send a blank email to [email protected].
For the purposes of this documentation, wherever possible, APH assumes your basic knowledge of Voiceover (VO) and does not, with rare exception, convey information in VO terminology. For example, a VO user, must know that you double tap an option to turn it on. Look here for basics on VoiceOver.
To better understand the benefits and limitations of Nearby Explorer, it is useful to obtain a basic understanding of how the technology works.
There are several components in play. Two of the most important are GPS and maps.
The mobile device (phone or tablet) uses a GPS receiver to read signals sent from an array of satellites designed for this purpose. The receiver uses these signals to pinpoint a position on earth and assign lateral and longitudinal coordinates to that position. In general, a good consumer-grade receiver can render accuracy to within a few yards of a person's actual position under optimal conditions. More realistically, you can expect to achieve accuracy good enough to determine on which side of the street you are traveling.
Some of the conditions that adversely affect accuracy with reading satellite signals include the following:
For location and maps within a building, Nearby Explorer uses beacon based technology and indoor maps to provide similar information. Unfortunately, each building must be configured to take advantage of these features.
The latitude and longitude coordinates do not mean much to most users, so they must be combined with maps that contain more familiar landmarks such as streets and places. Nearby Explorer comes equipped with maps that cover the United States and Canada.
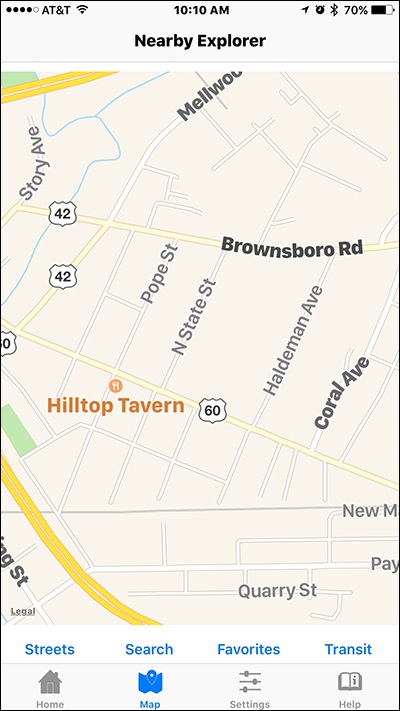
Figure 1. Nearby Explorer street map
There are several factors about the map data that are useful to understand to make the most effective use of the software.
You must pay attention to your environment. The data given from Nearby Explorer are suggestions, not absolute facts. The present conditions and immediate environment must always take precedence over the app's suggestions.
GPS is no substitute for navigation skills. Consult an orientation and mobility professional, and check out the Land Navigation website for basic navigation skills.
Nearby Explorer requires the following:
When the GPS chip is in use, such as when using Nearby Explorer, battery consumption is significantly increased. It is usually necessary to plug in the device if using it on a long trip where the GPS is in use for more than several hours at a time.
To reduce the GPS power consumption, press Nearby Explorer's Pause button. This turns off tracking. Press the Resume button to resume using GPS. Using an external GPS receiver can both improve accuracy and reduce battery consumption.
If you do not move for 15 minutes, Nearby Explorer pauses use of GPS automatically. To resume, press the Resume button or unlock the device and activate Nearby Explorer if necessary.
When you start Nearby Explorer for the first time, it displays licensing information that should be read carefully. If you understand and agree with the terms, select the OK button to continue.
If the full version of the app detects it has no map data, Nearby Explorer asks you if you want to download the maps. Though you may use WiFi or cellular data to download the maps, using WiFi only is recommended, since the maps are very large.
You may use the app while the maps are downloading, but only limited functionality is available until the download is completed.
Do not pause the GPS during the map download process. Pausing the GPS puts the app into a state that makes it difficult to allocate enough time to efficiently download the maps.
When you start the app, Nearby Explorer displays the Home screen and waits for positioning information from the GPS receiver.
At the top of the Home screen is a toolbar with icon buttons for Pause, Compass, Geobeam, Radius, and Level adjustments, and a control to hide some of the items. If you are not using VoiceOver, you can get a description of what these buttons each do by holding the button. At the bottom is another toolbar with text buttons for Streets, Search, Favorites, and Transit. Below the bottom toolbar is a collection of four tabs for Home, Map, Settings, and Help.
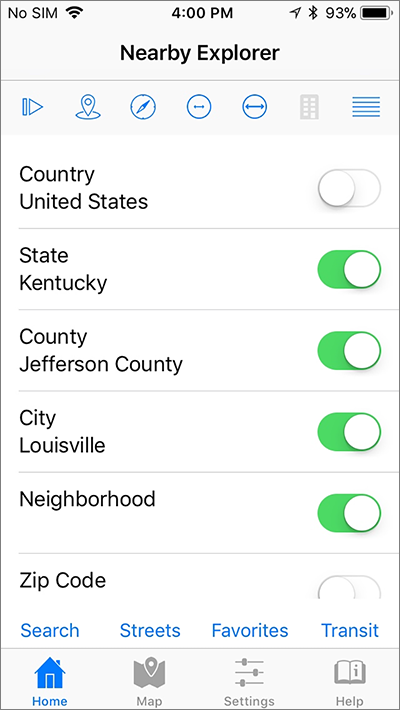
Figure 2. Nearby Explorer Home screen
To return to the Home screen, select it from the bottom left of the screen.
The Home screen shows the most used controls. Between the two toolbars, the screen displays a list of information about your current or virtual position. You use the list in one of two ways:
You may also adjust specific behavior for each list item by activating its Context menu.
The items you turn on depend on how you wish to use the program.
While walking in an unfamiliar area, it may be useful to turn on the street address, street name, and possibly the nearest POI and its distance. However, if you are riding in a car it may be too much to have street numbers and distances to POIs announced.
You may want information that changes very infrequently to be checked. For example, City, County, and State, are items that change so infrequently that you may wish to have them selected at all times. If you use the Map Tab for virtual exploration, keeping these options enabled can provide useful information about distant places without bothering you for local use.
It is important to keep "chatter" to a minimum. Since most of the information from the Nearby screen is time and distance sensitive, it is not useful to have too many announcements, especially in a moving vehicle. By the time you hear a description 100 yards past the actual location, that announcement is usually no longer relevant. The trick is to balance the amount of details with your need and situation.
In addition to the list items, the top toolbar provides buttons to pause the GPS for virtual navigation, Radius buttons to increase or decrease the distance for reporting points of interest, and a Level button that lets you select the floor for indoor venues.
In addition to announcing all the on items as you move and they change, Nearby Explorer can repeat important turned on options, on demand. To repeat the information contained in important items that are turned on, shake the phone. The Shake to Repeat procedure works even if the phone is in sleep mode.
Note: You must enable this feature in the Settings tab for it to work.
In addition to using the phone as a passive reception device for location information, you may actively seek details on demand by using the position of the phone to point to objects in the environment. See the sections on Compass and Geobeam for details.
Active positioning is a powerful feature but can be confusing when the phone starts vibrating or speaking when you do not expect it.
To turn off the Compass or Geobeam, select the Compass or Geobeam Buttons in the toolbar at the top of the Home screen.
In addition to turning on the items to monitor, you may use the Context menu. The menu provides additional options for the selected item. Details are explained in the section for each option.
To activate the Context menu with VoiceOver running, swipe down and select the Show menu option or double tap and hold.
One of the context menu options is Hide. You may hide any of the items on the Home screen. To restore options you hid, press the Show All button on the top toolbar.
The Neighborhood option shows the current neighborhood (or settlement) when available. When using the NAVTEQ onboard maps in the United States, this field is always blank. However, it is sometimes populated when using a different address provider, or when in using the NAVTEQ onboard maps in Canada.
When the Heading item on the Nearby screen is on, Nearby Explorer announces your direction of travel and continually updates it as you move. This heading is derived by comparing the location of the last GPS reading with the position of the current reading. This means that in order to get a heading, you must be moving.
Nearby Explorer uses the heading to determine which streets you are approaching as you move. When you stop moving, the heading becomes invalid, and Nearby Explorer's Heading value goes blank.
In addition to obtaining heading information from the GPS, you may use the compass to provide the direction you are facing.
You activate the compass by positioning the phone. Before you use it, ensure the Compass Button is turned on.
To use the compass, hold the device vertically and point the camera in the desired direction (as if you were taking a picture in portrait orientation). Nearby Explorer responds with a vibration and announcement of the direction.
In addition to the direction, the full version announces a list of streets that intersect a line in the direction you point the device.
As you point the device in another direction, the compass silences, the phone vibrates, and the compass announces the new information about direction and streets.
To use the compass with a refreshable braille display, move the VoiceOver cursor to the Heading Option. Nearby Explorer updates it as you rotate the phone to obtain your direction.
When using the compass in a supported indoor venue, instead of announcing streets in the direction you point, Nearby Explorer announces the rooms and other indoor points of interest.
To stop using the compass, move the device so it is no longer oriented vertically. Nearby Explorer responds with another confirmation tone and resumes obtaining the heading information from the GPS.
Note: All other functions of Nearby Explorer remain active, even when you start another program. If you do not want the position of the phone to provide Compass feedback, turn off the Compass feature by selecting the Compass off button on the toolbar at the top of the screen.
The Street Number option on the Nearby screen provides the closest house number of the current position. As you move, the number changes to reflect the new, closest address.
Nearby Explorer calculates street addresses by dividing a block into equal segments and assigning a number to each segment. There are cases where this approach can report a number that is one or two houses away from the actual address. Take the example of a large business that occupies an entire block. While its published address might be 900 Main Street, as you travel down the block, Nearby Explorer reports 900, 902, 904, and so on, to the end of the block and the official last number.
Sometimes, you can get more precise street numbers by using an alternate provider. Nearby Explorer offers the following providers:
The accuracy of each provider may depend on your area. One way to test the accuracy is to see if the app gives you an accurate address for your house or business.
To change providers, activate the Context menu, then select Address Provider.
The Street Name option displays the street on which the user is currently traveling. If this item is selected, the name of the street is announced when you turn onto another street or when you enter a cross street.
When approaching a cross street, depending on the accuracy of the GPS signal, Nearby Explorer announces the name of the cross street as you enter the street. Inaccurate signals may make it announce the cross street either before or after you enter or leave the street crossing.
To constantly update your street address while walking, turn on both the Street Number and Street Name items. As you walk, Nearby Explorer announces the street address but not the street name (because the street name is not changing). With both options selected, when you approach and pass a cross street, the app announces the name of the street and the closest house number on that street. Often, Nearby Explorer announces an address from each side of the cross street as you pass it. The first is the closest house number on the side of the street on which you are traveling. As you cross, the app announces the second number, which is the closest house number on the far side of the street.
As you turn onto another street, Nearby Explorer announces the name of that street as soon as it recognizes the new coordinates. This usually occurs within a few seconds of the turn.
The street number and name announcements are two of the best ways to obtain the most detailed information about your location. When combined with a Nearby Places address, which is also approximated, you can easily determine on which side of the street you are traveling and on which side the desired destination is located.
Note: Poor GPS reception can result in misinformation, such as addresses located on the wrong side of the street. If this happens, avoid setting any Favorites until you obtain a better signal.
Streets often have multiple names. Enabling this option lets Nearby Explorer announce the alternate name, along with the common name.
If you are not near a street, Nearby Explorer appends a distance and direction to the nearest address. For example, if you turn south into a parking lot at 100 Main Street and move away from the street, the program adds a message, such as "30 yards north" to the street name announcement. In this way, as you move south away from Main Street, the program announces the address as "Main Street 30 yards north." This additional information about the distance and direction is useful to determine the route back to the road network in a park, parking lot, or other open area.
Occasionally, even though you are on a street, the program may announce the street name as if you were away from the street. This usually occurs as the result of a poor satellite signal and ordinarily corrects itself unless atmospheric conditions are extremely poor.
If you do not want to know how far away from the street you are, open the Street Name item's Context menu and select Disable off Road Indication.
In many US cities, the city is divided into quadrants with a street separating the north quadrant from the south and a street separating the east quadrant from the west. Any street that is west of the east/west line often contains "W" in the name to indicate that it is west of the dividing line between east and west. Similarly, streets east of the east/west line often contain "E" in the name. The addresses begin at the east/west line and increase as they move away from it in either direction. Thus, if the east/west dividing line is Main Street, and Maple Street intersects Main, the addresses west of Main would start with 100 and increase as you move west. 400 W. Maple Street is west of 300 W. Maple Street. Similarly, the addresses east of Main increase as you move east, so 200 E. Maple Street is east of 100 E. Maple Street.
Often a block starts with an address such as 100 or 200 and increases to 99 before the next block begins, so addresses on a typical block range from numbers such as 100 to 199 or 200 to 299. Of course, if a street is particularly long, the street numbers might be a range of five digit numbers such as 26800 to 26899.
Even-numbered addresses are on one side of the street, and odd numbers are on the other side. Usually, 200 is straight across the street from 201. In many cities, the even-numbered addresses fall on the south and west sides of a street, and the odd-numbered addresses fall on the north and east sides. If this pattern does not match your area, there is usually a similar one on which you can rely.
Interstates and highways indicate their prevailing direction by their route number. All the even-numbered interstates and highways generally travel from east to west, and odd-numbered interstates and highways go from north to south.
Even numbered interstates (east/west) are numbered smallest to largest, starting in the south and increasing to 100 as you move north. For example, Interstate 10 is the southernmost interstate. It runs from Jacksonville to Los Angeles. I-20 is north of I-10 and runs from Kent, Texas to Florence, South Carolina.
Odd numbered interstates (north/south) are numbered lowest to highest starting from the west coast and increasing as you move east. I-5 is on the west coast, and I-95 is on the east coast.
When a city has an interstate that routes traffic circuitously around the heart of the city, the interstate is given a three-digit number in the 200, 400, or 600 range. It derives its number from the interstate that it branches from. In Dallas, for example, the LBJ Freeway is numbered I-635 because it loops around Dallas branching from I-35.
Interstates are marked with mile markers, one every mile. Mile markers on an interstate begin at the border of each new state. They start with zero at the southern border and increase as you move north for odd numbered or north/south interstates. They start with zero at the western border of the state increasing as you move east for the even numbered or east/west routes.
If an interstate does not start at the state's border, the mile markers begin numbering at the start of the interstate.
The exits on an interstate are indicated by the mile marker. Exit 5 is always located between mile marker 5 and 6. If there are two or more exits within a mile, their designation includes both the mile marker and a suffix letter. If there were three exits at marker 5, they would be labeled 5A, 5B, and 5C.
When you see exits in the map data, they are treated like streets, but the street name is the exit number. Therefore, it is not uncommon to have streets entering and exiting the interstate with names such as 8 or 8A.
Interstates are named with "I-" followed by the interstate number. I-40 E refers to the eastbound lanes of Interstate 40.
US highways are labeled with the prefix "US-" followed by the route number. US-67 refers to US Highway, Route 67.
State highways are named with the state abbreviation followed by the highway number as in IN-62 for Indiana Highway 62.
County roads are labeled with "County Road" or some abbreviation such as "CR" followed by the number of the road as in CR 1429.
The Approaching option on the Nearby screen lets Nearby Explorer describe the upcoming intersections as you approach.
The app describes the next intersection as soon as you pass the current one.
If the cross street only intersects on one side, Nearby Explorer announces either "Left Side" or "Right Side" after the name and before the distance.
If the street is a cross street, Nearby Explorer says the street name and "ahead."
In addition to announcing the side of the street, Nearby Explorer also estimates and provides the distance to that intersection. As you approach the street, the distance is updated to reflect your changing position.
The Guidance item on the Home screen displays the next maneuver to take (in the directions) when using Turn-by-turn Guidance. For example, it might say, "In 30 yards, turn left on Main Street."
For complete information, see Turn-by-turn Guidance.
The Nearby item on the Home screen indicates the closest POI to your current location. If you turn on the Nearby Position item, the app also announces the distance and direction to that POI and continually updates the information as you approach and then leave that location. These POIs include Nearby Places, Favorites, and Transit Stops in supported cities. If you are indoors at a supported venue, they also include room names and other features inside the building.
By default, Nearby Explorer shows the closest place and updates the distance and direction as you move. To show more or less places, use the Context menu and pick "Maximum Places Per Location" to set the number of places to report, from one to eight.
If you live in a city with a public transit feed that is supported by Nearby Explorer, one kind of Place the app reports is Transit Stop information. The report includes the time, direction, and route name of the next bus or train. These live transit reports are active only when moving less than 10 miles per hour.
To control which type of information Nearby Explorer reports, activate the Context menu for the Nearby item on the main screen. The Context menu includes three items: Nearby Places, Transit Stop Information, and Favorites. You may enable or disable any or all of these options.
Since Nearby Explorer knows both your current location and the location of places around you, it is possible to use the phone's compass and accelerometer to point at places and receive feedback about them. The feedback consists of a vibration, a tone, and an announcement with the name and distance of the place. Focusing your VO cursor on the Nearby item also interactively shows the distance and name on a connected refreshable braille display.
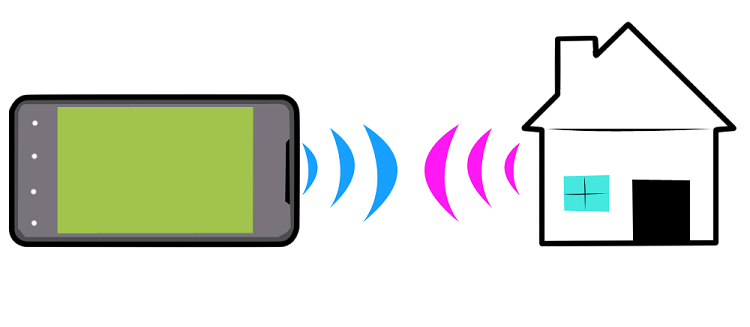
Figure 3. Nearby Explorer Geobeam
The vibration, in particular, makes pinpointing places both intuitive and easy. Think of this feedback as a beam (Geobeam) emitting from the end of the device, which you can use to point directly to places around you. As long as you maintain the direction, the vibration continues. You can use this vibration to help guide you to the point where the place is marked.
CAUTION:
There may be obstructions between you and the place to which you point. Nearby Explorer cannot know about certain environmental barriers that may exist between you and the point. You must use traditional mobility techniques to ensure the path is safe or to follow a safe path to the place.
In addition to the vibration, the tone conveys information about the distance between the object to which you point and your location. The higher the pitch, the closer you are to that point. The speech also announces the distance, but the tone can be used to quickly get an idea about which objects are closest as you scan the environment.
Before using Geobeam, ensure the Geobeam Button is turned on. When on, Nearby Explorer uses your phone's position and orientation to activate features. There are two ways to position your device to use Geobeam. For both positions, the "business end" is considered the top edge closest to where your ear would be while on a phone call.
To engage Geobeam in the first position, put the phone down on a table with the screen up. In field use, you will not have a table, but this is a convenient way to learn about the positioning.
Now, slowly spin it so the end points in different directions. When the end by the ear piece points to the closest place to you, Nearby Explorer beeps, vibrates, and announces the distance and name of the place.
If you spin the phone completely around in a circle and get no feedback, it means there is no place within the radius in use. Increase the radius by tapping the Increase Radius button or use a Watch or Destination.
If you have a destination or a Watch set, use the device in this position to find the destination or Watch point. When the end points to that place, Nearby Explorer responds.
The second position is the normal Geobeam operating orientation. To put the phone into this position, start with it in the first position on the table with the screen facing up, then gradually lift the right edge up until the screen faces left. The left edge of the phone rests on the table, in landscape orientation, and the face of the screen is perpendicular to the table surface.
As you move your phone into this position, Nearby Explorer makes a confirmation sound to notify you about the new operating characteristics. When you move it back out of Geobeam position, Nearby Explorer makes another sound to confirm. Try gradually lifting and lowering the right side to help gauge the triggering angles. This angle also applies to the other axis as you can confirm by lifting the pointer end from the table's surface.
When the phone is in Geobeam position, rotate the end so it points in different directions. This may be tricky to do without touching the screen, so you may wish to lock the screen while using Geobeam.
When the end of the device points to a place while in the Geobeam position, Nearby Explorer beeps, vibrates, and announces the name of the Place and its distance.
When using Geobeam, be sure to take notice of these characteristics:
If you don't want Nearby Explorer to provide feedback when you position the phone, turn Geobeam off with the Geobeam button on the toolbar.
If you don't want Geobeam and Compass mode to work while the screen is locked or the app is in the background, you can disable this in the Settings tab.
If you leave Geobeam on all the time, you must be conscious of your phone's position whenever the app is running. Some things to remember are as follows:
By default, for the Nearby Position, Nearby Explorer reports the direction to the nearest place as a position on a clock face, but you can change this behavior to receive direction as a compass direction. To do that, use the Context menu, and select the Disable Report as Clock Face option.
If you do not have a network connection, Nearby Explorer uses the POIs in the NAVTEQ maps (full version) or OpenStreetMap to identify nearby places. If you have a data connection, the app uses the Foursquare® service or Google Places™ business listings instead. These services can provide POIs in interesting and useful ways. See Description and Blind Description Fields in OpenStreetMap, for more information.
Google Places provides as many as 20 place results for each search request. Therefore, it can provide different, more general, or more meaningful results by changing the radius of the search. Google Places allows a radius of up to approximately 30 miles. Foursquare shows 50 place results at a time.
By default, Nearby Explorer uses a radius of 500 yards to help identify the nearest place. This radius usually provides adequate information about almost any small business, government facility, or other place in relative proximity. If you are located where there are few businesses or institutions, or if you reduce the radius too much, you may get no results.
There are a few ways to adjust the radius. The easiest way is to use the Radius buttons on the toolbar.
You may also select the Set Radius option from the Context menu of the Nearby Position item. Nearby Explorer responds with a menu from which you may select the desired radius.
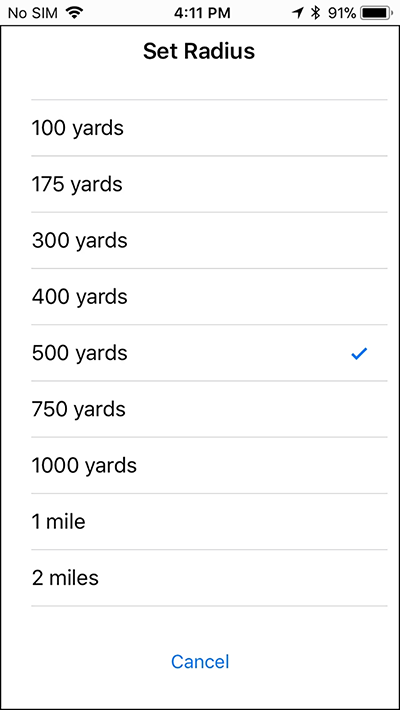
Figure 4. Nearby Explorer Set Radius
If you are traveling in a vehicle, you should not use a small radius, especially in a densely populated area. As you travel, increase the radius based on the environment and your personal preferences.
The Description and Blind Description fields display information from OpenStreetMap. While these descriptions are relatively rare at this time, they are used either to complement a POI or to give information about a point on the map that is not a POI. Note that you must have the search provider set to OpenStreetMap for these fields to be populated.
In addition to using beacons with maps, Nearby Explorer supports the use of beacons for ad hoc installations. Note that ad hoc beacon positioning is much less useful than fully mapped beacons, but they have the advantage of easy setup. To set up beacons this way, simply remove one from the box, stick it on the wall, then rename it to what you want.
To start using beacons without mapping, turn on the Ad Hoc Beacons button in Settings. Once that button is on, the app looks for beacons with default configurations. When it detects one, it assigns it a temporary name consisting of the next sequential number. Be aware, therefore, that if two people explore a venue configured this way, they may each get different numbers for the beacons.
When the app detects a beacon, it announces the name of the beacon and beeps to indicate the distance to the beacon. Unfortunately, this method of beacon placement provides no direction information, so all you can tell is if you get closer or further away from a beacon.
If you do not want beeps, use the Disable Proximity Beeps option from the Beacon context menu.
To rename a beacon, use the Rename option from the Beacon context menu.
Note that there is currently no way to share names, but that is a feature on which you can provide feedback.
The Watch function is used to monitor a particular point of interest. It is most effective as a reference and orientation tool. When you monitor a POI, Nearby Explorer always displays the distance and direction to the Watch point from your current position.
To set a place as a Watch, follow these steps:
Alternatively, select Set Location as Watch from any Context menu on the main screen.
If you have the Watch item turned on, the app monitors and announces the distance and direction to the place you are watching.
By default, Nearby Explorer reports the direction to the Watch point as a position on a clock face, but you can change this behavior to receive this as a compass direction. To do that, use the Context menu, and select the Disable Report as Clock Face option.
If you set the Watch point, the compass in your device can also be used to point to it. As you point at the watched position with your screen facing skyward, Nearby Explorer announces the name and distance and vibrates to let you know where that position is located. For example, you could set the location of your car in a large parking lot as a Watch point and be able to locate it later.
The Accuracy setting provides a number to be considered as a range for horizontal positioning. For instance, if the app shows "5 yards" the program is fairly confident that it knows your position within 5 yards. The smaller the number, the more accurate you should consider Nearby Explorer's information.
Vertical Accuracy is an indication of the reliability of the Altitude report.
In addition to the places in the on board maps and online place services, you can mark your own places. In Nearby Explorer, these are called Favorites.
Nearby Explorer treats favorites like Nearby Places. As you approach a Favorite, the app announces its name and location. If you do not want notifications about proximity to favorites, use the Disable Favorites button in the Nearby context menu. Similarly, if favorites are all you want to be notified about, use the Enable Favorites button and the Disable Nearby and Disable Transit buttons in the Nearby context menu.
You may also use Geobeam to point at favorites.
You use Favorites to mark an existing place more suitable to your needs or to mark a place that does not exist in the map data. You can also save existing places as Favorites for easier access. Marking the exact location of a barn or shed in a field is another good way to employ favorites.
To create a favorite, physically or virtually move to the place you want to mark, then select Save Location as Favorite from any Context menu on the main screen, or use the Add button on the Favorites screen.
The app responds by displaying a dialog box where you may type a new name or press the OK button to accept the automatically generated name. The automatically generated name consists of the nearest address.
It is useful to give favorite places meaningful names that more precisely describe the marked position. When marking the door to a restaurant, for example, use exact wording to distinguish that Favorite from the more general POI in the maps. "Side Door to Wendy's" distinguishes the entrance from the map data's more general "Wendy's" moniker.
The Favorites list organizes your Favorites by their distance from your current position, so the closest places are listed first. Each item in the list shows the name of the Favorite, its distance and direction from your current position, and its address.
To display a list of your Favorites, press the Favorites button at the bottom of the screen.

Figure 5. Nearby Explorer Favorites list
You may also search for favorites.
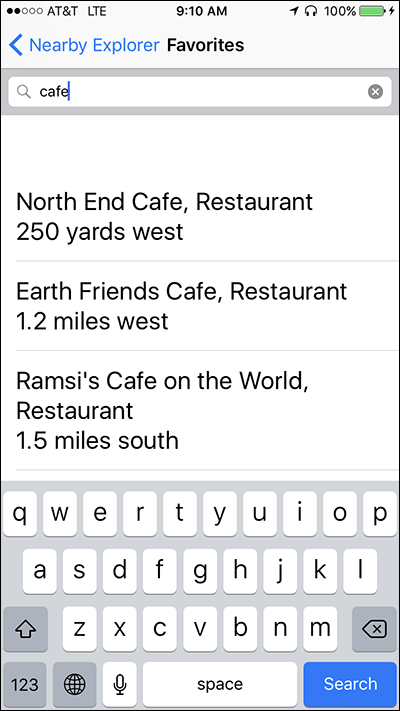
Figure 6. Nearby Explorer Favorites search
You have a variety of options on the Favorites Context menu. From this menu you can do the following actions to Favorite places:
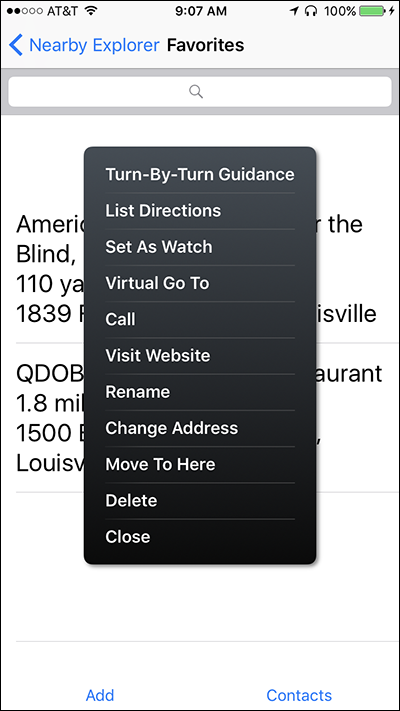
Figure 7. Nearby Explorer Favorites Context menu
To rename a Favorite, follow these steps:
To delete a Favorite, follow these steps:
To change the address of a favorite, select Change Address from the menu.
To update the location of a favorite, move to the new position, select the appropriate favorite item, then select Move to Here from the context menu.
If the favorite publishes a web site or a phone number, you may go to the web site of the favorite or call it by picking the appropriate option from the menu.
To work with more than one favorite at a time, use the Edit button at the top of the Favorites view. When in Edit mode, you may select one or more favorites. You may also use the Select All button to select all favorites. Once you have made your selection, you may share or delete the selected favorites.
To share the selected favorites, use the Share button at the bottom of the screen. The standard iOS sharing dialog appears, allowing you to select any app that can accept a file. If you wish to back up your favorites, you can use the Files app to store the favorites in iCloud. You can also send your favorites to another person with AirDrop, send them as a text or mail message, or copy them between the Full and Online versions of the app.
After using the selection procedure above, you may use the Delete button at the bottom of the screen to delete multiple favorites at once.
To use one of your contacts, select the Contacts button at the bottom of the Favorites screen. Nearby Explorer responds with a list of contacts and the associated addresses. The context menu for each contact offers choices for turn-by-turn guidance, listing directions, saving to favorites, setting as the Watch, or virtually moving to the address of the contact.
Cautionary Note: Remember that when you use any of the menu options to change OpenStreetMap, the changes are worldwide and public. If you only want to save a place for yourself, add it to Favorites. Those places stay on your device until you elect to share them.
To add a point that is not yet in the map, follow these steps:
Move to the location where you want to mark the point. If it is an establishment you are adding, try to get as close to the front door as possible. Sighted users usually match points with satellite imagery, so they can generally get the point pretty close to the intended location. As a blind user, you use the location based on the GPS signal accuracy, so your points may not be quite as accurate as sighted users’. Nearby Explorer adds a “fix me” notation to the map, so if a sighted user sees the point you marked that may be a few feet from the intended location, they can edit the position.
Save your current position as a Favorite. When you save your position as a Favorite, Nearby Explorer prompts you to provide the location a name.
Go to the Favorites and locate the item you just saved and activate it. You don’t have to be at the favorite when you activate it. You only need to be at the location when you create the Favorite.
Once you activate the favorite, select Save to OpenStreetMap from the menu that appears. Nearby Explorer opens the Save activity.
If you have not logged into OpenStreetMap, Nearby Explorer prompts you for your OSM user ID and password. If you have not yet created a user name and password, there is a link you can activate to create one. Nearby Explorer remembers your account information, so you only need to log in once.
Once you log in, Nearby Explorer shows an activity with information to describe the attributes of the point you are creating. It asks for a category, address, phone number, website, description, and blind description. Fill out as much of this information as accurately as possible. In addition, if the location is an indoor place and you have accurate indoor positioning, you can check the Indoor indicator. You should also indicate on which level of the building the place is located.
Note: The main entrance level of the building is always 0, rather than 1 - this is an OSM data entry standard.
Many times, an establishment changes hands through the life of the building. When using OpenStreetMap as your search provider, if you visit a location, and you notice the map reports the name of an establishment than was once there but is no longer, you can usually use the existing location and correct the data associated with it. You can also use this position to add more details about a POI, such as phone number, URL, or descriptive information.
To edit the information associated with an existing point, follow these steps:
Sometimes, you may find places marked in OSM that are clearly not intended to be in a public map. Often, such places get added by novice users. While you have the ability to remove these places from the map, please use caution. When you remove an item, it removes it for everybody, not just you. You should only delete items that you know no longer exist.
To remove a place from the map, follow these steps:
Public transportation information rounds out any complete app's feature set for navigation. Nearby Explorer provides two levels of integration into public transportation systems in the following ways:
Which one you use depends on where you are and what you want to do.
The native Nearby Explorer transit interface is dynamic and easy to use, but it only works in about 100 North American cities, and it cannot create routes.
Moovit is an excellent, accessible app for finding public transportation all over the world, and it creates routes, shows schedules, and locates stops.
To use Nearby Explorer's Transit feature in a supported metropolitan area, press the Transit button at the bottom of the screen. To launch Moovit directly, hold the Transit button or activate the button in unsupported areas. If Nearby Explorer launches Moovit, and Moovit is not yet installed, Nearby Explorer opens the App Store Information Page for the app and lets you confirm the privacy policy, terms of use, and install the app. Once the app is installed and you launch it from Nearby Explorer's Transit Button, it shows the transit stops nearest your current location. For more information about using Moovit, see the Moovit web site or in the app itself. Also, see information about how to get public transportation routes in the Search Results screen.
If you haven't used the Transit feature in the current city, Nearby Explorer downloads the transit map for that area.
Nearby Explorer automatically updates transit feeds when possible. You may still use expired feeds, but be aware they may no longer be accurate.
Nearby Explorer's Transit Stops screen displays a list of nearby stops, with the closest stop listed first. To see more nearby stops, press the More Stops button at the bottom of the screen.
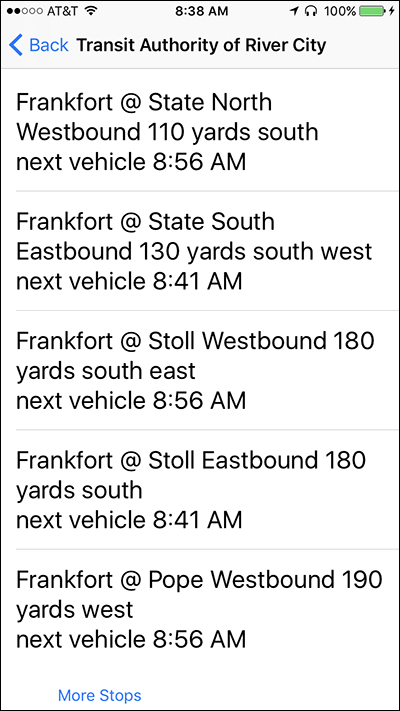
Figure 8. Nearby Explorer Transit Stops screen
Each list item on the Stops screen contains the following information:
To see a list of all the routes that service a particular stop, select one of the stops.
The Route screen includes buttons for the previous and next day in addition to a list of routes.
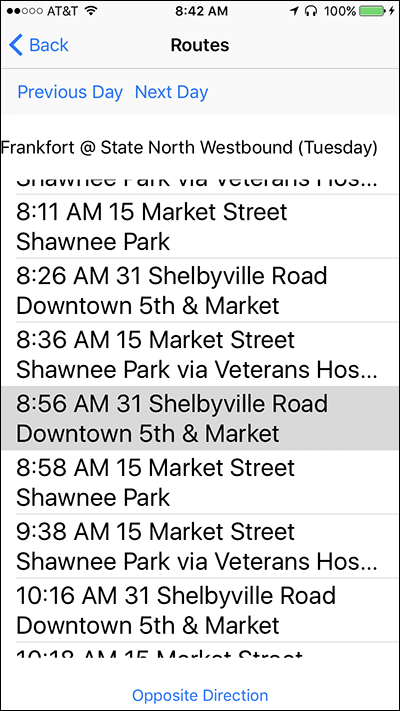
Figure 9. Nearby Explorer Routes screen
Each item in the list includes the following:
To see a schedule of all times for the current stop on a route, select the route of interest. Nearby Explorer responds with a schedule screen that shows all the times for the day.
To follow the vehicle's route, select the time of interest. Nearby Explorer responds with the All Stops screen, which shows every stop on the route along with the time the stop is reached.
To identify buses/trains at other stops, press Back to get to the Nearby Stops screen and select another stop.
If there are multiple transit systems in your area, Nearby Explorer shows an Alternate Transit System button at the bottom of the Transit view. Press this button to rotate through the available transit systems.
Nearby Explorer uses an automated system to keep its transit information up-to-date. If an update is available, Nearby Explorer downloads the schedule the next time you start Nearby Explorer. If you do not want to automatically update transit feeds, see the Transit Feed Manager in Settings.
If your local area does not support the General Transit Feed Specification (GTFS), see the GTFS Static Overview page and consider asking your transit agency to make a GTFS feed publically available to developers.
| St./Dist./Prov. | City/Co. | Transit Line |
|---|---|---|
| AL | Birmingham | |
| AZ | Phoenix | |
| AZ | Tucson | SunTran |
| BC | Nanaimo | BC Transit - RDN Transit System |
| BC | Vancouver | |
| BC | Victoria | BC Transit |
| CA | Bakersfield | |
| CA | Beaumont | |
| CA | Eastern Sierra | |
| CA | Los Angeles | |
| CA | Orange County | |
| CA | Riverside | RTA |
| CA | Sacramento | |
| CA | San Diego | |
| CA | San Francisco | BART |
| CA | San Francisco | SFMTA |
| CA | San Jose | |
| CA | Santa Rosa | CityBus |
| CO | Colorado Springs | |
| CO | Denver | |
| CT | Hartford | Connecticut Transit |
| CT | Meriden | Connecticut Transit |
| CT | New Britain | Connecticut Transit |
| CT | New Haven | Connecticut Transit |
| CT | Shore Line East | Connecticut Transit |
| CT | Stamford | Connecticut Transit |
| CT | Waterbury | Connecticut Transit |
| DE | DART | |
| DC | Washington | |
| FL | Brevard County | SCAT |
| FL | Fort Lauderdale | |
| FL | Jacksonville | |
| FL | Miami | |
| FL | Orlando | |
| FL | Tallahassee | StarMetro |
| FL | Tampa | HART |
| FL | Volusia County | Votran |
| GA | Atlanta | |
| IL | Chicago | |
| IN | Indianapolis | |
| IA | Des Moines | DART |
| KY | Lexington | |
| KY | Louisville | |
| MD | Baltimore | |
| MA | Boston | WRTA |
| MA | Worcester | WRTA |
| MI | Ann Arbor | |
| MI | Detroit | |
| MI | Grand Rapids | The Rapid |
| MI | Lansing | CATA |
| MN | Duluth | DTA |
| MN | Minneapolis | |
| MO | Kansas City | |
| MO | St. Louis | |
| NV | Las Vegas | |
| NJ | NJ Transit Bus, NJ Transit Rail | |
| NY | Albany | CDTA |
| NM | Albuquerque | |
| NM | Buffalo | |
| NY | New York | Manhattan MTA, Brooklyn MTA |
| NC | Cary | GoCary |
| NC | Charlotte | CATS |
| NC | Durham | GoDurham |
| NC | Greensboro | PART |
| NC | Raleigh | GoRaleigh, NCSU Wolfline |
| NC | Research Triangle | GoTriangle |
| NS | Halifax | |
| OH | Cincinnati | |
| OH | Cleveland | |
| OH | Columbus | |
| OH | Lakeshore County | Laketran |
| OH | Cincinnati | |
| OK | Oklahoma City | |
| ON | Hamilton | HSR |
| ON | Kingston | Kingston Transit |
| ON | Ottawa | |
| ON | Toronto | TTC |
| ON | York, Toronto | York Region Transit |
| OR | Eugene | |
| OR | Portland | |
| OR | Salem | |
| PA | Philadelphia | |
| PA | Pittsburgh | Port Authority |
| QC | Montreal | |
| RI | Providence | RIPTA |
| TN | Nashville | MTA |
| TX | Austin | |
| TX | Corpus Christi | |
| TX | Dallas | |
| TX | Fort Worth | |
| TX | Houston | |
| TX | San Antonio | |
| UT | Salt Lake City | UTA |
| VA | Fairfax | Fairfax Connector |
| VA | Hampton | HRT |
| WA | Everett | Everett Transit |
| WA | Olympia | Intercity Transit |
| WA | Pierce County | Pierce Transit |
| WA | Seattle | King County Metro, Sound Transit |
| WI | Madison | |
| WI | Milwaukee |
Nearby Explorer assists you with finding businesses, institutions, addresses, and places that relate to a specific topic.
Once you find a place of business, you can do one of several things, depending upon the information available for that location. These things include receiving directions or guidance, adding it to your Favorites, or traveling to it virtually on the map.
There are Search Provider radio buttons at the bottom of the screen that let you select among Google Places, Foursquare, OpenStreetMap, and onboard NAVTEQ maps (full version). The Search screen always inherits the provider and radius settings from the Home screen. To change the default search provider, see Search Provider in the Settings Tab.
Nearby Explorer can search within approximately a 30-mile radius of your actual or virtual position. To initiate a search with another location than your own, first search for a city and state, and then search for the place of interest.
To open the Search screen, press the Search button. Nearby Explorer responds with a screen that lets you type a term and shows a list of nearby places.
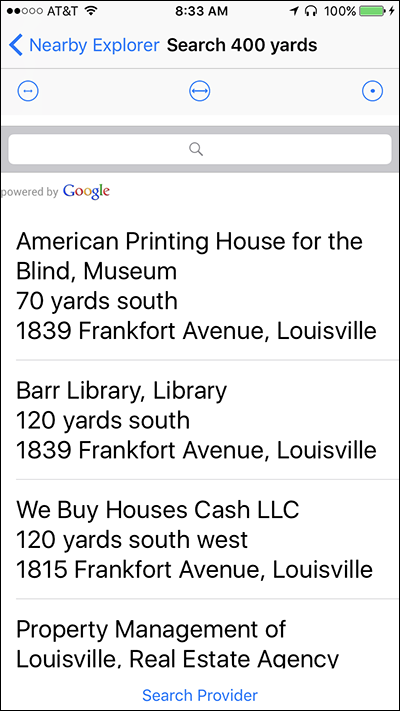
Figure 10. Nearby Explorer default Search screen, with a list of nearby places
To search for places in another city or state, you must switch to that city first. To do this, follow these steps:
Nearby Explorer responds by displaying a list of matching cities and the county in which that city is located. Each item in the list also indicates that city's distance and direction from your current location. Choose the city of interest.
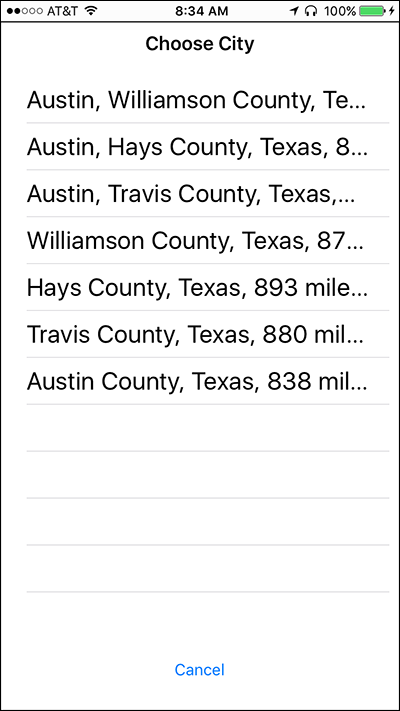
Figure 11. Nearby Explorer Choose City screen, with a list of matching cities
The app responds with a menu containing Search From Here and Virtual Go To.
To move the virtual position to that city and close the Search screen, choose Virtual Go To.
To display search results from that city, choose Search From Here.
The types of items that appear in the Search screen list depend on your network connection, the search radius setting, your location, or any terms you have typed. These POIs are arranged so the closest one appears at the top of the list. Each list item shows the name of the place, its category, and its distance and direction from your current or virtual position.
To show places related to a term you type, follow these steps:
Nearby Explorer automatically increases the search radius to approximately 30 miles when you provide a specific term to find. You may change the radius to narrow the distance to search. Nearby Explorer discards any changes to the radius or search provider when you close the Search view.
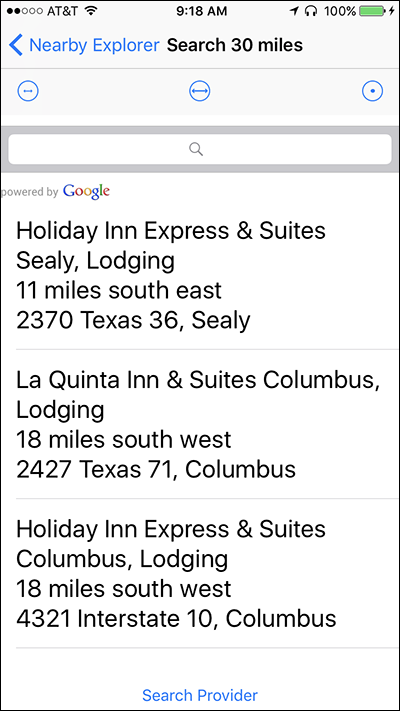
Figure 12. Nearby Explorer search results for Texas
You may search for addresses in any location by entering the street number as the first portion of the search term. For example, 1839 Frankfort Ave, Louisville shows APH from wherever you search.
When you select one of the search results, Nearby Explorer displays a menu of actions from which to choose. The menu includes the following:
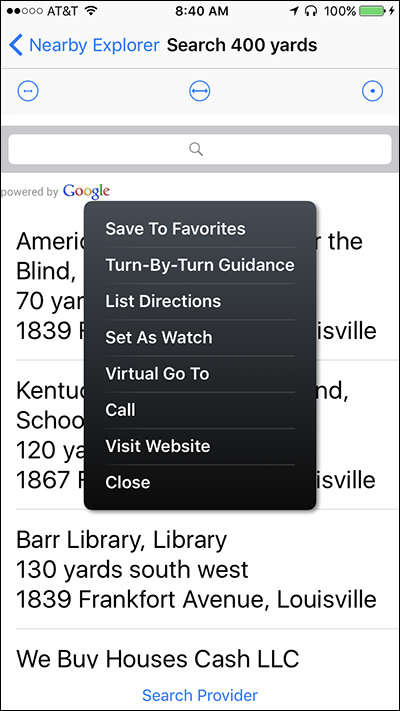
Figure 13. Nearby Explorer Context Menu for Search
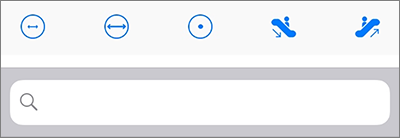
Figure 14. Nearby Explorer Search toolbar
The Streets screen shows all the intersections on the current street, and a Virtual Go To button. Each intersection in the list shows the name of the intersecting street, the distance and direction to that intersection, and in which direction the street runs.
To show the Streets screen, press the Streets button at the bottom of the screen of the full version.
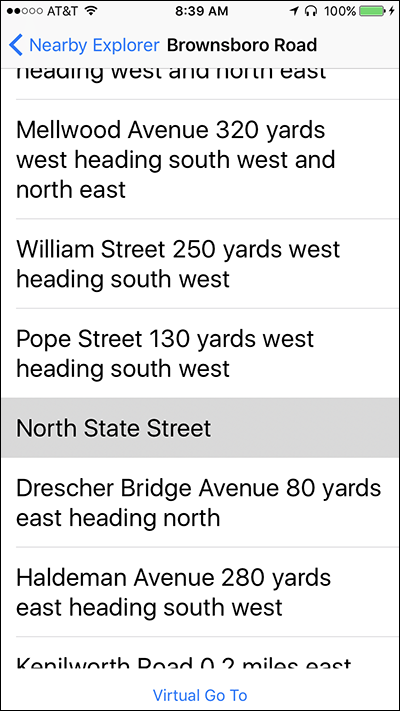
Figure 15. Nearby Explorer Streets screen
If you were on Maple Street between 1st and 2nd Streets and opened the Streets view, you might see a list like the following:
Nearby Explorer highlights the closest intersection to your current location. When you open this view, the cursor will be on the 2nd Street or 3rd Street item depending on which is closest.
To turn onto one of the streets listed, select the street. Nearby Explorer displays a new list with all the intersections on the new street. Of course, one of those intersections is the street you were on when you Selected it, so the list might look like the following:
Since the intersection of 2nd and Maple is closest, Nearby Explorer highlights the street "Maple" in the list.
To move to an intersection, press the Virtual Go To button to return to the Nearby screen with your location set to the selected intersection. Use the Back button to return to the Nearby screen without choosing an intersection.
To set a place as a Destination and receive turn-by-turn guidance, follow these steps:
When you set a destination for turn-by-turn guidance, Nearby Explorer announces the route type (pedestrian or vehicle), and tries to determine the side of the street on which the destination lies. If the app is reasonably sure it can determine the side of the street, it also lets you know that.
Each time you set a destination, Nearby Explorer adds it to the list of recent destinations. The program remembers the last 20 places to which you requested guidance, so if you need to use one of those destinations again, it is easy to access.
When using the guidance function, keep in mind that streets are marked at their center line. Therefore, when Nearby Explorer says, "Turn left on Maple in 40 yards," you need to take into consideration the width of the street.
Route settings customize the kinds of routes and directions Nearby Explorer generates. In the iOS full version of Nearby Explorer, there are two routing engines: NAVTEQ and Valhalla. To select the routing engine, go to Route Settings in the app. NAVTEQ is the default setting. In the Online version of Nearby Explorer, Valhalla is the only routing engine and is on by default.
To change how Nearby Explorer calculates the route, select Route Settings from the Settings menu or from the Guidance Context menu if a route is active.
The route settings include route optimizations for pedestrian VS vehicle, fastest time, shortest distance, or least turns (main roads) and switches to let you include or exclude highways, unpaved roads, toll roads, and ferries in the route calculations.
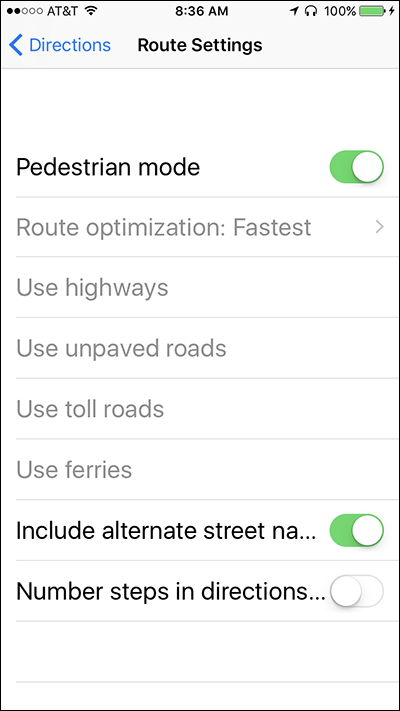
Figure 16. Nearby Explorer Route Settings screen
To receive a list of directions, select a search result or favorite. From the next menu, choose List Directions. Nearby Explorer displays a list of directions. At the top of the list, Nearby Explorer shows the distance and time to the destination. Each item in the list shows the direction and distance to the next maneuver in the route.
For real-time turn-by-turn guidance while you travel to the place, choose Turn-by-turn Guidance from the menu. The app responds by adding the first step of the directions in the Guidance field of the Home screen. It also updates the Guidance field, so the next maneuver is announced as you move. The information in the Guidance field always contains the current distance and direction to the next maneuver.
To switch to or from Pedestrian mode while using the Guidance feature, follow these steps:
If there are other route settings to change, adjust them here as well. Nearby Explorer automatically recalculates the route based on the new settings.
Once you start moving faster than 10 miles per hour, Nearby Explorer automatically switches to driving mode for route settings.
To display a list of remaining directions to the destination while using the Turn-by-turn Guidance feature, follow these steps:
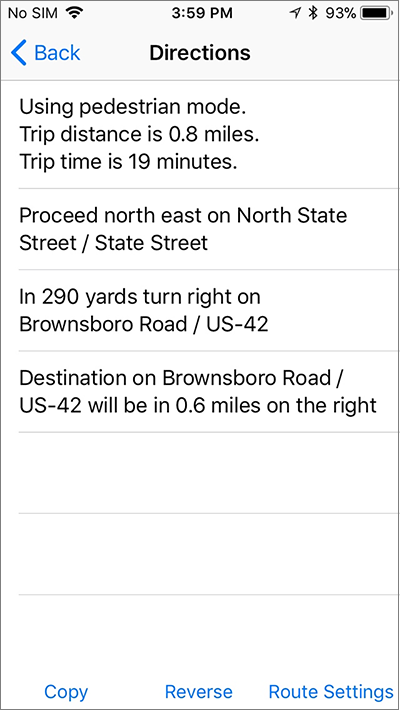
Figure 17. Nearby Explorer Directions screen
When you set a destination, Nearby Explorer lets you point to it to get audio and haptic feedback about that point. Hold the phone with the screen face up and use the end to point. When you point at the destination, Nearby Explorer vibrates and announces the name and distance to the point. If you allowed Nearby Explorer to use Geobeam and Compass when the app is in the background, you may use this feature even when the screen is locked.
While Nearby Explorer keeps track of your location as you move, it can also provide information about other places while you remain stationary or move about virtually.
The program provides several methods for map exploration, such as using the Virtual Go To option from the result of the Streets, Search, or Favorites views.
You can also use the touch screen of your device to explore the map. To learn more about map exploration using a touch screen, see Map View.
To virtually shift to another city or state, see Search.
Nearby Explorer lets you navigate virtually. Select Enable Virtual Navigation from any Context menu on the Home screen or from search results and favorites.
When Virtual Navigation is enabled, Nearby Explorer stops using the GPS receiver and lets you tell it where you want to be. This proves useful for exploring an area to familiarize yourself with it before you travel to it.
Nearby Explorer shows buttons to move in any cardinal direction. Each button click moves 20 yards. Hold the button for faster moves.
In addition to moving virtually, you may use Geobeam and Compass to explore the vascinity of your virtual location by positioning the device as described for each of these modes.
Navigation mode moves in the exact direction you request by default. However, this can be a problem if you wish to follow a road that does not run exactly north/south or east/west. The Follow Roads (full version) switch on the Navigation screen makes Nearby Explorer follow the road instead of moving in the precise direction you indicate. This usually works well, but it can sometimes cause Nearby Explorer to assume the incorrect street when navigating through an intersection. Moving in a different direction often helps you get back on the correct street in this situation. This option is only available when you are using NAVTEQ as the address provider in the full version.
When using virtual navigation, it may be necessary to adjust the announcement settings to obtain better feedback about your position as you virtually move. Turning on the Street Number option can be a good orientation aid for small moves.
Setting the Watch to your original position can help maintain orientation as you move away from your origin.
When virtually navigating to a venue that supports indoor maps, Nearby Explorer works just like it does outdoors, except you have the additional option of selecting the level of the building.
Level numbers begin with 0 on the ground floor and -1 as the first floor below that. 1 is the first floor above the ground floor.
Selecting "None" from the Level picker indicates you wish to explore outdoors.
In addition to the direction buttons on the Home screen, you can scroll the map in the Map View to increase distance and direction possibilities.
To exit Navigation mode, press Resume on the toolbar or disable Virtual Navigation from any Context menu.
Nearby Explorer provides indoor orientation in supported venues. When you move into a venue with configured beacons and maps, the app indicates the indoor status by changing the app's title to "Indoor Explorer" and announcing "Indoor Mode" and the level number of the building in which you are traveling and announces the name and position (if desired) of the nearest point of interest on that level. It also makes the Level button active, so you may virtually investigate other floors in the building.
There are two ways to use beacons. This section discusses the mapped method which provides several advantages but is more difficult to install. For a simpler method that can be deployed on an ad hoc basis, see the sections on Beacon and Ad Hoc Beacon Manager.
When using indoor locations, the app switches the Search Provider to OpenStreetMap. Nearby Explorer automatically downloads the map for the state where you are located when you start the app for the first time.
If you do not want to download OpenStreetMap data for your state when you start the app, turn off the Allow Indoor Support in the Settings Tab.
If you wish to use map data from another state, you must either download the map data manually by selecting the state in the OpenStreetMap Manager button on the Settings Tab or set OpenStreetMap as the address provider in Settings. If OpenStreetMap is the address provider, Nearby Explorer automatically downloads the maps as you virtually navigate to other states. To prevent automatic map downloads, turn off the Allow Indoor Mode option in Settings.
When you position the phone for Compass Mode operation, Nearby Explorer announces the direction and points of interest, from nearest to furthest, in the direction you point when indoors.
Getting information about all the possibilities in a given direction can provide good overview and orientation clues without having to specifically point at anything.
Geobeam restricts points of interest, favorites, and search results to the floor on which you are located. Point the end of the phone to determine building features and their distance.
To virtually move to other floors, use the Level button in the Home screen or in the Search page. Note that the app must be paused for the Level button to be available when in the Home screen.
When you use the Search function, Nearby Explorer shows results from the current level of the building. The Level button at the top lets you select other levels to search or lets you select "None" for an outdoor search.
To show search results, favorites, and points of interest from outside the building, select the Level button and choos "None."
Along with the Home screen, where you fine tune what the app says as you move, Nearby Explorer offers a view of the map. The Map view shows an interactive, accessible map of your current or virtual position.
To use the map, select the Map tab at the bottom of the screen. Nearby Explorer fills the screen with the standard Apple Map view with integration into Nearby Explorer's interface.
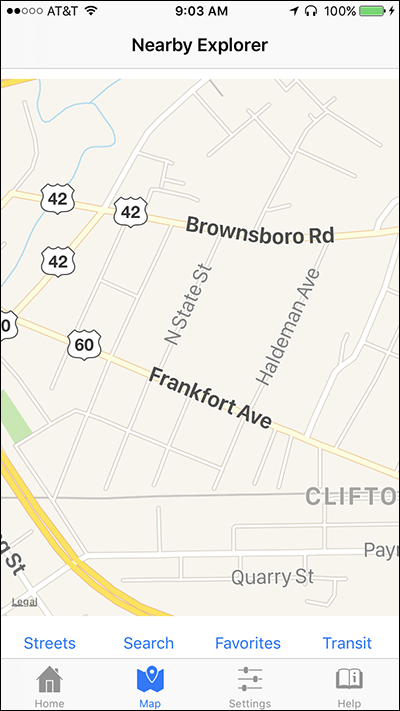
Figure 18. Nearby Explorer Map View
You may wish to make adjustments in what gets announced as you scroll through the map. If so, change the settings, then return to the Map View.
If you scrolled the map, Nearby Explorer pauses the GPS reception. To return to a live GPS position, activate the Resume button at the top of the screen.
Use your finger to touch or slide on any part of the screen to receive feedback about that part of the map.
North is at the top of the screen, south is at the bottom, and east and west are right and left, respectively.
As you touch the screen, VoiceOver gives feedback in the form of tones and verbal announcements. When you touch a street and pause there on the map with VoiceOver Hints enabled, you begin getting beeping feedback as you slide your finger to follow that street. Whether or not you enable VoiceOver Hints, pausing while touching a street makes VoiceOver begin beeping at different tones. This lets you know when you drift away from the street, and it provides verbal announcements as you approach intersections while you slide.
In addition to street name and direction information, VoiceOver announces POIs. The amount of detail depends on how closely the map is zoomed.
If the map does not cover enough space, or you want to move the center of the map, use the scroll and zoom features to adjust the view.
To scroll the map, use the technique where you double tap then hold and slide. The usual three-finger scrolling technique required when you are running VoiceOver does not work.
When you scroll, Nearby Explorer virtually moves to the point at the center of the map and applies the announcements you set in the Home screen. It also pauses the GPS, so to resume tracking your position, activate the Resume button at the top of the Home screen when you finish using the map or other tools where you virtually explore.
The amount you scroll depends on how far you drag your finger and the zoom level.
To zoom, use the Rotor to get to the Zoom control, then flick up or down. Zoom is not in the default Rotor configuration, so you must add it in the Settings / General / Accessibility / VoiceOver / Rotor setting. You only need to add it once.
Once you add Zoom, you may flick up and down to change the amount of information to show on the map. VoiceOver responds with each adjustment by announcing the number of roads visible in the new view. The closer you zoom, the more information about roads and POIs you get.
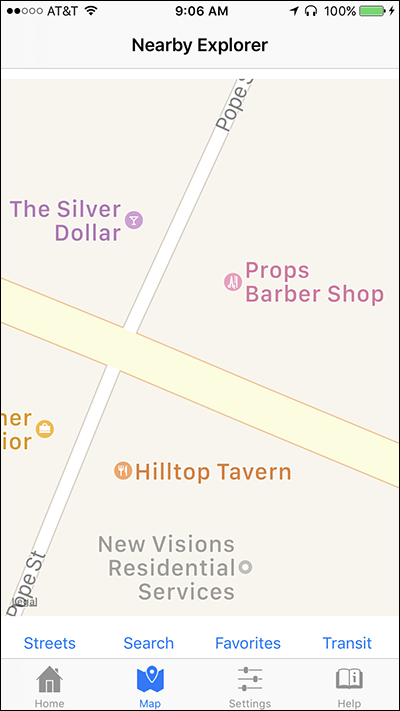
Figure 19. Nearby Explorer zoomed-in Map View
As you broaden the view, you see only more prominent roads and POIs.

Figure 20. Nearby Explorer zoomed-out Map View
When focused on the Map view, VoiceOver adds Points of Interest to the choices available in the Rotor. To see all the POIs, select Points of Interest in the Rotor, then flick through the names of each of them that appear in the view.
You may use Geobeam and Compass to examine the surrounding virtual area, just as if you were there. These tools can help orient you to unfamiliar places before you travel to them.
The Map View can be an instructive and effective tool for virtual navigation. Judiciously setting options in the Home screen can make the experience more understandable.
Using the Watch is one of the most effective ways to help maintain orientation, especially when scrolling by large distances. Set the Watch to your house or some familiar landmark to help with your perspective as you move. This way, if you scroll into areas where there are no places on the map, the Watch provides feedback about the distance from your origin.
As with any form of virtual navigation, it may be useful to increase the radius for Nearby Places, so you get feedback even from several miles away.
Turn on Nearby Position to add additional information about your virtual position and its relative position from places near you.
Nearby Explorer offers three Siri voice commands (or shortcuts):
Note: The Siri shortcuts are only available on iOS 12 or later.
When you install Nearby Explorer for the first time, the app asks for permission to activate Siri. To manage Siri shortcuts go to Settings in the app and select Siri Shortcuts.
From the Siri shortcuts screen, you can activate or deactivate individual voice commands by selected the button to the right of the command. On the next screen select Add to Siri. Activated shortcuts are indicated by a check mark and and the words "Added to Siri."
To deactivate, select the activated button to the right of the command, and select "delete shortcut" twice when prompted.
The Settings menu shows options that let you change how Nearby Explorer behaves.
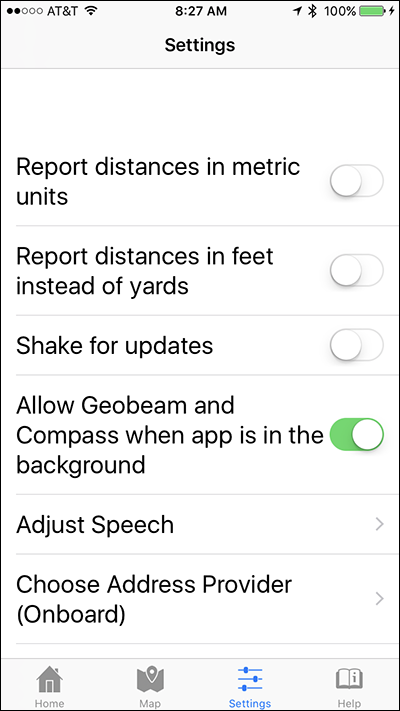
Figure 21. Nearby Explorer Settings menu
When you turn on this setting, Nearby Explorer uses metric measurements for distance reports. When the setting is off, it uses imperial units of measurement.
If using imperial measurement units, Nearby Explorer can express distances in feet rather than yards. Turn this setting on to receive distance announcements in feet.
This option is not available if the Report Distances in Metric Units setting is on.
Normally, Nearby Explorer rounds reports for items in the far distance. It might, for example, say Library in 100 yards when the library might actually be 103 yards away. It rounds distant objects assuming that at 100 yards, three yards does not really matter. As you get closer, Nearby Explorer starts reporting at the yard level, but if you want all distance reports to be exact, turn this setting off.
When this option is on, you may shake your device to repeat the last information spoken in the Home screen. The information given is not just repeated, but is updated and made accurate as of the time of the shake. You may also shake the device to hear the progress of a map download.
Shake to Repeat works even if the screen is locked or the app is in the background.
When this option is on and a destination is chosen, the Watch is automatically set to the destination.
Normally, Geobeam, Compass, and Shake To Repeat work any time Nearby Explorer is running. If you want them to work only while Nearby Explorer is in the foreground, turn off this option.
The maps contain many abbreviations that make listening difficult. Such abbreviations might include things like CTR for center, PKY for parkway, TWN for township, etc. Nearby Explorer normally expands these abbreviations, so they are easier to listen to.
If you are using a braille display, you may wish to turn these abbreviation expansions off.
To change the voice, pitch, speech and volume of the speech Nearby Explorer uses, select Adjust Speech from the Settings tab. The Adjust Speech screen shows sliders to adjust any of the speech parameters and a button to return the speech to the default settings. There is also a button to test the speech selections. Select the Back button when complete.
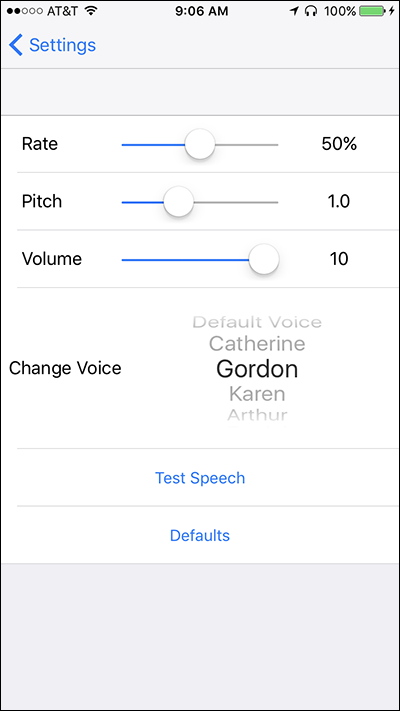
Figure 22. Nearby Explorer Speech settings in the Settings menu
Normally, Nearby Explorer uses NAVTEQ onboard maps to provide addresses. You may select among Apple, Google, OpenStreetMap, or NAVTEQ maps to provide this information.
Normally, Nearby Explorer uses Foursquare to provide results for searches and Nearby Places. Use this button to select among Google Places, Foursquare, OpenStreetMap, or NAVTEQ maps.
When using Guidance or listing directions, the route settings let you customize the way Nearby Explorer delivers instructions.
Normally, Nearby Explorer assumes you are walking and provides instructions optimized for walking. These instructions keep you off highways but let you, for instance, walk the wrong way on a one-way street.
When Pedestrian mode is on, the route generation process uses the shortest route without highways, and does not consider street direction.
If you are in a vehicle traveling more than 10 miles per hour, Nearby Explorer switches to driving mode and recalculates the rout based on the other settings available in driving mode as described next.
The Route Optimization settings button opens a dialog that lets you control things like shortest distance, fastest, and simplest route.
When using Driving mode, Nearby Explorer uses highways by default; however, you may instruct it not to use them by turning off this button.
If you wish to use only paved roads, turn this button off.
If you wish to avoid tolls, turn off this button.
To avoid using ferries, turn off this button.
When the Alternate Street Names option is enabled, Nearby Explorer provides additional names to which the street may be referred.
When Nearby Explorer shows a list of directions, you can prepend a number to each item in the list by turning on this switch.
The Transit Feed Manager button lets you manage how Nearby Explorer works with transit feeds. When you activate the button, Nearby Explorer shows a screen with all the feeds you have downloaded. It lets you delete feeds, update feeds, or turn off automatic updates.
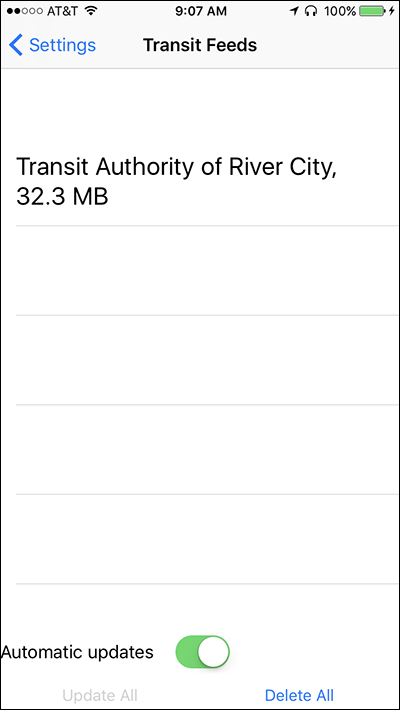
Figure 23. Nearby Explorer Transit Feeds screen
To delete a feed, highlight the feed of interest, and select Delete from the menu. You may delete all the feeds with the Delete All button.
By default, Nearby Explorer automatically updates all feeds you have downloaded when you start the app. While updates to feeds usually occur around once a quarter, you may wish to turn off this feature if you are concerned about unexpected data usage.
Nearby Explorer provides onboard NAVTEQ maps for the United States and Canada. You may use this option to select between the following NAVTEQ maps:
Using just the map for a single country can substantially cut down on required storage space.
By default, Nearby Explorer scans for beacons if it determines you are within 100 yards of a venue with installed and mapped beacons. If you move into another state, the app downloads the map for that state. If you do not want to use indoor beacon detection, download maps automatically, or you wish to use GPS in those buildings that provide good GPS coverage, turn this control off.
The OpenStreetMap Manager lets you select regions to download and lets you determine how often the app should update each region.
When you open the OpenStreetMap Manager, Nearby Explorer shows a list of regions you may select. At the end of the list, Select All, Deselect All, and Options buttons provide additional convenient ways to act on all the regions at once.
In the list, select the regions to download. Use the Options button at the bottom of the screen to set the frequency for updates or other functions for all selected regions. To adjust or uninstall a single region, use the context menu for that region.
In most instances, you won’t want to update a region every day. You only do that if you are working in an area that is receiving initial indoor support. Once the support for that venue is complete, you probably want to change the update schedule to something much less frequent.
The options for each region include:
• * Install (no updating)
• * Uninstall
• * Install When Needed
• * Update Every Day
• * Update Every 15 Days
• * Update Every 30 Days
• * Update Every 6 Months
• * Update Now
Once you make adjustments to the areas to download and how often to update the maps, Nearby Explorer takes action on the selections you made when you exit this screen.
If you configure a building or venue with indoor beacons, the Beacon Report is a tool that can help ensure you have configured everything correctly. If you wish to use this feature, you will need to first turn it on so it will gather data about beacons it detects. Once you turn it on, it will remain on even when restarting the app.
Once you configure and place beacons, use the Beacon Report to check your work. The app continuously gathers beacon information, and you must open the report to see the results. Move throughout the venue, so the app can see every beacon.
To open the beacon report, select the Beacon Report button. If there are undetected beacons, among other things, the report notes them, and you can then close the report window and move to areas where undetected beacons exist.
The beacon report contains three areas:
This is a list of beacons with possibly misconfigured UUID or major/minor values. Use OpenLevelUp to examine the values for any typing errors.
This is a list of beacons the app detects but does not see in OpenStreetMap. Ensure you use the OpenLevelUp tools to add these beacons to your map.
This is a list of beacons in OpenStreetMap that the app has not seen. To clear this list, move to each beacon in the venue. When you have moved to all the beacons, this shows a list of beacons that may have been removed or no longer exist for some reason.
Each item in the list includes the level number, the beacon name, and its distance and direction from your currently detected position.
Use the copy button to place the beacon report onto the clipboard, so you can email it for a more perminant record.
Use the Clear button to clear the beacon report and start over. This button is especially helpful when testing beacons in different venues.
Enable Ad Hoc beacons through the Ad Hoc Beacon Manager. This setting consumes a lot of power, so it is not recommended to leave Ad Hoc beacons enabled all the time. Mapped beacons, on the other hand, only come on when the app knows there are beacons on the map.
Enable proximity beeps by turning on the Enable Proximity Beeps button. The beeps get higher in pitch as you approach the closest beacon and lower in pitch as you move further away from the beacon.
Select the Forget All Beacon Names button to clear the names of renamed beacons or even any fitted with automatic names.
The About button shows the version number and copyright information.
If you make or receive a phone call while Nearby Explorer is working, the program mutes the announcements until the phone call is complete.
Nearby Explorer plays "nicely" with other audio playback, so you may listen to audio content or watch a movie while Nearby Explorer makes its announcements.
When using Nearby Explorer with VoiceOver, be aware that VoiceOver includes a feature that announces changes to a field when the field changes. So, if you prefer, you can use the VoiceOver focus position to announce changes as you move.
Note: The screen must be On for this feature to work. In most cases, Nearby Explorer users prefer to lock the screen and let the self-voicing announce changes, but if you wish to keep the screen on, this can be an alternative.
In addition to the tools GPS apps offer, physical maps can significantly increase knowledge about a location. There are at least two excellent sources of obtaining tactile maps of nearly any location.
The Sanfran Cisco Lighthouse for the blind offers to emboss and mail you a tactile map from nearly any address for $19.
Touchmapper.org provides tactile maps on a do-it-yourself bases. Many of the locations covered also include building shapes. The site lets you enter an address then generates a file to download. That file can either be used on an embosser or, more impressively, on a 3-D printer.
© 2012 Google Inc. All rights reserved. Google Places™ is a trademark of Google Inc.
© 2012 Google Inc. All rights reserved. Google Transit™ is a trademark of Google Inc.
© 2011 Foursquare Labs, Inc. All rights reserved. Foursquare® is a registered trademark of Foursquare Labs, Inc.
© 2013 NAVTEQ is a registered trademark of NAVTEQ Corporation.
OpenStreetMap® is open data, licensed under the Open Data Commons Open Database License (ODbL) by the OpenStreetMap Foundation (OSMF).
You are free to copy, distribute, transmit and adapt our data, as long as you credit OpenStreetMap and its contributors. If you alter or build upon our data, you may distribute the result only under the same licence. The full legal code explains your rights and responsibilities.
The cartography in our map tiles, and our documentation, are licensed under the Creative Commons Attribution-ShareAlike 2.0 license (CC BY-SA).
Read more about using our data, and how to credit us, at the OSMF Licence page.
Although OpenStreetMap is open data, we cannot provide a free-of-charge map API for third-parties. See our API Usage Policy, Tile Usage Policy and Nominatim Usage Policy.
The data ("Data") is provided for your personal, internal use only and not for resale. It is protected by copyright, and is subject to the following terms and conditions which are agreed to by you, on the one hand, and American Printing House for the Blind, Inc. and its licensors (including their licensors and suppliers) on the other hand.
The Data for areas of Canada includes information taken with permission from Canadian authorities, including: © Her Majesty the Queen in Right of Canada, © Queen's Printer for Ontario, © Canada Post Corporation, GeoBase®, © Department of Natural Resources Canada. All rights reserved.
NAVTEQ holds a non-exclusive license from the United States Postal Service® to publish and sell ZIP+4® information.
© United States Postal Service® 2011. Prices are not established, controlled or approved by the United States Postal Service®. The following trademarks and registrations are owned by the USPS: United States Postal Service, USPS, and ZIP+4.
You agree to use this Data together with the Nearby Explorer app for the solely personal, non-commercial purposes for which you were licensed, and not for service bureau, time-sharing or other similar purposes. Accordingly, but subject to the restrictions set forth in the following paragraphs, you may copy this Data only as necessary for your personal use to (i) view it, and (ii) save it, provided that you do not remove any copyright notices that appear and do not modify the Data in any way. You agree not to otherwise reproduce, copy, modify, decompile, disassemble, create any derivative works of, or reverse engineer any portion of this Data, and may not transfer or distribute it in any form, for any purpose, except to the extent permitted by mandatory laws.
Except where you have been specifically licensed to do so by the American Printing House for the Blind, Inc., and without limiting the preceding paragraph, you may not (a) use this Data with any products, systems, or applications installed or otherwise connected to or in communication with vehicles, capable of vehicle navigation, positioning, dispatch, real time route guidance, fleet management or similar applications; or (b) with or in communication with any positioning devices or any mobile or wireless-connected electronic or computer devices, including without limitation cellular phones, palmtop and handheld computers, pagers, and personal digital assistants or PDAs.
By using the Nearby Explorer application, the user is bound by Google's Terms of Service.
A link to the APH Privacy Policy is available at www.aph.org/about/privacy.html. Be advised that Nearby Explorer app uses Google Maps API. To learn more, go to the Google Privacy Policy webpage.
The Data may contain inaccurate or incomplete information due to the passage of time, changing circumstances, sources used and the nature of collecting comprehensive geographic data, any of which may lead to incorrect results.
This Data is provided to you "as is," and you agree to use it at your own risk. American Printing House for the Blind, Inc. and its licensors (and their licensors and suppliers) make no guarantees, representations or warranties of any kind, express or implied, arising by law or otherwise, including but not limited to, content, quality, accuracy, completeness, effectiveness, reliability, fitness for a particular purpose, usefulness, use or results to be obtained from this Data, or that the Data or server will be uninterrupted or error-free.
Disclaimer of Warranty: American Printing House for the Blind, Inc. AND ITS LICENSORS (INCLUDING THEIR LICENSORS AND SUPPLIERS) DISCLAIM ANY WARRANTIES, EXPRESS OR IMPLIED, OF QUALITY, PERFORMANCE, MERCHANTABILITY, FITNESS FOR A PARTICULAR PURPOSE OR NON-INFRINGEMENT. Some States, Territories and Countries do not allow certain warranty exclusions, so to that extent the above exclusion may not apply to you.
Disclaimer of Liability: American Printing House for the Blind, Inc. AND ITS LICENSORS (INCLUDING THEIR LICENSORS AND SUPPLIERS) SHALL NOT BE LIABLE TO YOU: IN RESPECT OF ANY CLAIM, DEMAND OR ACTION, IRRESPECTIVE OF THE NATURE OF THE CAUSE OF THE CLAIM, DEMAND OR ACTION ALLEGING ANY LOSS, INJURY OR DAMAGES, DIRECT OR INDIRECT, WHICH MAY RESULT FROM THE USE OR POSSESSION OF THE INFORMATION; OR FOR ANY LOSS OF PROFIT, REVENUE, CONTRACTS OR SAVINGS, OR ANY OTHER DIRECT, INDIRECT, INCIDENTAL, SPECIAL OR CONSEQUENTIAL DAMAGES ARISING OUT OF YOUR USE OF OR INABILITY TO USE THIS INFORMATION, ANY DEFECT IN THE INFORMATION, OR THE BREACH OF THESE TERMS OR CONDITIONS, WHETHER IN AN ACTION IN CONTRACT OR TORT OR BASED on A WARRANTY, EVEN IF American Printing House for the Blind, Inc. OR ITS LICENSORS HAVE BEEN ADVISED OF THE POSSIBILITY OF SUCH DAMAGES. Some States, Territories and Countries do not allow certain liability exclusions or damages limitations, so to that extent the above may not apply to you.
You agree not to export from anywhere any part of the Data provided to you or any direct product thereof except in compliance with, and with all licenses and approvals required under, applicable export laws, rules and regulations.
These terms and conditions constitute the entire agreement between American Printing House for the Blind, Inc. (and its licensors, including their licensors and suppliers) and you pertaining to the subject matter hereof, and supersedes in their entirety any and all written or oral agreements previously existing between us with respect to such subject matter.
The above terms and conditions shall be governed by the laws of the State of Illinois, without giving effect to (i) its conflict of laws provisions, or (ii) the United Nations Convention for Contracts for the International Sale of Goods, which is explicitly excluded. You agree to submit to the jurisdiction of the State of Illinois for any and all disputes, claims and actions arising from or in connection with the Data provided to you hereunder.
If the Data is being acquired by or on behalf of the United States government or any other entity seeking or applying rights similar to those customarily claimed by the United States government, this Data is a "commercial item" as that term is defined at 48 C.F.R. ("FAR") 2.101, is licensed in accordance with these End-User Terms, and each copy of Data delivered or otherwise furnished shall be marked and embedded as appropriate with the following "Notice of Use," and shall be treated in accordance with such Notice:
CONTRACTOR (MANUFACTURER/ SUPPLIER) NAME: NAVTEQ
CONTRACTOR (MANUFACTURER/SUPPLIER) ADDRESS: 425 WEST RANDOLPH STREET, CHICAGO, ILLINOIS 60606
THIS DATA IS A COMMERCIAL ITEM AS DEFINED IN FAR 2.101 AND IS SUBJECT TO THESE END-USER TERMS UNDER WHICH THIS DATA WAS PROVIDED.
If the Contracting Officer, federal government agency, or any federal official refuses to use the legend provided herein, the Contracting Officer, federal government agency, or any federal official must notify NAVTEQ prior to seeking additional or alternative rights in the Data.
http://www.aph.org/privacy-policy/
For information on Indoor Mapping set up, please refer to the Indoor Mapping webpage.