Studio Recorder TM
User's Manual
User's Manual

Copyright 2000 - 2025
American Printing House for the Blind, Inc.
2025/08/06
ASIO is a trademark and software of Steinberg Media Technologies GmbH.
2025/08/06
ASIO is a trademark and software of Steinberg Media Technologies GmbH.
Studio Recorder is a powerful digital recording and editing software package geared toward making recordings of the spoken word. It includes features not found in audio recording and editing programs primarily designed for music production. Such features include:
Studio Recorder was originally written for internal use at American Printing House for the Blind to serve as a tool for creating direct to digital audio recordings for the National Library Service (NLS). It contains many features that ease the task of recording, editing, and proofreading audio books. It also includes features that simplify the production of analog cassette tapes from the digital master, and it aids in the production of Digital Talking Books.
 While Studio Recorder was originally written for use by the professional narrator and narration monitor, its simple operation makes it ideal for nearly anyone interested in recording, editing, and producing spoken word audio documents in an efficient manner.
In addition to all of the benefits of digital recording and playback technology common to digital recording software, Studio Recorder provides unique capabilities geared to both spoken word content and, more specifically, recordings intended for distribution on audio cassette or via the World Wide Web. The software supports projects ranging from the quick and simple home recording to the most demanding and professional task.
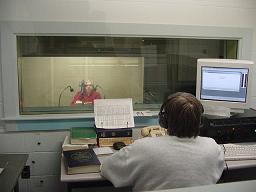
Features such as the Intercom Mode let recording professionals, who often collaborate from separate booths, communicate through the PC's speakers and sound card. Other features, such as the ability to mark and label points in the recording, make it easy for narrators working on large works to preserve notes about pronunciation and characterization, allowing quick reference to information from past recording sessions. The phrase detection capabilities streamline the process of sifting through cumbersome audio files. Instead of using time as the criterion for navigation, these features let the narrator use content for maneuvering through the audio file in a manner similar to that of moving through text in a word processing program. Studio Recorder also provides advanced capabilities such as punch in/out recording, fade, instantaneous editing, and time-specific alarm tones that assist the user in sizing a document to a cassette tape.
This document contains the entire documentation to Studio Recorder. It is current and accurate as of the date of this writing, but there may be updates to this documentation and software at the APH Web site. See tech.aph.org.
This manual is designed to get you started quickly. It begins with a look at opening and navigating through an existing file. Next, it takes you step-by-step through the process of creating and recording a new document. This section discusses basic recording, playback, and navigation functions. Then, the manual familiarizes you with the program's representation of the documents you create and play, and it shows you how to interpret and adjust the display characteristics. Then the discussion graduates to more advanced topics such as the various ways to use the record function and all its permutations, making selections, and cutting, pasting, and copying selected areas of the document. Next, it describes advanced transport functions and functions related to the transport and selections. Finally, the manual explains the special processing capabilities and advanced features of the program.
The table of contents is arranged to double as a quick reference to hot keys that perform specific functions in Studio Recorder. While there are often many ways to execute a particular command, the one shown in the contents is the global hot key that is most commonly used. Studio Recorder's hot keys are all compatible with the standard Windows hot keys that work with most Windows programs.
This document uses the "+" to indicate a series of keys that should be pressed together. The notation Alt+F, for example, means to hold down the Alt key, then while that key is still down, press the F key. Once the F is down, release both keys. You should not type the +; it is merely used to show that two or more keys should be pressed together.
In addition to this documentation for information about Studio Recorder's operation, you may wish to subscribe to the Studio Recorder email list. This list lets you speak to other users and directly to the developers of the product and provides you an opportunity to make suggestions and observations that can help the product improve.
To join the Studio Recorder email list, send an email to [email protected] and put the word subscribe in the subject line of the email.
To listen to an audio product demonstration of Studio Recorder, point your media software to tech.aph.org/sr_demo.mp3.
To install Studio Recorder, start by downloading it from the APH Web site. The direct download link is tech.aph.org/sr_setup.exe. After the download completes, run the downloaded setup application.
Once Setup starts, follow the instructions displayed on screen. Before you can proceed with Setup, you must agree to the End User License Agreement.
To start the software, find its icon on the desktop, or go to the Start menu and open the Programs folder. Use the arrow keys to find the program's name and press Enter.
Before you can use the full version of Studio Recorder, you need to purchase a registration code. If you do not register, Studio Recorder will run as a demo.
To obtain a registration code, call APH at 800-223-1839.
Studio Recorder makes it easy to begin recording and editing audio. The program is a standard Windows Multiple Document Interface (MDI) application. This means you may open as many documents as you wish and quickly move from document to document while maintaining your current position in each document.
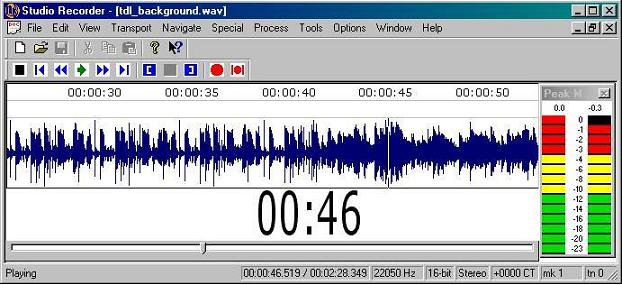
The program's display is designed to provide all of the critical information you need at a glance. If using the wave view, you see a graphical representation of the sound wave that you may adjust to show as much or as little of the entire file as desired. In the time view, the large time elapsed clock is centered on the screen and provides information about the current position in the current document.
By default, the status bar contains several pieces of information including:
The sections that follow explain how to adjust and set the parameters that relate to these items.
Displayed along with the large Time or Wave view and the status bar is the peak meter. This meter provides information about the strength of your signal. You may read more about its features and characteristics in the Peak Meter section of this manual.
The display is also complemented by the Standard toolbar which contains file and editing commands and the Transport toolbar which provides instant access to transport functions.
Once you familiarize yourself with the program's screen layout and status information, you are ready to begin working with existing recordings.
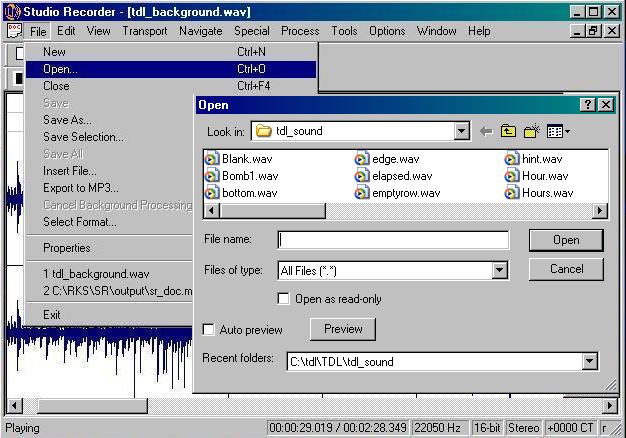
Before you can work with a document, you must open it. To open a file, select Open from the File menu (Ctrl+O). When you do, Studio Recorder shows the Open File dialog. This dialog looks like the Open dialog in other Windows programs, but it contains some special features related to sound files.
Normally, Studio Recorder previews the files in the list as you highlight them. If you prefer not to preview files, uncheck the Auto Preview box in the Open dialog.
Press the Preview button (Alt+P) to preview the file before you open it to hear what the file contains. If you have Auto Preview checked, Studio Recorder automatically previews the file. If you do not have this option checked, you may use the Preview command to listen to a portion of the file on demand before you open it.
Press Esc to cancel file preview while a file plays in the preview mode.
Studio Recorder remembers the locations of recently used files and provides a control to easily reopen their folders. The Recent Folders control lists the last 20 folders you used. To open one of the recently used folders, highlight the folder name, then press Enter. You may use Alt+F to move directly to the Recent Folders list.
When this box is checked, files you open can be played and navigated, but any attempt at modifications will be prevented.
Once you open a document, you are ready to work with that document. If you have selected the Remember Place in Files option in the Settings dialog, Studio Recorder returns the caret to where it was when you last closed the file. If you select the Auto Play on Open option in the Options menu, Studio Recorder begins playing the document automatically. If neither option is selected, the program makes the beginning of the document the current position, and the transport is in the stop mode. Press Play to begin playing the document.
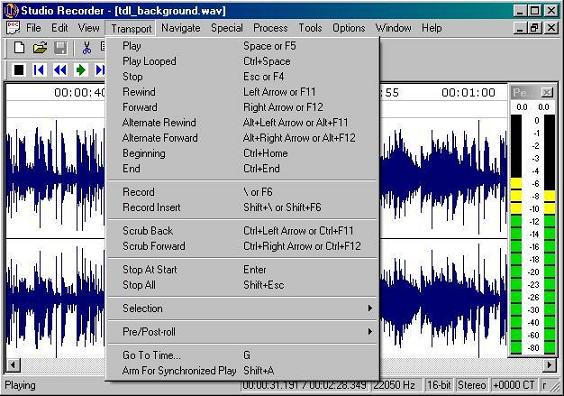
Transport functions such as Play, Record, Stop, and Rewind, function the same as they do on a cassette or CD player. Studio Recorder also supports several transport functions that you will not find on normal consumer playback equipment. These transport functions make editing and playback tasks simple and convenient. You may access all these transport functions from the Transport menu, the Transport toolbar, or by using the shortcut keys.
The Play command (Space or F5) plays the document. The command begins playback at the current position. Playback continues until the end of the document is reached, or until you use some other transport function.
The Play Looped command (Ctrl+Space) continuously plays the document. This may be used for projects in which you edit a sound effect or short musical piece designed to be played over and over. The Play Looped command lets you see how your looped effect or short musical piece sounds.
The Play Looped command continues playing the entire document until you stop it with the Stop command or until you use one of the other transport functions.
The Stop command (Esc or F4) pauses the playback or recording of audio. Press Play to resume playback, or press Record to continue recording at the current position.
The Stop At Start command (Enter) stops at your last starting position. This is helpful if you want to return to the place where you last started playing or recording without having to use the Rewind function to find your place.
The Stop All command (Shift+Esc) stops all transport functions regardless of the document in use. This is useful in situations where you are playing one document and recording in another. You cannot play or record more than one document at a time.
As with any audio tool, Studio Recorder provides standard rewind and forward functions. These functions work in one of three ways:
For each of the rewind and forward commands, you may adjust the amount of time the transport moves. See the discussion about Rewind/Forward Time in the Settings dialog of the Options menu.
The Rewind command (Left Arrow or F11) moves backward within the document. The default setting is for one second. This setting may be changed.
The Forward command (Right Arrow or F12) moves forward in the document. The default setting is for one second. This setting may be changed.
The Alternate Rewind command (Alt+Left Arrow or Alt+F11) moves backward more quickly in the document. The default setting is for one minute. This setting may be changed.
The Alternate Forward command (Alt+Right Arrow or Alt+F12) moves forward more quickly in the document. The default setting is for one minute. This setting may be changed.
The Beginning command (Ctrl+Home or w) moves you to the beginning of the document.
The End command (Ctrl+End or e) moves you to the end of the document.
The Go To Time function moves directly to any place in a document.
Select Go to Time from the Transport menu (or press g) and enter the time to move to a specific time in the document (absolute). You may also enter a specific amount of time proceeded by a + or - in order to go forward or backward the desired measure of time within the document (relative).
In addition to moving to absolute and relative times, Studio Recorder permits moving to a percentage. To move to a percentage, type the number (between 0 and 100) followed by the "%" character.
Note that Studio Recorder provides a shortcut method of entering relative values. The shortcut is to use the - and = keys directly from the document (without first opening the Go To dialog.) When you press - or =, the program opens the Go To dialog, enters a - or a +, and puts the caret in position to enter the relative value. Notice that you do not use the +, but instead use the = to make entering these values faster.
When you enter a time value, you may use several formats. You may either enter the time in seconds, minutes and seconds, or as a combination of hours, minutes, and seconds.
Studio Recorder assumes you mean seconds if you enter a number with no ":", so if you entered 20, the program moves you to the position in the document 20 seconds from the beginning. If there is one ":" in the number, the program assumes minute:second. If the number contains two ":" characters, the program assumes hour:minute:second. Note that for convenience, you can substitute either a space or a ";" for the ":".
In addition to entering time values with the ":" character, you may use the "." character to indicate fractional seconds.

The Navigation functions available in Studio Recorder are unique to this program. These functions are specifically designed for high quality spoken word documents, and they operate by detecting phrases. The functions let you navigate between sentences, paragraphs, and sections of the recorded text.
Phrase detection works by examining the length of silence between phrases within your recording. In Studio Recorder, pauses of specific lengths are classified under three categories: sentence, paragraph, and section. The program lets you customize each category to represent pauses of different lengths. The Navigation tab in the Settings dialog (on the Options menu) holds the values for these minimum pause times and for the period of time the program searches before determining that no existing pause meets your criteria.
When you use one of the navigation commands, Studio Recorder plays the document at the new phrase boundary if the transport is in play mode, and simply moves to the new phrase without going into play mode if the transport is stopped.
The Previous Sentence command (Up Arrow) moves you to the previous sentence, and the Next Sentence command (Down Arrow) moves you to the next sentence.
By default, Studio Recorder categorizes a sentence as audio that is preceded with a pause of at least 0.5 seconds and which does not exceed one minute.
The Previous Paragraph command (Ctrl+Up Arrow) moves you to the previous paragraph. The Next Paragraph command (Ctrl+Down Arrow) moves you to the next paragraph.
Studio Recorder categorizes, by default, a paragraph as audio that is preceded with a pause of at least 1 second and which does not exceed 2 minutes.
The Previous Section (Alt+Up arrow) and Next Section (Alt+Down Arrow) commands move you to a pause in the document that is at least, by default, 1.9 seconds in the indicated direction. If Studio Recorder does not find such a pause for 10 minutes, it moves 10 minutes in the indicated direction.
Select Close from the File menu, press Ctrl+F4, or exit the program to close the current document. If you modified the document, Studio Recorder prompts you to save the document before closing it or exiting the program. Choose No to close the document without saving, or choose Cancel to return to the document without saving it. Select Yes to save the document.
If Studio Recorder is working on your document in the background, and you attempt to close the document, it displays the Background Processing dialog. This dialog explains that you cannot close the document while background processing continues. The dialog gives you two choices about what to do. You may continue to wait until the processing completes, or you may cancel the background processing.
When you start Studio Recorder, it automatically creates a new document. The default name for the new document is Document 1. You may begin recording in this new document, or you may open additional documents from the File menu. To open existing documents, use the Open command (Ctrl+O), or to create new documents, use the New command (Ctrl+N.)
You may switch from document to document with the commands available in the Window menu or, as with any MDI application, you may use the short cut keys Ctrl+F6 or Ctrl+Tab to move between documents.
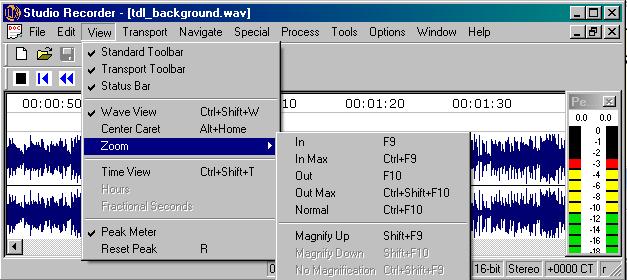
The View menu provides options about how you want your documents to appear. You may select toolbars, a time view, or a wave view of your document's data. The View menu also provides options for zooming or magnifying data in the wave view.

Studio Recorder provides toolbars to help you find and use commands quickly.
Select Standard Toolbar from the View menu to show or hide the Standard toolbar. This toolbar provides quick access to options on the File menu such as New, Open, and Save.
Select Transport Toolbar from the View menu to show or hide the Transport toolbar. The Transport toolbar provides quick access to options found on the Transport menu. Such items include Record, Stop, Rewind, and Forward.
Select Status Bar from the View menu to show or hide the status bar.
Note about toolbars: You can drag floating toolbars anywhere on the screen or dock them to any side of the program window. Double-clicking on any toolbar's free space switches it from being floating or being docked. To keep a toolbar from docking, hold down the Ctrl key while dragging it.
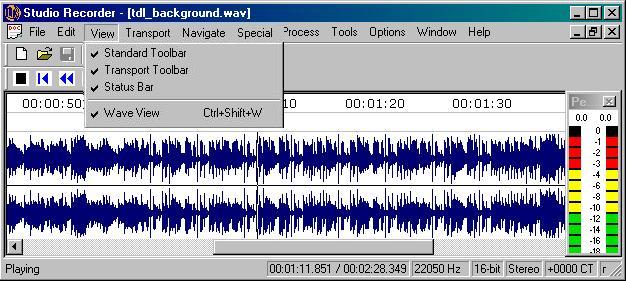
Checking the Wave View option (Ctrl+Shift+W) on the View menu makes Studio Recorder provide a visual representation of the data in your document. You may find this an exceptionally easy method of editing and manipulating your documents, especially for fine changes. This is the default view.
Once you select the Wave View option, Studio Recorder continues to use the wave view on any new documents you open until you select the time view.
If you have the Wave View option selected, Studio Recorder automatically goes into the time view when you begin recording. It then switches back to the wave view when you stop recording.
If your document is stereo, Studio Recorder displays two sound waves that are separated by a horizontal line. One sound wave represents the left channel (on top), and one sound wave represents the right channel (on the bottom). If your document is mono, only one sound wave is displayed, but it will appear twice as tall as each of the two stereo view representations of the sound wave.
In addition to the data itself, the wave view provides several other visual tools to help with editing tasks.
The Wave Ruler appears at the top of the document window. The ruler shows you the position in the document, expressed as a time value, of the currently displayed data. As the wave scrolls, the ruler also scrolls to show increasing time values. The ruler automatically adjusts itself to show larger or smaller time intervals depending on the zoom settings.
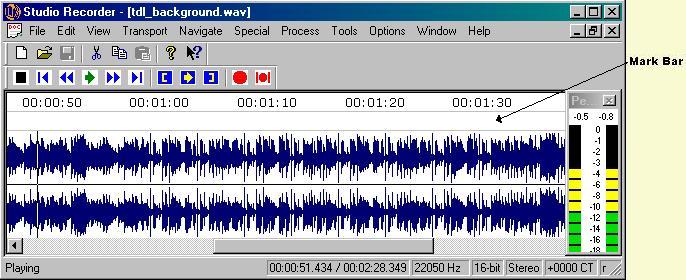
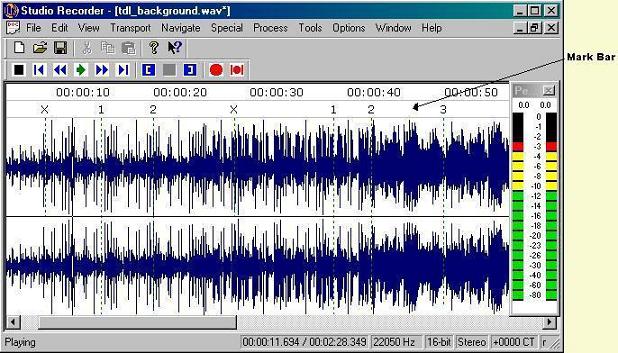
Below the Wave Ruler appears the Mark Bar. This bar displays indicators for different types of marks in the document.
You may control the presence of these attributes with the Wave View page of the Settings dialog.
Studio Recorder lets you customize the colors used to display the sound wave. You may change the color of the wave itself, the color of the background, the color of the selection, the color of the selection background, the color of the center line, and the color of the mark line. You may change these settings by choosing the Wave View tab of the Settings dialog.
Similar to its function in a word processing document, the caret in Studio Recorder represents the point in your document where any editing changes occur. The caret is represented in the wave view by a blinking line that runs the full height of the document window.
![]()
There are several ways to move the caret. All of the transport movement commands affect the caret's position and, with one exception, these commands all work exactly the same in either the wave view or the time view. The one exception to this rule is that when the transport is stopped (you are not in play mode), the Right Arrow and Left Arrow keys move by pixel, and the program plays the pixel. (This is called Pixel Scrubbing.) The amount of actual movement through your file depends on how far in or out you choose to zoom the view. (See Zoom for more details.) If the transport is in play mode, the extent of movement allowed by the Right Arrow and Left Arrow keys is governed by the amount of time you specify in the General page of the Settings dialog. This is true even if you are using the wave view.
In addition to all the methods for moving to another place in your document by using the functions within the Transport menu, the wave view provides two additional ways of getting quickly from one place to another. One way is to simply move the mouse pointer to a position on the sound wave and click. You may also use the scroll bar at the bottom of the wave view to scroll through the entire document.
While most key commands perform identically within either the time view or wave view, there are a few exceptions. In addition to the fact that the Rewind and Forward commands work differently in the wave view when the transport is stopped, as previously discussed in the Caret section of this manual, the Page Up and Page Down keys act differently in the wave view. These commands move through the document by an amount equal to 10% of what is represented in the document window. The actual amount of time moved depends, of course, on the zoom setting.
It is often desirable to move the caret to the center of the screen so you may see the data immediately before and after the caret. There are several instances when Studio Recorder scrolls the data so the caret is at the center of the document window. Such instances occur when you use the phrase detection commands to navigate your document, when the size of the document window changes, and when you use many of the navigation commands such as the Go To command. You may also use the Center Caret command at any time to scroll the data so the caret is positioned at the center of the document window.
The Center Caret command is unavailable when using the time view.
The wave view provides a visual means of selecting a portion of your document. To select a part of the document, move the mouse pointer to the beginning or end of your desired selection, then hold down the left mouse button. To select, drag the mouse in the desired direction. As the caret approaches the edge of the screen, the sound wave begins to scroll to provide a convenient means of making a selection without having to move your hand from the mouse. If the transport is in the play mode, Studio Recorder provides audio feedback about the selection by playing portions of the file as you increase or decrease the selection range.
To clear the selection, double click within the selection, or press the letter c.
To select the entire document, double click outside any existing selection, or press Ctrl+A.
To change an existing selection, move the mouse pointer to either end of the selection. When the pointer changes to the horizontal arrow, left click, and drag the end of the selection to the desired location.
In addition to changing the selection, you may extend it by shift clicking at the desired location. If you shift click and there is no selection, the program selects the portion of the document between the caret and the mouse pointer.
To select to the beginning or end of the document, follow these steps:
This selects the portion of the document from the mouse pointer to either the beginning or end depending on which direction you moved the mouse. You may also select to the beginning by pressing Ctrl+Shift+Home, or to the end by pressing Ctrl+Shift+End.
You may drag the selection to an empty part of the Studio Recorder workspace. When you do, the program creates a new document containing the selection.
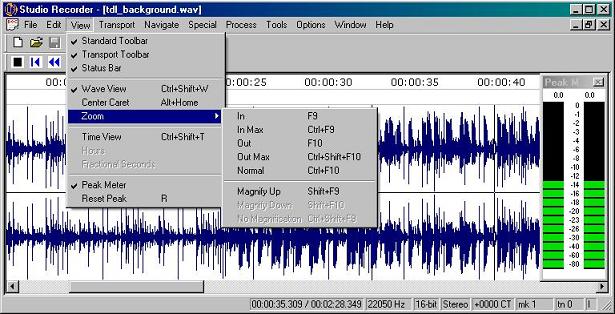
When using the wave view, the Zoom sub menu becomes available. Its purpose is to let you zoom in to provide either a more detailed picture of your document data or to zoom out for a broader overview of how the sound wave looks. Each time you zoom in, Studio Recorder shows twice the detail but less of the total document. Likewise, each time you zoom out, the program displays half the detail but shows a longer section of the document.
You may use the mouse wheel to zoom in and out in the document. You may also use F9 to zoom in, and F10 to zoom out.
The Magnify commands let you see more detail in lower level signals. The commands make looking at noise, ticks, pops, etc. possible by increasing the amplitude of the displayed peaks.
The Magnify Up command increases the displayed signal level by 3 dB each time you use the command.
The Magnify Down command decreases the displayed signal level by 3 dB each time you use the command.
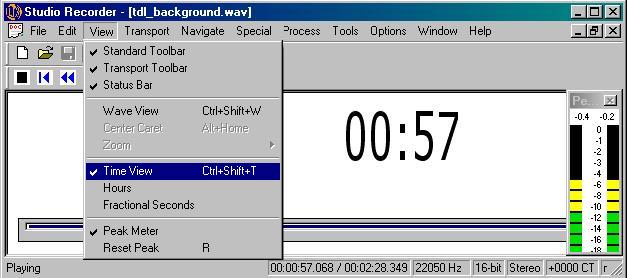
The time view (Ctrl+Shift+T) is an alternative to the wave view. When you select this option, Studio Recorder replaces the wave view with a large time display centered on the document window. The time display indicates your position in the document.
You may customize the time display's appearance by opening the View menu. The default view displays minutes and seconds. You may also view the hours or fractional seconds by selecting one or both of those options from the View menu while using the time view.
Select Hours from the View menu to include hours in the time display. If you do not show hours, they will be included in the minutes display.
Select Fractional Seconds from the View menu to include fractional seconds as decimals in the time display.
 Selecting the Peak Meter option on the View menu makes Studio Recorder display a meter that is helpful for recording and playback tasks.
You may move or resize the peak meter by using the "click and drag" feature of your mouse.
The peak meter can either float or be docked.
The peak meter retains its position from session to session.
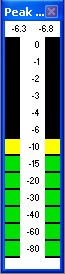
The peak meter lets you monitor the levels of incoming and outgoing signals. The signal level is represented as the peak amplitude in decibels. The meter helps you maximize dynamic range and avoid distortion.
When recording, the louder parts of the incoming signal should generally stay in the yellow area of the meter. The yellow area covers the range from -9 dB to -4 dB. If the word "clip" appears in either of the peak hold fields, you have exceeded the maximum signal level, and you should record the clipped section again. Note that the word "clip" never appears when playing a document because there is no way to know if the recording is actually clipped or if it is simply at full scale.
The peak meter maintains the largest peak for each channel at the top of the window. This value ranges from -inf. dB (negative infinity) to 0 dB (full scale.)
You may reset the peak hold values on the meter manually by selecting Reset from the View menu or by pressing r. Studio Recorder automatically resets the peak holds when you start the play or record modes.
You may turn off the peak meter by deselecting Peak Meter from the View menu.
You may use the Announce Peak Hold command (press a) to make Studio Recorder speak the values of the peak holds with either the JAWS, Window-eyes, NVDA, or System Access screen readers.
Pressing the Announce Status Bar command (press s) makes Studio Recorder announce each of the panes in the status bar. Recall that you may configure the information that appears in the status bar.
The Record command (\ or F6) starts recording. The recorded material overwrites any existing audio at the current position.
If the Pre-Roll Record box in the Recording Tab of Settings is checked, and the transport is stopped, Studio Recorder plays a small portion of the material immediately preceding the caret before recording begins. If the transport is in Play mode and you press Record, the transport immediately drops into Record mode.
If the Indicate Record State with Sounds option in the Recording Tab of the Settings dialog is checked, Studio Recorder plays a short beep when recording starts and another sound when recording stops. This option is turned off by default, because most recording experts do not want the beep sound recorded along with their recorded material. It may, however provide additional confirmation that recording has actually started. Most recording engineers wear headphones to prevent recording the beep sound, or they may choose to edit out the sound later.
If you are using the wave view, Studio Recorder switches to the time view while the transport is in the record mode. When you stop recording, the program then switches back to the wave view.
If there is a selection in the document, the record command only records over the selection. When you reach the end of the selection, the transport stops. This facilitates making corrections that must fit the exact length of the original material.
The Pre/Post-Roll Corrections feature works in combination with the Record command and a selection in the document to make edited material sound as much like the original recording as possible.
If the Pre/Post-Roll Corrections button is checked and you have a selection in the document, Studio Recorder, prior to recording, plays a small portion of the material preceding the selection. This is called a pre-roll, and it is very helpful to gauge timing, inflection, and attributes of the existing recording. The amount of audio you hear depends on how you set the Pre-Roll Time option in the Settings dialog. When you arrive at the beginning of the selection (after the pre roll), recording begins. When you reach the end of the selection, Studio Recorder drops out of recording and plays a portion of the audio following the selection. This is called a post-roll. The amount of time selected for playing the post-roll is set in the Post-Roll Time option in the Settings dialog.
If you do not want to hear a pre-roll and post-roll when you record with a selection, uncheck Pre/Post-Roll Corrections in the Recording Tab of the Settings dialog.
The Record Insert command (Shift+\ or Shift+F6) begins recording, inserting new material into the document at the current position. This command does not overwrite existing sound.
If there is a selection in the document when you use the Record Insert command, Studio Recorder deletes the material in that selection before inserting the new material. This is the most convenient means of replacing a section of the recording where the time is not a critical factor.
Note that Studio Recorder automatically extends or reduces the selection when the new material is inserted. This feature makes it convenient to continue to use the Record Insert command until you are satisfied with the audio quality of the new material.
The Save (Ctrl+S) and Save As commands (Ctrl+Shift+A) let you preserve the work you have done. When you are satisfied with the new recording or the editing you have completed in an existing document, use one of these commands to preserve your work.
The first time you use the Save command with a new document, Studio Recorder displays the Save As dialog and prompts you to give the document a file name. This name is how you refer to the document in the future. Once a document is named, you may use the Save command to preserve your work without further prompting. If you want to give your document a different name, use the Save As command, and Studio Recorder will prompt you for a new name.
Saving may involve a large amount of information and may take a significant amount of time. When Studio Recorder completes the save operation, it plays a short tone to alert you that the operation is complete. This tone is called the completion sound, and is played after many functions in Studio Recorder.
The Save Selection command (Ctrl+Shift+S) saves the part of your document that is selected. This is a convenient means of saving a part of a file without having to copy the selection to the clipboard, paste the clipboard into a new document, and save than new document.
The Save All command acts like the Save command. It commits your work to disk--but it automatically saves all the documents you have modified since the last save.
If you have not named a document when you use the Save All command, the Save As dialog appears and prompts you for the file name to use for that document.
Once you know how to create new documents and open existing documents, you'll use the commands and techniques in this section to edit those documents.
The Edit menu contains most of the functions you need to edit your document.
Selecting data is the first step in most editing processes. You select data by indicating a beginning and end position. The selection is the range of material between the beginning and end point.
After you select data, you may cut, copy, paste, and more.
The Start Selection command ([) marks the beginning of the selection. If you already have a selection, this command changes the start of the selection. If you set the start to a point after the end of the selection, Studio Recorder issues the message, "Selected to end" and resets the selection to begin at the current position and continue through the end of the document just as if you had no selection at all when you issued the command.
The End Selection command (]) marks the end of the selection. If you already have a selection, this command changes the end of the selection. If you set the end to a point before the beginning of the selection, Studio Recorder issues the message, "Selected to start" and resets the selection to end at the current position and start at the beginning of the document just as if you had no selection at all when you issued the command.
The Select All command (Ctrl+A) selects the entire document.
The Set Selection command (Ctrl+E) lets you specify times for the start, end, and/or length of the selection. Studio Recorder provides the current time as defaults for both start and end times and 0 for the length if there is not already a selection. If there is already a selection, Studio Recorder shows the current values for the selection as defaults for each of the fields.
The Clear Selection command (c) clears the selection.
The Recall Selection command (Shift+C) recalls the last cleared selection and sets the current position to the beginning of the selection.
In addition to using the mouse and the Start Selection and End Selection commands, you may hold down the shift key while using navigation commands to select material as you move through it much like you would in a word processing program. If you use the shift+navigation key method of selecting data and you have an existing selection, that selection gets extended or reduced if you move from within your original selection. If, on the other hand, you make the new selection completely outside the old selection, the old selection gets thrown away, and your new selection becomes the entire selection.
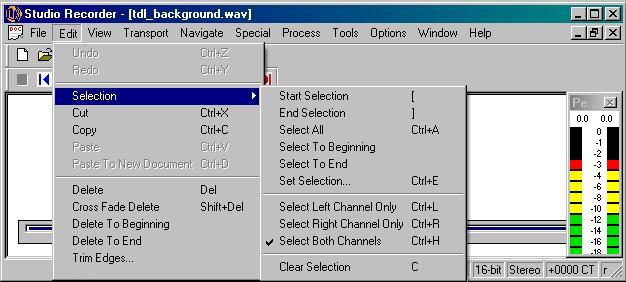
Normally, Studio Recorder selects both channels when making a selection in a stereo document. It is also possible to select individual channels of a stereo document if desired.
The following commands work with a stereo document which already has a selection set. Once you use one of these commands, the Selection commands work only with the selected channel.
Use the Select Left Channel Only command, Ctrl+L, to restrict the selection to only the left channel of a stereo document.
Use the Select Right Channel Only command, Ctrl+R, to restrict the selection to only the right channel of a stereo document.
Use the Select Both Channels command, Ctrl+H, to return to working with both channels of a stereo document.
The clipboard is an area in the program used to hold temporary data. When you use the Copy, Cut, and Paste commands, Studio Recorder places data on or copies data from its clipboard. Note that Studio Recorder's clipboard is independent of the Windows clipboard.
The Cut command (Ctrl+X) cuts the selection and puts it on the clipboard. Cutting sound data replaces the previous contents of the clipboard.
The Copy command (Ctrl+C) copies the selection to the clipboard. Copying sound data replaces the previous contents of the clipboard.
The Paste command (Ctrl+V) inserts the clipboard contents into the document at the current position. If there is an existing selection, the Paste command deletes the selected data before inserting (paste over). In this case, a message is given, indicating that the selection was replaced. If your intent is not to replace any selection, remember to use the Clear Selection command before using this command.
The Paste To Fit command requires a selection in the document, and pastes only as much of the clipboard as is required to replace the selection. If the length of the data on the clipboard is shorter than the selection, the entire clipboard is pasted as with the normal paste command.
This command is useful when you need to keep the length of the document unchanged, but need to replace the selection, commonly with background content such as room tone.
This command copies the selection to the room tone buffer. The room tone buffer is separate from the clipboard, and is used when you wish to replace breaths with room tone. See Breath Attenuation for more information on using this command.
The Insert File command (on the File menu) inserts a file into the current document at the current position.
The Insert File Pair command (on the File menu) inserts a pair of files into the current stereo document at the current position.
The Paste to New Document command (Ctrl+D) pastes the clipboard contents into a new document.
The Delete command (Del) deletes the selection without copying it to the clipboard. If the selection extends to the beginning or end of the document, a message is given after the deletion confirming the extent of the deletion.

The Cross Fade Delete command (Shift+Del) works like the delete command with an additional twist. When the command finishes deleting the material, it cross fades the edges of the remaining material. You may specify the type of fade and the cross fade time the command uses in the Fade tab of the Settings dialog.
This command is useful to eliminate pops and other abrupt sound changes between where the deletion started and where it ended. This is usually not necessary in a very quiet studio environment, but it will not hurt either.
Note that this command actually deletes a little more material than what is selected because of the cross fade process. For example, if you have the Cross Fade Delete Time set to 10 ms, and you selected 1 second of material, the net deletion will be 1.01 seconds long.
The Delete to Beginning command deletes all material between the current location and the beginning of the document.
The Delete to End command deletes all material between the current location and the end of the document.
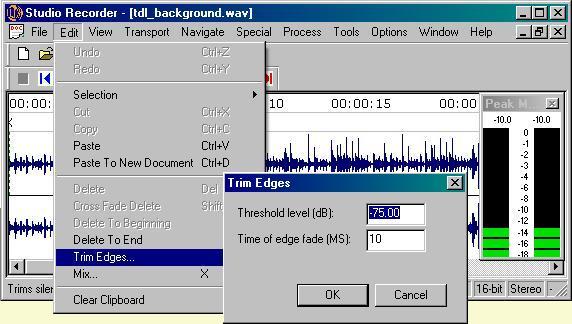
The Trim Silence command trims silence from both ends of the document. You may specify the signal level threshold where deletion should stop and an optional fade time to apply to the remaining material.
The Trim command deletes all data from the document that is outside the selection.
The Clear Clipboard command clears all data from the clipboard. You might want to do this if you are running low on disk space. It is also necessary to use this command if you wish to delete the file from disk which is on the clipboard.
The Undo command (Ctrl+Z) reverses the last action performed. This command may be used if you are not satisfied with the results of an action or if you make a mistake. For example, if you deleted a section of data by accident, simply choose the Undo command from the Edit menu to restore the data.
Studio Recorder remembers the command you last used and displays the name of that command as part of the Undo command's name in the menu.
The Redo command (Ctrl+Y) restores the current document to the state in which it was before you last used the Undo command. In other words, this command undoes the last Undo. This is useful if you accidentally use the Undo command, or change your mind after an Undo.
The Undo All command reverses all of the changes made to the document since it was opened. Undo All returns your file to its original state even after you use the Save command.
Redo All redoes all actions that were undone since the last editing action.
Scrubbing makes it easy to perform detailed editing jobs. Here is how it works:
When you use the scrub commands, Scrub Back (Ctrl+Left Arrow) or Scrub Forward (Ctrl+Right Arrow), Studio Recorder moves a very small distance in the direction of the scrub. The program then plays a small portion of the document at the new position. By default, the program also loops the playback as long as you hold down the Control key. The amount of movement and the amount of time that the program plays back from the new position are both adjustable. To adjust these settings, specify the Scrub Move Time and the Scrub Play Time options in the General Tab of the Settings dialog in the Options menu. The Loop Scrubs option in the Advanced tab controls whether or not scrub segments are looped.
In addition to the normal scrubbing functions, Studio Recorder supports Pixel Scrubbing. Pixel Scrubbing works in the Wave view when the transport is stopped. When you use the Left and Right arrow keys, the program plays the sound represented by the pixel under the caret. The distance moved and the amount played is controlled by the Zoom In and Zoom Out commands, so the further you zoom out, the more you move and the more you hear.
There is an item in the Options menu which controls whether the playing of pixels is looped. If this item is checked, pixels are looped until another transport function (such as stop) is used. You may toggle the looping of pixels by pressing X.
The looping feature is automatically disabled if you zoom in far enough that the sound that would be played would be short enough or at a high enough frequency to be meaningless. This is done in an attempt to avoid very high frequency signals from being generated while looping as these high frequency signals could damage hearing or equipment.
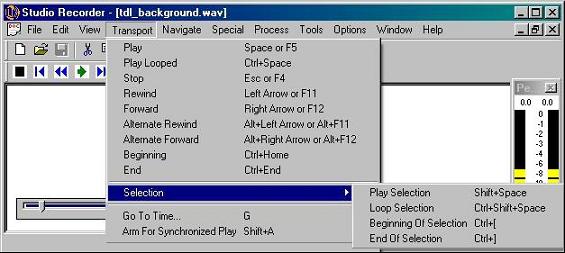
The Selection sub menu on the Transport menu provides functions for working with a selection.
The Play Selection command (Shift+Space) plays the selection.
The Loop Selection command (Ctrl+Shift+Space) plays the selection repeatedly.
The Beginning of Selection command (Ctrl+[) moves to the beginning of the selection.
The End of Selection command (Ctrl+]) moves to the end of the selection.
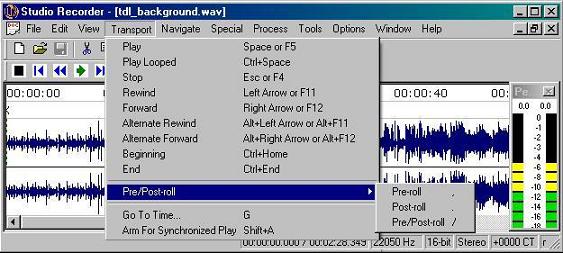
The Pre/Post-Roll sub menu on the Transport menu lets you play a small portion of your document just before or after the current position. This does not change your position in the document. The exact amount of time the function plays depends on the settings you specify in the Pre-Roll Time and Post-Roll Time options of the Settings dialog's General Tab.
The Pre-roll command (,) plays a short segment before the current position.
The Post-roll command (.) plays a short segment after the current position.
The Pre/Post-roll command (/) plays a short segment before and after the current position.
The Preview Delete command lets you play the recorded data just outside of the selection, allowing you to hear what the recording would sound like if the selection were deleted. When you issue this command, which requires a selection, the program pre-rolls at the start of the selection, and post-rolls at the end of the selection.
Pressing j plays from the current position to the next generic mark, and leaves the caret at the next generic mark. Since the caret is moved to the next mark, this command can be used repeatedly to play content between generic marks. You might use this command to verify that marks created by the Mark Sentences command are correct.
The Play From Previous Mark command plays from the previous generic mark to the current position, leaving the caret at the previous generic mark. Since the caret is moved to the previous mark, this command can be used repeatedly to play content between generic marks in a backwards direction. You might use this command to verify that marks created by the Mark Sentences command are correct.

The Special Menu provides miscellaneous functions for performing various tasks.
Index tones are used to help the listener of an audio cassette tape quickly move to relevant sections of the tape. They work in cassette players that provide chatter feedback when the rewind and forward functions are used by leaving the playback head partially engaged.
The index tone is a seven second 50 Hz sine wave with peak amplitude of -26 dB.
When playing the tape, the index tone is largely unnoticeable, but when played back at the speeds of the rewind and forward functions, the sound is perceived as a short beep.
Studio Recorder features several commands and functions that make creating, editing, and removing index tones simple and convenient.
The first thing to note about using Studio Recorder to create index tones is that you should use the Place Tone command at the point in the material where you want the tone to end, because Studio Recorder automatically backs up the seven seconds and establishes the beginning of the tone at that point. This may be a difficult concept for those narrators who use analog equipment and must guess at where to start the seven-second tone so that it ends in the proper place. Moreover, index tones can only be used in documents that contain 16-bit PCM data.
The Place Tone command (T) places an index tone in the document ending at the current position. The Place Tone command can be used while in the play, record, or stop mode.
You cannot place an index tone within 10 seconds of another index tone, nor can you place an index tone within the first seven seconds of the beginning of a document.
The Remove Tone command (Shift+T) removes the index tone at the current position. The tone is removed cleanly, unless clipping occurred when the tone was originally placed.
The Remove Tone command works from anywhere inside the seven-second tone, and can be used from the stop or play modes.
The Remove All Tones command removes all tones in the document.
The Next Tone command (Alt+Page Down) moves you to the next tone in the document, and the Previous Tone command (Alt+Page Up) moves you to the previous tone in the document. The position corresponds exactly with where the tone was placed (at the end of the seven seconds.) These two commands are located on the Navigate menu instead of the Special menu because they are used to navigate to these special places in the document.
If the transport is playing when you use the command, Studio Recorder resumes play at the new position. If the transport is stopped, the program moves your current position to the next or previous tone and the transport remains stopped.
Normally, Studio Recorder provides audible feedback when you add or remove tones or when an error occurs while adding or removing a tone. The General Tab of the Settings dialog provides a setting that lets you change this response so you hear nothing if a tone is successfully placed or removed, and receive an error message if an error occurs.
You use marks to place a reference to a point in the document that you may refer to later. The reasons for referring to a marked position vary depending on your task or the kind of material you record. These reasons include tasks to help the narrator and tasks to aid in the production of DAISY Digital Talking Books. Narration mark aids include:
The marks that aid in the production of DAISY Digital Talking Books include:
Studio Recorder provides commands that establish marks, clear marks, move to marks, and name marks in your document.
Studio Recorder helps make marks as flexible as possible by providing several kinds of marks. The program uses standard audio marks that you may find in any audio editing program and it supports custom marks that you may use in the process of creating Daisy Digital Talking Books with the aid of Book Wizard Producer, another program from American Printing House for the Blind, Inc. Custom marks are regular audio marks that contain special meaning to Studio Recorder. Book Wizard uses these marks for navigation and Studio Recorder uses them for helping narrators keep notes about the material.
Marks maintain their position in your document, even when you insert or delete material around them. However, if you delete a section of material that contains one or more marks, those marks get deleted as well. Recording over existing marks also erases those marks.
While using the wave view, Studio Recorder indicates the presents of a mark in two ways. First, it draws a dashed vertical line in the wave view at the location of the mark. (You may change the color of this line in the Wave View tab of the settings dialog.) Secondly, Studio Recorder places an indicator representing the mark in the Mark Bar.
The Mark Bar runs horizontally along the top of the wave view and displays indicators for all of the mark types used by Studio Recorder. The Mark Bar also enables basic manipulation of marks. The indicators used by the Mark Bar are as follows:
| X | generic mark |
| 1 | custom 1 |
| 2 | custom 2 |
| 3 | custom 3 |
| 4 | custom 4 |
| 5 | custom 5 |
| 6 | custom 6 |
| 7 | custom 7 |
| 8 | custom 8 |
| 9 | custom 9 |
| 0 | custom 10 |
| C | correction |
| N | note |
| R | note reference |
To move a mark, left-click its indicator in the Mark Bar, and drag the mark to the desired location.
In addition to moving marks, you may also perform operations on a mark by right-clicking its indicator and selecting a command from the shortcut menu that appears.
The Mark Bar shortcut menu contains the following commands:
Because two marks of different types may share the same location, or many marks may be placed close together, the Mark Bar uses a simple rule of precedents to determine the actual indicator that gets displayed. Custom mark 1 has the highest precedents, followed by the rest of the custom mark types (2 through 10.) Finally, the generic mark has the lowest precedents.
The Set Mark command (M) places a generic mark at the current position.
Studio Recorder allows only one mark of the same type at a particular position. If you attempt to set another generic mark at a position where a generic mark already exists, the program does not create an additional mark and beeps to indicate the failure to create a mark. You may, however, set a custom mark where a generic mark already exists, or you may set a generic mark where any of the 10 custom marks already exist.
Pressing a number key places a custom mark at the current position in your document. You may use custom marks categorized by number. Use the numbers at the top of the keyboard to place any of 10 categories of custom marks. The number 0 sets custom mark 10. You may also use F7, i, or o to place marks for corrections, notes, and noterefs.
The Clear Mark command (Shift+M) clears the generic mark at the current position.
The Clear Custom Mark command (Shift+0 through Shift+9) clears the custom mark at the current position.
The Name Mark command (N) names the generic mark at the current position. When you use the Name Mark command, Studio Recorder presents a dialog that lets you type the name you wish. This name appears on the status bar when you stop on that mark. This name also appears when you choose the Show Marks dialog from the Special menu.
The Clear All Marks command opens a sub menu that lets you decide what kinds of marks to clear. You may clear generic marks, custom marks, or all marks from this sub menu. Note that breath marks are not included in these commands -- they are handled separately.
The Show Marks command (h) shows all marks in a list. This dialog lets you name marks, rename marks, delete marks, and move directly to any mark in the list. The status bar at the bottom of the dialog tells you the number of the mark you are on and how many marks of the selected type exist in the document.
Each mark in the Show Marks dialog has either a real or temporary name. If the name is temporary, the program shows that name enclosed in brackets and labels it with a name like "Generic X," where X is the sequential number of all unnamed marks of the current type in the document.
To change the name of a mark in the list, select the mark and type the new name in the edit field below the list of marks.
The Tighten Mark and Tighten Marks commands help put marks as close to phrases as possible. Experimentation at American Printing House for the Blind (APH) shows that it is very difficult for a human to get marks within the 100 ms time slice as required by the National Library Service (NLS) for the production of Digital Talking Books as outlined in the specifications for the NISO z3986 Digital Talking Book.
When you use the Tighten Mark command, Studio Recorder checks to see how close the mark is to the start of the next phrase. If there is room between the mark and the next phrase, the program moves the mark up to the start of the phrase. Conversely, if the mark is found to be just inside the start of a phrase, Studio Recorder moves the mark back to the beginning of the phrase. While this command can be very helpful, it is important to be sure it is doing what you intend. For this command to work properly, the phrase parameters should be set appropriately for the current document. You may want to issue the Calibrate Phrase Parameters command before attempting to tighten marks, or be sure that the default noise threshold is set properly for the kind of recordings you normally produce.
The Tighten Marks command works like the Tighten Mark command with the addition of a dialog that lets you select which kinds of marks to tighten. The program remembers which kinds of marks you last tightened and leaves those types selected for the next time you use the command.
In addition to selecting the kinds of marks to tighten, the dialog offers an "All" button that makes the software tighten all marks of any type. This command searches through either the entire document or the current selection for the selected marks. When the program finds a mark, it uses the techniques outlined in the previous section to tighten that mark.
The Previous Mark and Next Mark commands are located on the Navigate menu instead of the Special menu because they are used to navigate to specific places in the document.
The Previous Mark command (Ctrl+Page Up) moves you to the previous mark.
The Next Mark command (Ctrl+Page Down) moves you to the next mark.
You may set what kinds of marks these commands use to determine the next and previous mark with the Mark Navigation Filter dialog.
The Mark Navigation Filter command on the Options menu shows a dialog that lets you control how the Next Mark and Previous Mark commands work. When you select this command, Studio Recorder shows the Select Mark Types dialog.
The Select Mark Types dialog contains a checkbox for each mark type and an All button to select all mark types. Use the checkboxes to check each kind of mark you wish to use for navigation purposes.
You may move directly to the previous or next custom mark by pressing the mark's number along with the shift and control keys (to move back) or the control key (to move forward) to the next mark of that type. So, to move back to the previous custom mark 1, press shift+ctrl+1, and to move forward to the next one, press Ctrl+1.
The bleep option in the Special menu replaces the selection with a bleep sound. This is used to mask objectionable content, in the event this is necessary for the target audience.
The level of the tone used for the bleep is determined by the level of the selected material.
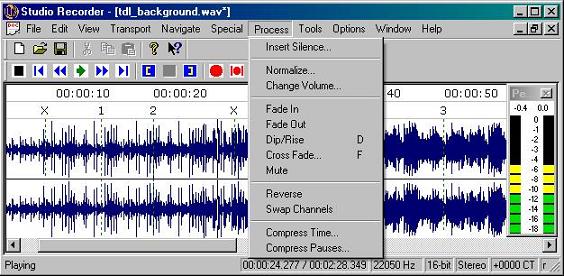
The Process menu offers a range of tools used to modify existing sound.
The Insert Silence command inserts the length of silence you specify into the document .
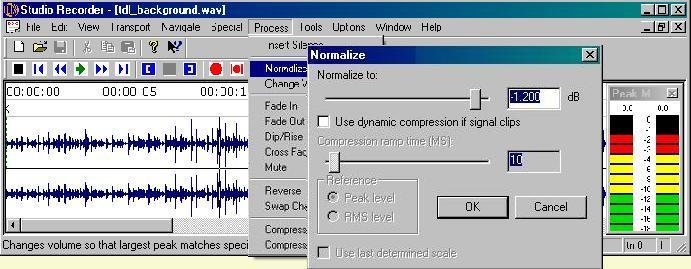
The Normalize command changes the volume level of the document so that its largest peak is equal to the normalize value. The Normalize command respects tones, so if your document contains one or more tones, the value of those tones remains constant while the rest of the document gets normalized.
When you use the Normalize command, Studio Recorder displays the Normalize dialog where you may specify the normalize value. The default normalize value is 0 dB, and this is the value you usually want to use. This means that the value of the largest sample in the document will be at full scale (as loud as possible) once the command is issued.
You may use the dialog's slider control to set the value, or you may type the value in the edit box. Normalizing to the value 0 dB makes the file as loud as possible without clipping.
You may use values greater than 0 dB as long as you realize that some peaks will clip if you do not check the Use Dynamic Compression checkbox. If clipping occurs, Studio Recorder displays a message that shows you how many samples were clipped for any particular normalize value. If the number of clipped samples is too great, you may wish to use the Undo command to revert back to a version of the document before you used the Normalize command.
If you check this box, Studio Recorder prevents signals from clipping. This lets you raise the level of the low parts of the document while keeping the higher values at maximum.
The Ramp Time parameter lets you decide how long Studio Recorder should take to smooth off sudden changes in the signal level. So, if you specify 10 ms as the ramp time, the program uses 10 ms as the time to look ahead. If it sees the signal will clip in that time, it begins dropping the Normalize To value over that amount of time. Conversely, this time is used to raise the Normalize To value after the peak passes.
When you normalize a document, there must be a reference. That reference may be either the peak level or the RMS level. The peak level is most commonly used. Use the RMS level to make normalizing similar documents result in the documents having a similar sounding level.
After you use the Normalize command once during a session, this checkbox becomes available. When checked, this control instructs the Normalize function to use the previous scale as its scaling factor. This becomes important when you want to normalize several documents by the same scaling factor.
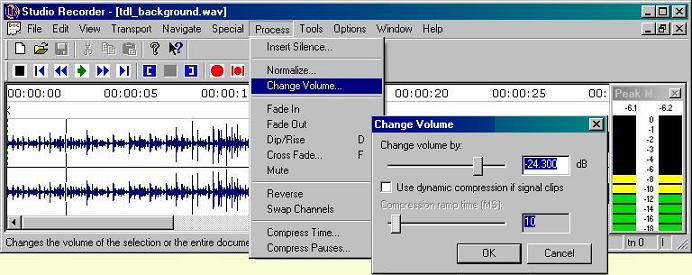
The Change Volume command increases or decreases the volume of the document by a specified dB level. The change respects tones, so as you increase or decrease the volume of the document, the level of the tones remains constant.
When you use the Change Volume command, Studio Recorder shows the Change Volume dialog where you may either use the slider to select a value or type the desired value into the edit box. You may also elect to use dynamic compression to prevent any clipped samples, and you may specify the amount of time to ramp the volume down and back up to avoid clipping samples (the compression ramp time.)
If you increase the volume to the point where clipping occurs and you do not have the Dynamic Compression option enabled, the program shows a message with the number of clipped samples.
The Fade In and Fade Out commands gradually modulate the volume of a selection, or the entire document. If the data to be faded contain one or more index tones, Studio Recorder removes those tones.
The Fade Out command fades out the selection from 0 dB to -Inf. dB. The Fade In command fades in the selection from -Inf. dB to 0 dB. You may specify the type of fade used for both of these commands in the Fade tab of the Settings dialog.
Because fades are generally performed on short segments of material, the message, "Long fade" is given before fading if the material to be faded is 20 seconds or longer.
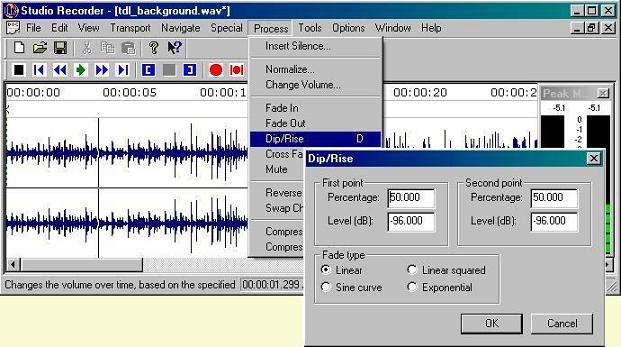
The Dip / Rise command (press d) lets you create a simple volume curve on the selection using two points. These points indicate where to raise or lower the volume.
The points are specified as a percentage, and the levels are specified in dB. You may also select the fade type.
This command controls the fade time and amount of volume change by changing the volume from 0 dB at the beginning of the selection to the specified level at the first point, changing the volume to the level specified at the second point, then changing the volume back to 0 dB by the time the sound reaches the end of the selection.
Imagine you had a selection that has a sound 10 dB too high at 25% of the file and the extreme sound lasts for about 50% of the file. To lower the volume for that extreme sound, use 25% as the value of the first point and -10 dB as the level to achieve. Now, use 75% as the value of the second point and -10 dB again as the level to achieve. This would make Studio Recorder start fading down the volume from 0 dB to -10 dB over the course of the first 25% of the selection, remain at -10 dB until 75% of the selection, then gradually rise back to 0 dB by the end of the selection.
Note: the first point cannot exceed the second point, and points must range between 0 and 100%, and they may be fractional.
The Cross Fade command (press f) fades and/or mixes the material on either side of the cursor. This command is useful for smoothing transitions in a document from one type of material to another (a change of scene.) When you use this command, Studio Recorder displays a dialog that asks for the amount of time for the mix and lets you optionally fade material on either side of the cursor.
The Time of Cross Fade/Mix control specifies the amount of time on either side of the caret that gets mixed. This is also the net amount of time that gets deleted from the document, because the parts are combined and mixed.
Checking this control instructs Studio Recorder to fade the data left of the caret. The fade type that the program uses is the Cross Fade Type you specify in the Fade tab of the Settings dialog.
Checking this control specifies that you wish to fade in the data right of the caret. The fade type that the program uses is the Cross Fade Type specified in the Fade tab of the Settings dialog.
The Mute command (press u) mutes the selection. When a selection is muted, Studio Recorder replaces the recorded material with silence.
The Reverse command changes your data so that it plays backwards. This command is most useful in cassette production.
The Swap Channels command swaps the channels of a stereo document so the left channel becomes the right channel and the right channel becomes the left channel. This command is useful if you accidentally record a file with the channels reversed.
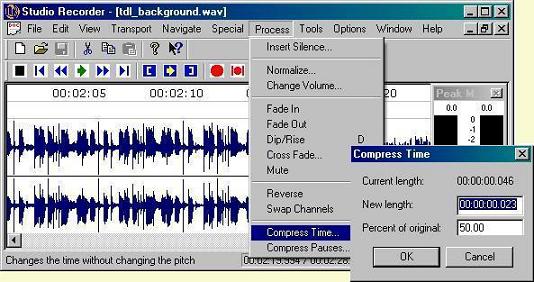
The Compress Time command lets you change the time of a file without changing the pitch. This command is similar to the Increase Rate command in the Playback menu. The difference is that when you use the Compress Time command, changes are actually made to the document rather than just the playback of the document.
When you use this command, Studio Recorder displays a dialog to get information about how much you wish to compress time.
The New Length field lets you specify the preferred length of the document once the compression has taken place. This value may range from 1/3 of the current document length to just under the current length of the document.
The Percent of Original is an alternate way of expressing how you wish the time to be compressed. It ranges from 33 to 99 percent.
When you change one of the values in this dialog, the other value also changes to reflect your input.
Studio Recorder's Compress Pauses command lets you trim space from a recording without affecting the intelligibility of the recording. The command works by removing silence from the recording.
When you use the Compress Pauses command, the software displays a dialog to gather information about how much you wish to compress.
The Compress Pauses By field lets you specify how much of the original pause you wish to eliminate. Enter a percentage value to remove that much of the pause.
The Ignore Pauses Less Than field lets you inform Studio Recorder about the minimum length of pause to compress. The default value is 250 ms. If the software sees a pause which is shorter than 250 ms, that pause gets left alone.
Studio Recorder uses the Threshold to discriminate between content and silence. Adjust this parameter to fine tune the program's ability to identify pauses given the noise level of your specific recording.
If this parameter is set too high, the program cuts content, especially words that begin softly such as words that start with the letter F. If it is set too low, the program does nothing. You may put a 0 in this field to tell Studio Recorder to use the threshold level specified in the Navigation tab of the Settings dialog.
When this box is checked, Studio Recorder fades the edges of the remaining material. This procedure helps make a more natural sounding deletion from the recording.
By default, Studio Recorder uses 50 ms as the value of the length of the fade. This means that the software tries to match the two edges, and it uses 50 ms duration in which to accomplish this task.
The resample command changes the wave data to play properly at a different sample rate. This command is useful when you require a specific sample rate for a specific application. Creating an audio CD is an example of a task that requires a specific sample rate. Audio CD data, for example, must always be prepared at 44,100 Hz, 16-bit, stereo.
Note that Studio Recorder automatically resamples when inserting or pasting. The program always resamples the source material to match the document's sample rate. This may take some time, and if you notice a delay, look at the program's status line to determine if the software is resampling.
Specify the new sample rate in this field.
Resampling is a complex process which takes a lot of time to do well. If the quality of the result is not critical, choose Low for the Quality option. This results in much faster processing. If, however, you are working on a production document, choose High, and be prepared to wait a while for resampling to complete.
The change pitch command modifies the pitch of the document or a selection. This command can be used, for example, to restore recorded material to its original pitch, assuming the original pitch can be determined. Note that this command removes all index tones in its path.
The Change Pitch dialog contains two edit boxes where you specify the pitch change relative to the current pitch. The first box contains the number of semitones to deflect the current pitch, and the second box contains the number of cents. A semitone is one note of the twelve-tone musical scale, and a cent is 1 / 100 of a semitone. This gives you very fine control of the pitch change. Use positive values to increase the pitch, and negative values to decrease the pitch.
Note that changing the pitch also changes the time of the modified material.
There is one more control in the dialog, the quality box. Using a higher quality setting takes longer, but uses a better resampling process for the pitch change. These quality settings are the same as the ones found in the Resample dialog.
The Reverb command adds a reverb effect to the entire document or the selection. Studio Recorder uses the very popular Freeverb algorithm to provide its reverb effect.

When you open the Reverb dialog, you are presented with many parameters to customize the effect.
The Dry Out slider controls how much of the original unmodified signal is included in the output. The default is 0 dB, meaning that the level of the original signal is unmodified.
The Reverb Out slider controls how much of the reverberated signal is included in the output. The default is -10 dB, which is a good starting point.
The Room Size slider controls the length (perceived size) of the reverberation. The default is 50, which offers a reverb length similar to that of a medium-sized room.
The damping parameter controls how much attenuation is applied to high frequencies as reverberation progresses. A lower value lets higher frequencies ring out more, while a higher value reduces them more rapidly. The default is 50.
The Stereo Width parameter pertains only to stereo documents, and controls the perceived width of the reverberated image. Setting this value to 0 results in the reverberation being the same in both channels (mono), while a higher setting increases the difference between the two channels. The default is 100.
The Low Cut Frequency parameter reduces the low frequency content included in the reverberated signal. Setting this value to 0 leaves the input to the reverberation algorithm flat, while specifying a frequency in Hz attenuates frequencies below the specified frequency by 12 dB/octave. This parameter can be used to remove boomy or overly bassy content from the reverberation. The default is 100 Hz.
The Pre-delay parameter controls the time the reverberation is delayed relative to the dry signal. Smaller values can be used to make the reverberation sound a bit larger, and are often timed to correspond to the drum beats in music. Larger values offer a more strange reverb effect, where the reverberation can be perceived to be less related to the original material. The default is 0 ms, or no delay.
The "tail" of the reverb is the reverberated signal at the end of the processed audio, beginning where the dry signal ends. Proper handling of the reverb tail is important, because cutting it off too early results in a bad sounding end to the reverberated content.
Studio Recorder offers two options for handling the length of the reverb tail; Automatic, and Specific Length. If Automatic is chosen, a tail length based on the room size and pre-delay is used. The Automatic option allows the tail to decay by 60 dB before cutting it off. This should be fine in most situations. If you prefer a specific tail length, select the Specific Length radio button and type in the length you desire.
When the reverb effect is being applied to a selection and not the whole document, another aspect of the reverb tail must be considered. What should happen at the end of the selection where the tail begins?
The Mix Tail With Data After Selection option mixes the reverb tail with the data which is beyond the selection, if such data exist. This is the default, and is useful for emphasizing a small segment of content without changing the length of the document. Note that if data do not exist after the selection, the document is extended to accommodate the tail.
The Extend Selection to Include Tail option increases the length of the selection to include the reverb tail. This allows the reverb tail to ring out uninterrupted by other content, but extends the length of the document, and breaks up flow.
The Ignore Tail option ignores the reverb tail altogether, leaving the size of the document unchanged, but producing an abrupt cutoff to the reverb effect.
The Preview button lets you preview the reverb effect from the dialog, and make changes to the parameters as you listen. Click the button or press Alt+P to start or stop the preview.
The Bypass checkbox allows you to toggle between hearing the processed signal and the original signal during the preview. If you select OK to apply the effect, the effect is always applied, regardless of the Bypass switch.
You may press the letter a to hear the peak hold on the peakmeter while in the reverb dialog, to assist you in getting the levels correct and avoiding clipping.
The Measurements command (Ctrl+U) is used to determine level information for the entire document or a selection. This command scans all data in question, and displays information about what it finds. Information includes the negative and positive peak level, the average level, and the RMS (root mean square) level.
The negative peak level is the value of the sample with the largest negative amplitude. When using 16-bit PCM data, the largest negative amplitude possible is -32,768, which is 0 dB.
The positive peak level is the value of the sample with the largest positive amplitude. When using 16-bit PCM data, the largest possible sample value is 32,767, which is also 0 dB.
The average value is the average of all samples measured. This level should normally be close to 0, since wave forms oscillate between positive and negative values. If this level is consistently large with your own recordings, your sound card is probably biasing data toward positive or negative values. Such a bias is called a DC offset.
The RMS level offers an idea of how loud a document or selection sounds. For example, you may have a recording containing samples which reach the minimum and maximum peak values, but it may sound low when played back, because the peaks are extreme. Typical RMS levels of a recording of the spoken word, without using any equipment which alters the level of the signal, are generally around -20 dB or lower. RMS levels of most popular music, however, are typically -12 DB or higher, because lots of dynamic compression is used to make the music sound loud.
By default, Studio Recorder uses a normal RMS calculation for the RMS level. If you wish to use an RMS level based on the AES17 specification, you may change this in the Advanced tab of the Settings dialog.
This command adds the total times of all open document windows and displays the result. This command is useful in a multi-file project when total running time is a concern.
The Calibrate Phrase Parameters command (press p) helps you determine appropriate values for phrase detection by examining the audio at the current document position. The command looks for pauses in the narration and divides them into the three phrase categories--section, paragraph, and sentence. It takes the longest pauses it finds and assigns the length of those pauses to the section category. Likewise, it takes the middle length pauses and calls them paragraphs. Finally, it takes the shortest pauses and calls them sentences. This helps you Taylor the phrase detection parameters to a specific narrator. For the most accurate results, the narrator should use consistent pause times for each kind of phrase.
In addition to grouping pauses into three categories, the command sets the noise threshold parameter. The noise threshold parameter value is the point at which the program distinguishes between silence and non-silence. This is important when the background noise level is relatively high. This may be particularly useful when recording from tape or when the narrator uses a less than optimum microphone or when there is fan noise in the room.
This command examines ten minutes of data, or if there is a selection, it uses the selection as the amount of data to examine. It is important to keep in mind that the narrator's presentation may change in different parts of the document, so you may wish to use this command several times in the document, especially if you work with material that contains a wide variety of narration styles or content changes.
The parameters this command determines are temporary and cannot be saved. If you close the current document then reopen it, the phrase detection parameters revert back to the defaults.
The Default Phrase Parameters command (Shift+P) resets the phrase detection parameters for the current document back to the values set in the Navigation tab of the Settings dialog.
These commands find the highest peak in the specified direction between the current position and the beginning or end of the document or selection. If you use one of these commands outside the selection, the command respects the beginning or end of the selection if you indicate that direction. If, however, you are before the beginning of the selection and use the Find Previous Highest Peak command, the command has no effect. Similarly, if the current position is past the end of the selection, you may not use the Find Next Highest Peak command.
When the command completes, the documents position will be set to the location of the largest peak, and the peak level will be displayed on the peak meter.
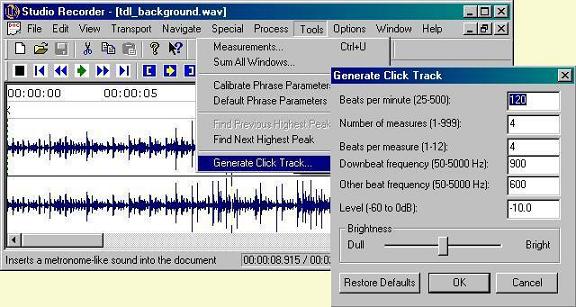
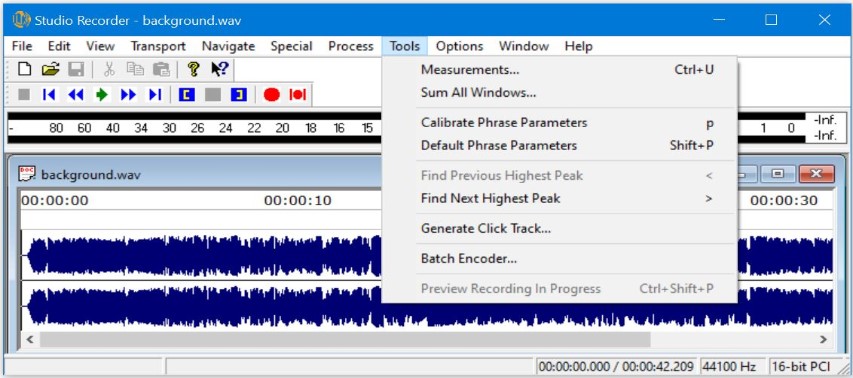
The Generate Click Track command inserts a metronome-like rhythm into the document at the current position. A click track is used to keep time when recording music.
When you select this command, a dialog opens which asks for parameters necessary for generating the click track. The dialog contains the following items:
This field controls the number of clicks which occur in one minute. The default is 120, or 2 beats per second. If you are not sure of the beats per minute you require, you can tap out a rhythm with the shift key. Press the shift key at least 5 times when tapping out a rhythm to get a accurate reading.
This field specifies the number of measures in the track. You may want to leave this value relatively short if you plan to audition the click track before deciding on your final settings.
This field specifies the number of beats per measure.
This field specifies the frequency of the first beat in every measure. The default is 900 Hz, but you may prefer a different frequency, depending on the material you are recording.
This field specifies the frequency of the beats in the measure which are not the downbeat. The default is 600 Hz.
The level field lets you specify the peak level, in decibels, of the click track. If you plan to mix the click track into your project while working, you might try a level between -15 dB and -10 dB.
The brightness slider controls the timbre of the click track. Move the slider to the right to make the track brighter. Brighter instruments, like drums and cymbals, generally require a brighter click track.
Press this button to return all values to their defaults.
Studio Recorder's Batch Encoder compresses all open documents into MP3 files. It is a quick and convenient way to encode a group of files all at once.
To use the batch encoder, open all the files you wish to encode, then select Batch Encoder from the Tools menu. Studio Recorder responds with a dialog that lets you specify the folder where you wish to store the newly encoded files, set encoding parameters, and select whether or not to overwrite existing files.
Once you set these options and select OK, Studio Recorder begins processing all open files in the background, so you may continue to work with the open files normally. It reports the progress of the batch encoding in the Background Progress portion of the status bar.
The batch encoder may skip files for the following reasons:
If Studio Recorder skips any files during encoding, it displays a dialog indicating the number of files skipped.
The Preview Recording In Progress command allows you to review what has been recorded without disturbing the recording currently in progress. This command is useful in situations where other tasks prevent you from monitoring an active recording.
When you issue this command, a new document is created with a copy of what has been recorded so far. You can do whatever you whish with this new document, including reviewing, editing, and saving. It is important to be careful not to issue the Record command, however, or you will disturb the recording in progress, and start recording in the new document.
When you are through with the new document, simply close it with Ctrl+F4, and answer No to the Save Changes question.
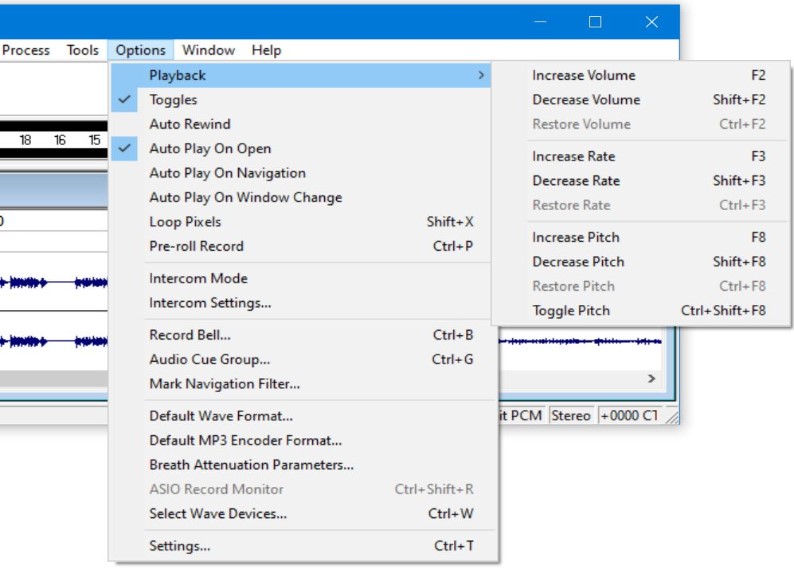
Studio Recorder lets you adjust the volume, rate, and pitch as you listen to a document. The options are as follows:
The Increase Volume command (F2) increases the playback volume.
The Decrease Volume command (Shift+F2) decreases the playback volume.
The Restore Volume command (Ctrl+F2) resets the volume to normal (100%.) Note that increasing the volume above 100% can cause distortion in playback.
The Increase Rate command (F3) increases the playback rate without changing the pitch.
The Decrease Rate command (Shift+F3) decreases the playback rate without changing the pitch.
The Restore Rate command (Ctrl+F3) restores the rate to the originally recorded rate.
The Increase Pitch command (F8) increases the playback pitch similar to speeding up a tape recorder.
The Decrease Pitch command (Shift+F8) decreases the playback pitch similar to slowing down a tape recorder.
The Restore Pitch command (Ctrl+F8) restores the pitch to the originally recorded pitch.
The Toggle Pitch command (Ctrl+Shift+F8) lets you switch between the last pitch setting and no pitch change. It makes it easy to set a pitch value then quickly switch between using and not using that value.
Note that the volume and rate commands only work with uncompressed PCM files, float files, or MP3 files.
The Toggles command enables transport toggles. When transport toggles are enabled, the Play, Record, and Stop at Start functions perform differently. The Play command toggles between Play and Stop, the Record command toggles between Record and Play, and the Stop at Start command toggles between Play and Stop at Start. If this option is not selected, the Record command only initiates recording, and the Play command only initiates playing. Thus, you must use the Stop or Stop at Start command to stop either function if the Toggles setting is unselected.
The Auto Rewind command resets the position of the caret to the beginning of the document when playback reaches the end of the document. This is helpful when editing very small files, such as sound effects.
The Auto Play On Open command makes Studio Recorder enter play mode automatically when you open a document.
The Auto Play On Navigation command makes Studio Recorder begin playing automatically after you use one of the following commands:
The Auto Play on Window Change command makes Studio Recorder begin playing when you switch between open documents or when you open a new document.
When this item is checked, the program repeats the segment of the file under the caret when you use the left and right arrow keys in the wave view. See Pixel Scrubbing for more details.
This option toggles the state of the Pre-Roll Record feature. This option can also be controlled in the Recording tab of the Settings dialog.
The Default Wave Format command lets you select the parameters used when creating a new document. You may also set a document's format with the Select Format command on the File menu.
This command lets you select the default parameters used when exporting mp3 files.
This command lets you configure the parameters used with the Breath Attenuation feature.
This command toggles the state of the ASIO Record Monitor. When the ASIO Record Monitor is on and recording is active, the incoming signal from the ASIO record device is immediately sent to the ASIO play device. This allows you to monitor what is being recorded when using ASIO devices which do not offer hardware monitoring. Be careful to check for possible feedback loops before using this command.
The Select Wave Devices command selects which sound cards (or channel groups on sound cards with more than two channels) the program uses for playing and recording. It also lets you choose between using MME or ASIO.
There are two different technologies available for accessing sound devices with Studio Recorder. These are MME (Microsoft Multimedia Environment), and ASIO (Audio Stream Input/Output.) MME is the oldest, most supported audio technology in Windows, dating back to the earliest versions of Windows. ASIO is a newer audio technology developed by Steinberg Media Technologies GmbH with the primary objective of low latency performance. Note that Studio recorder doesn't benefit from the low latency aspect of ASIO, because of the nature of the product.
Since MME is more widely supported, you will often be forced to use it. In fact, many sound devices, such as those which are built-in to computers, only support MME. If your sound device does support ASIO, however, you may want to consider some of the following advantages.
In short, if ASIO is available, it may be best to choose it, especially if you are making professional recordings where you can't afford to have Windows modifying your recorded data.
To use MME (the default), choose the MME radio button. Two lists, one showing playback choices and the other showing recording choices, will be presented. If you select the Microsoft Sound Mapper option, Windows selects the sound card used based on the settings you choose in the Windows Control Panel. You must select the Microsoft Sound Mapper option as the play device to play a .wav file that uses a compressed format other than MP3. You may also need to select this option when using the Increase Pitch and Decrease Pitch commands in the Playback menu.
To use ASIO, select the ASIO radio button. Three lists will appear. The first list, the device list, lets you choose which of your ASIO devices you wish to use. The second list, the Play Group list, lets you choose which channel pairs will be used for playback. The third list, the Record Group list, is where you choose which channel pairs will be used for recording.
There is also an option in the dialog to open the ASIO Control Panel for the selected ASIO device. This lets you fine-tune the ASIO parameters specific to your sound device. Note that it may be necessary to use Alt+Tab to focus the ASIO Control Panel application.
While each manufacture's ASIO control panel is different, the most common and interesting parameter is the ASIO buffer size. If you are finding that you have dropouts during recording or playback using ASIO, you should increase the buffer size and try again.
The Settings command opens a multi-tab dialog containing most of the settings available in Studio Recorder.
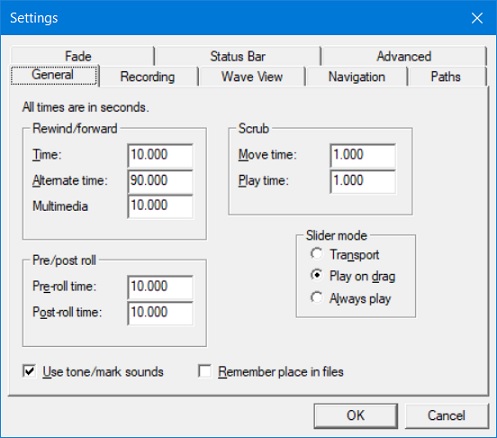
The General Tab of the Settings dialog controls the following settings:
Rewind/Forward Time controls the length in seconds of one press of the rewind or forward command. The default is 1 second.
Alternate Rewind/Forward Time controls the length in seconds of one press of the alternate rewind or alternate forward command. The default is 1 minute.
Multimedia Rewind/Forward Time controls the distance moved when using the Previous Track and Next Track commands on a multimedia keyboard or on a Bluetooth device capable of issuing these commands. The default is 10 seconds.
Scrub Move Time controls the distance moved by the Scrub Forward and Scrub Back commands. The default is 0.03 seconds.
Scrub Play Time controls the duration of audio played when using the Scrub commands. The default is 0.06 seconds.
Pre-roll Time controls how much of the document is played when using the pre-roll command, or recording with the Pre-roll Record option enabled. The default is 3 seconds.
Post-roll Time controls how much of the document is played when using the post-roll command. The default is 3 seconds.
Slider mode offers three radio buttons that control how the transport responds when you use the position slider at the bottom of the time view.
The first setting, Transport, ensures that the slider responds to the stop/ play state of the transport. If you use the position slider while the transport is playing, the position changes, and playing continues at the new position. If, on the other hand, the transport is stopped when you move the slider control, the position moves to where you slide the control, and the transport remains stopped. Transport is the default setting.
The Play On Drag setting produces performance similar to the Transport setting, except the Play on Drag setting makes the transport play any time you drag the thumb.
The Always Play setting makes the transport begin playing any time you use the slider.
When the Use Tone/Mark Sounds setting is selected, the Place Tone and Remove Tone commands play a sound to indicate their success or failure, and the Set Mark and Clear Mark commands generate tones to confirm your actions. When you successfully place a tone, the program plays two short ascending tones. When you successfully remove a tone, the program plays two short descending tones. If a tone-related error occurs, Studio Recorder sounds a short buzz.
When you turn this setting off, the program plays no sounds for placing and removing tones or marks, and shows an error dialog when a tone-related error occurs.
The default for this setting is to use tone sounds.
When you open a file and you have the Remember Place in Files setting selected, Studio Recorder returns you to the last place you were when you closed the file.
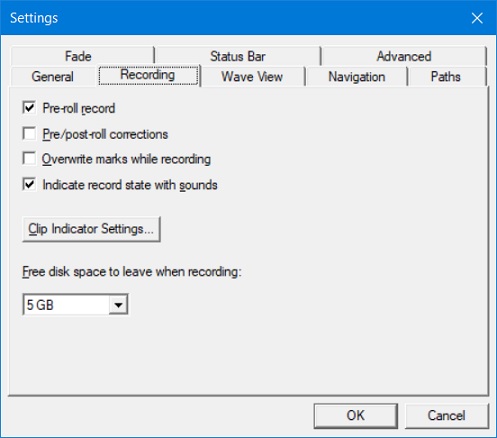
The Recording tab of the Settings dialog allows you to control the following settings:
The Pre-Roll Record checkbox instructs Studio Recorder to provide a pre-roll when you press the Record command while the transport is stopped.
The Pre/Post-Roll Corrections setting is selected by default. If this option is selected, and you use the Record command in a document with a selection, the program pre-rolls up to the start of the selection, enters record mode, and finally post-rolls at the end of the selection. This lets you record over a selection with pre-roll and post-roll prompting. If this option is not selected, you may still record over a selection, but there will be no pre/post-roll.
Set the amount of time Studio Recorder uses for the pre-roll and post-roll in the General Tab of the Settings dialog.
When this box is checked, Studio Recorder clears marks which you record over. Uncheck this box if you which to preserve marks when recording over them.
Normally, you don't want any external sounds getting into your recordings. As a result, Studio Recorder, by default, makes no sound when starting or stopping recording. If, however, you wish to receive audio confirmation when starting or stopping recording, check this box.
The Clip Indicator Settings button adjusts several characteristics of the clip indicator.
When the Audible Clip Indicator control is checked, Studio Recorder helps the narrator identify clipping during the recording process by playing two short alert tones when the level of the incoming signal is too strong. This audible alert helps the narrator monitor the recording level without having to keep his eyes on the peak meter.
The Audible Clip Indicator is enabled by default.
Normally, clipping occurs when the signal reaches 0 dB. Unfortunately, some cheaper sound cards actually clip at lower values. You may use this control to make the clip indicator activate at one of those lower values.
This setting controls the volume of the clip indicator sound. The default is -15 dB.
This control adjusts the timbre of the clip indicator sound.
This control lets you specify a reasonable amount of disk space to leave while recording. Since the maximum recording time in Studio Recorder is limited only by free disk space, it is possible to fill an entire drive, especially if the recording process is left unattended. It is a good idea to avoid filling up your entire drive, especially if you are using your Windows boot drive for recordings, since Windows and other apps require a fair amount of free disk space to function properly.
The default amount of disk space to leave while recording is 5 GB. Remember that you need free space equal to double the size of the recorded material to successfully save it to disk.
Recording material into a mono document presents an interesting question. Which channel of a stereo source should be recorded?
Generally, only the left channel from an audio source is recorded when making a mono recording, but this is completely determined by the audio device's driver. Studio Recorder offers four ways to address this problem:
The default setting is to use the driver's default, but you may change this to meet your specific requirements.
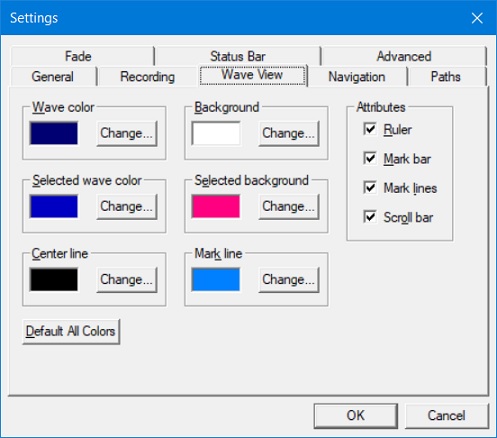
The Wave View Tab of the Settings dialog customizes the appearance and attributes of the sound wave representation when using the wave view.
You may change the following characteristics of the wave:
You may use the Default All Colors button to return the wave view's appearance to the default colors.
The Default Magnification combo box sets the amount of Wave View magnification applied when first opening a document. The default is 0 dB.
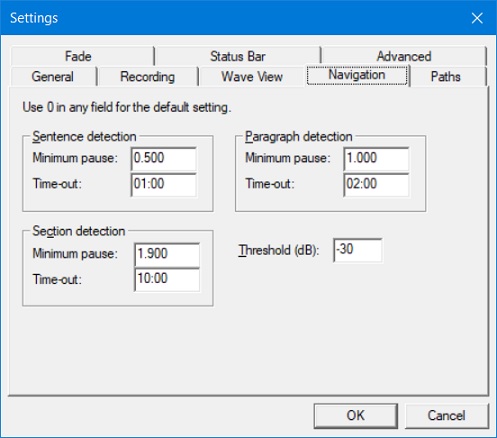
The setting values for Sentence Detection are used by the Next Sentence and Previous Sentence commands.
The Minimum Pause specifies, in seconds, the time that must exist between phrases for the program to detect a sentence break. The default is 0.5 seconds. If you change this setting, you should use a value very close to the default, perhaps 0.4 or 0.55 seconds. If you choose a value that is too small, the program stops on non-sentence pauses, such as commas. If you use a value which is too large, the program misses some sentences entirely.
The Time-out value specifies the maximum time in the document to search for the next or previous sentence. The default is 1 minute.
The setting values for Paragraph Detection are used by the Next Paragraph and Previous paragraph commands.
The default minimum pause for paragraph detection is 1 second. The Time-out default is 2 minutes. See the discussion of the Sentence Detection settings for more details.
The setting values for Section Detection are used by the Next Section and Previous Section commands.
The default minimum pause for section detection is 1.9 seconds. The Time-out default is 10 minutes. See the discussion of the Sentence Detection settings for more details.
The Threshold setting controls the threshold at which the program discriminates between silence and non-silence when detecting phrases. The default is -30 dB, and you can use values from -60 dB to -1 dB. This setting can be very useful when attempting to detect sentences, paragraphs, or sections in poor-quality files containing extensive background noise. If you have such a file, try a setting of -25 dB or so.
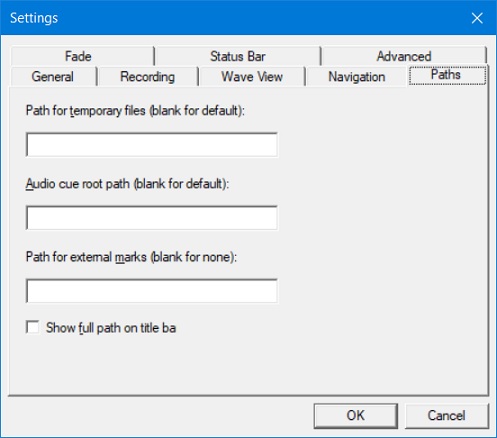
The Paths Tab of the Settings dialog controls the following settings:
The Path for Temporary Files field specifies the storage location of temporary files generated by the program. Temporary files are used to facilitate editing functions. If you leave this field blank, Studio Recorder uses the default temporary folder on your system. If you happen to have two hard drives, it makes performance much faster if the temporary folder is not on the drive where the files you are working with are stored.
The Audio Cue Root Path field specifies the path where the audio cue group folders are stored. This should normally be left blank, indicating that you want to use the audio cues that come with Studio Recorder.
The Path for External Marks setting lets you specify the location of externally stored marks.
This checkbox makes the program show the full path of files in the title bars of documents. The default is off, which shows only the document's file name.
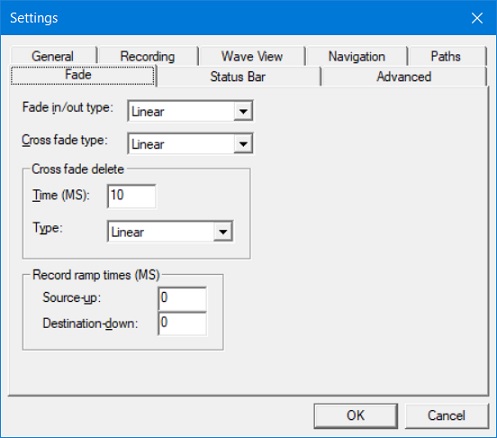
The Fade tab of the Settings dialog controls how you wish to treat the different fade processes in Studio Recorder.
Studio Recorder supports four types of fades. These are linear, linear squared, sign curve, and exponential. The type of fade you select depends on the source material and the time of the fade.
The Linear fade sounds loud for most of the fade then abruptly gets quiet very close to the end. The signal is at -6 dB at the midpoint.
The Linear Squared fade sounds more natural than a normal linear fade. You might equate this fade to the sound you get when turning down a volume control. The signal is at -12 dB at the midpoint.
The Sign Curve fade starts slow, gets fairly linear, then fades out aggressively at the end. The signal is at -6 dB at the midpoint.
The Exponential fade is very aggressive and fades out very quickly. This fade drops by 48 dB by the midpoint when using 16-bit samples.
The Fade In/Out Type control lets you assign the fade type used by the Fade In and Fade Out commands on the Process menu.
The Cross Fade Type control lets you set the type of fade used by Studio Recorder's Cross Fade command.
The Cross Fade Delete Type option lets you select the type of fade used by the Cross Fade Delete command.
This control specifies the number of milliseconds that Studio Recorder cross fades after the deletion when the Cross Fade Delete command is used.
Record Ramp Times settings include the Source-up and Destination-down fields, which are used to control short fades when entering record mode. The Record Ramp settings are used to minimize noise generated by controls when entering record mode. If you set both the Source-up and Destination-down fields to the same value, a linear cross-fade is performed between existing material and new material. Usually, however, you will want the Source-up value to be larger than the Destination-down value.
The Source-up field contains the time, in milliseconds, of a linear fade-in, which can be applied to incoming data when recording starts. The value defaults to 0, and it can range from 0 to 500 milliseconds. If, for example, a narrator presses F6 to enter record mode, the keyboard will most likely generate a click that can be heard in the recording. In this situation, the Source-up setting could be used to minimize the keyboard noise or to mask it entirely. This setting is also useful when using a sound card which inserts a pop or click when recording is started.
The Destination-down field contains the time, in milliseconds, of a linear fade-out which can be applied to existing material when recording starts. The value defaults to 0, and it can range from 0 to 500 milliseconds. The Destination-down setting is used to minimize abrupt changes in the recording. Consider the situation in which a tight edit must be performed on material that contains a breath. If you enter record mode during an existing breath, the breath will be unnaturally cut off. The Destination-down setting can be used to compensate for this problem.
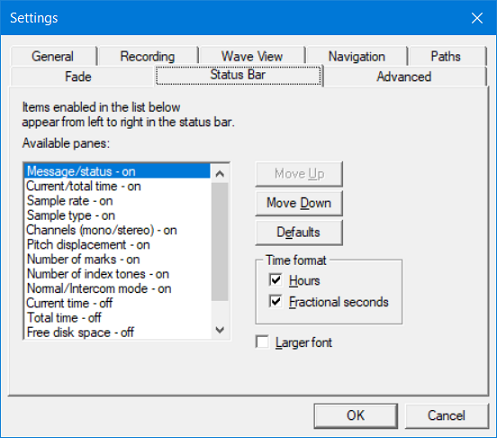
The Status Bar Tab of the Settings dialog lets you change the appearance of the program's status bar. You may include or exclude any items of information, and you may arrange the panes of the status bar to appear in the order you wish.
The Available Panes list shows each item of information you may include as part of the status bar. You may toggle the status from On to Off or Off to On by pressing the space bar while the item of interest is highlighted. When the item's status is set to On, Studio Recorder includes the pane in the status bar. You may also click the item with the mouse to toggle.
The Move Up and Move Down buttons let you arrange the items in the status bar. The items in the list from top to bottom appear on the status bar from left to right.
The Time Format control lets you customize the format of times used in the status bar. You may include or exclude hours and fractional seconds.
It is sometimes difficult to see the status bar text. Studio Recorder increases the size of the font in the status bar by 50% when this box is checked.
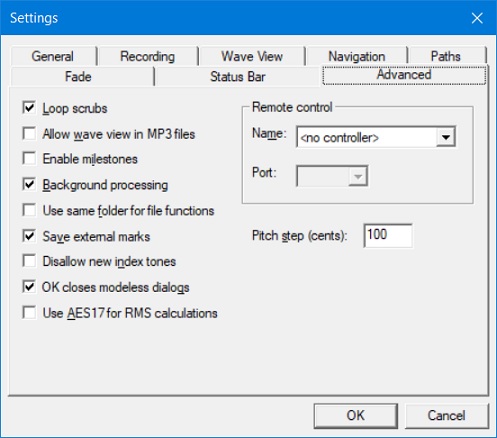
The Advanced Tab of the Settings dialog allows you to control the following settings:
The Loop Scrubs setting is selected by default and causes scrub segments to be looped while the Ctrl key is held down. Deselect this option to hear scrub segments only once when scrubbing.
Checking this box lets you see a wave view with MP3 files. While it seems that you would always want such a feature, there is a penalty. The drawback is that when this option is checked, the program must decode the entire MP3 file, slowing down the opening process.
This control makes the program drop marks in strategic places in the document upon the execution of certain key commands. When one of these commands is used, the program drops a mark at the beginning and end of the command's result so it is easy to get to the start or end of the new data.
The commands that are affected are: Record, Record Insert, Insert File, Insert File Pair, Paste, Paste To Fit, and Mix.
Normally, Studio Recorder keeps track of each folder you use for various file related functions and offers that same folder by default the next time you use that command. When this box is checked, the program offers the same folder for all file functions, offering the last folder used as the default.
Studio Recorder keeps individual folder location information for the following commands:
When this box is checked, Studio Recorder saves marks in external mark (.mrk) files when exporting MP3 files and when modifying marks in existing MP3 files.
Index tones were very useful when cassettes were popular. If you are no longer producing cassettes, you may want to check this box to prevent accidentally placing new index tones in recordings.
The Change Volume command uses a modeless dialog box. This is a dialog box which can remain open, allowing you to perform a series of volume changes more efficiently.
By default, Studio Recorder closes the Change Volume dialog when OK is pressed. If you wish to keep the dialog open, uncheck this box. When this box is unchecked, the dialog box will stay open, and you may use Alt+F6 to toggle focus between the active document and the dialog.
Normally, Studio Recorder reports RMS values as the dB level of a traditional RMS calculation on the data in a document. If you are required to reference your measurements to AES17, check this box. This makes RMS values report to be 3.0103 dB higher then the traditional RMS calculation.
When using ASIO as the protocol for playing and recording, Studio Recorder, by default, opens both the playback and recording channels of the selected ASIO device, even if you are only playing or only recording. If you commonly play and record at the same time, or are likely to get a clip notification sound while recording, you will want to leave this box checked. This is because if Studio Recorder Needs to, for example, open the play channel while recording, a small glitch will occur in the recorded material if this box is unchecked. If you find that ASIO performance is sluggish on your system, however, unchecking this box may help.
Normally, only one instance of Studio Recorder is permitted to run at a time. This means that if you attempt to start Studio Recorder when it is already running, the running copy will be focused, and you can continue working where you left off. A running copy of Studio Recorder is referred to as an instance.
There are times, however, when it may be advantageous to run multiple instances of Studio Recorder. Perhaps you are recording a document and wish to edit another document at the same time, but don't want to take the chance of disturbing the recording in progress. Or, perhaps you have multiple sound cards, or a sound card with multiple pairs of inputs, and you wish to record two or more programs at once. For these cases, multiple instances can help
Note: using multiple instances of Studio Recorder is a very advanced feature, and must be handled with extreme care to prevent confusion. Studio Recorder does not provide any inherent information about which instance is which; it is entirely up to you to reliably differentiate between instances. For example, you might choose to leave a document focused in each instance which reminds you of the instance you are using. If you assign a hotkey to the shortcut you use to start the program, pressing that hotkey will focus the first instance you ran. Beyond this, you're on your own.
The Allow Multiple Instances checkbox is unchecked by default, allowing only one instance to run at a time. Check this box to allow multiple instances.
Normally when using ASIO, Studio Recorder will not let you disturb a recording in progress when working in a document different from the one being recorded. For example, if you are recording and you attempt to play a document with a different sample rate from the one being recorded, Studio Recorder gives an error and protects the recording in progress. This protection cannot happen across multiple instances, however. So, if you play a document with a different sample rate in a different instance, your ASIO device may change the sample rate, ruining the recording in progress.
Studio Recorder supports the use of remote control devices. These external controllers let you control the software without having to use the computer's keyboard. Such a configuration may prove advantageous in a number of situations including:
Studio Recorder supports the following remote control devices:
This controller has 19 buttons, a 2 line 20 character/line display, 7 indicator lights, and a data wheel. Studio Recorder uses the data wheel as a jog wheel and only uses the record light. This is the only supported controller which is wireless, and is also the smallest controller supported.
This controller is a control surface, a MIDI hub, and a sound card all in one. Studio Recorder only supports the transport controls on this device.
This is a discontinued controller which has 15 buttons plus a Shift key, a jog wheel, and a shuttle wheel. It also has a 4 line 20 character/line display. It has no lights. It was discontinued at the end of 2004.
This is a controller with 18 buttons, a jog wheel, a shuttle wheel, and a joystick. Its only indicator is a record light. It appears to be built well, being of heavy metal construction.
The Remote Control Name list lets you select the remote control device you have connected to your PC. Studio Recorder shows only items in the list that you have either installed the driver software for (as supplied by the device manufacturer) or devices that are connected that do not require separate drivers. The program always lists serial controllers and lists other types of controllers only when they are connected.
The port combo box selects the serial port used for the remote control if such a port is required by the selected remote control.
Once you have installed any required drivers and specified which remote control to use, you may use Studio Recorder's Remote Control Key Describer to identify the keys and their associated functions.
The Pitch Step setting controls the amount of pitch change that occurs when using the Increase Pitch and Decrease Pitch commands. The default is 100 cents, which is equal to one semitone. A cent is 1/100 of a semitone in the musical scale. Therefore, with a pitch step of 100 cents, it takes twelve uses of the Increase Pitch command to double the pitch.
Many of Studio Recorder's longer running functions play a notification sound when they complete. The Completion Sound Level control lets you specify the level of this sound in decibels. The default is -15 dB. You may put a 0 in this field to disable the completion sound.
The Background Processing checkbox makes Studio Recorder perform many functions in the background, so you may continue to work while processing occurs. This box is checked by default.
Some of the processes that run in the background include saving / exporting files, normalizing, and measuring. You can, for example, normalize one document while editing another when this box is checked.
Studio Recorder lets you control the number of background threads which may run at the same time. The default is 2 which is sufficient in most situations, but if you commonly use the Batch Encoder to encode many files at once, you may find that increasing this value will substantially shorten the time it takes to encode the files. The number of threads available depends on your computer's CPU.
The Restore Defaults button will restore all of Studio Recorder's settings, including settings not controlled in the Settings Dialog, to their defaults. You will be prompted to be sure you want to do this, since all customization of settings you have made will be permanently lost.
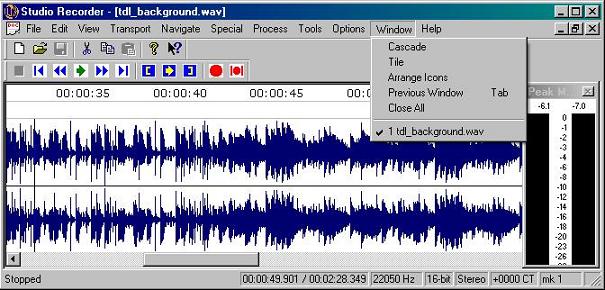
The options on the Window menu let you change the way information appears on your screen.
Select Cascade to arrange windows so they overlap with the title bar of each window remaining visible.
Select Tile to arrange windows as non-overlapping tiles.
Select Arrange Icons to arrange the minimized document window icons at the bottom of the window.
The Last Window command (press Tab) switches to the last window you used. It is used to quickly and easily toggle between the last two active documents.
The Close All command closes all document windows and prompts you to save any modifications.
The Help menu gives you access to the Studio Recorder documentation, information about the version of the program, and the ability to check for software updates.
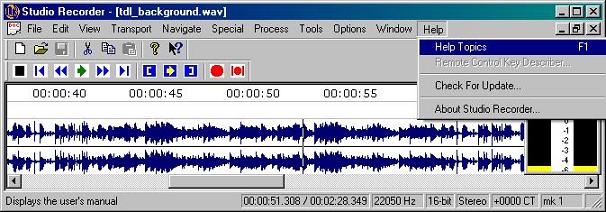
The User's Manual option (press F1) opens this documentation.
The What's New option opens a document which shows the revision history of the product.
The Remote Control Key Describer option opens a dialog that displays the key name and function each key on a remote control performs in Studio Recorder. This helps you learn which keys on the controller perform each function in Studio Recorder. Note that the remote control cannot perform every function in Studio Recorder. Only the most common recording, navigation, and editing functions are supported.
The Check for Update option checks the APH servers to see if there is an update to the software. If there is an update, the program shows you which version you are using, shows you the most recent version, and asks if you would like to update the software. If you decide to update the software, Studio Recorder contacts the server, downloads the latest version, and installs the new software.
The About Studio Recorder option shows the version of Studio Recorder you are using. This may be important if you call for technical assistance.
Studio Recorder supports several advanced features that aid in the production of high-quality audio content.
The Open A Copy command, found on the File menu and accessed with Ctrl+Shift+O, lets you open a copy of an existing .wav file, minimizing the chances of disturbing the original. The title bar of the document indicates that it is a copy, and you may save the document under a new name after you modify it if you wish.
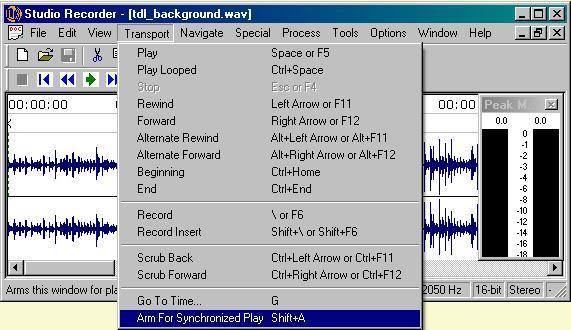
The Arm for Synchronized Play command (press Shift A) arms a document for synchronous playback when Recording is started. This is useful when recording several tracks that will be mixed together.
When you arm a document for playback then start recording in either the armed or another document, playback of the armed document begins when you press Record. This process lets you listen to a track while recording another and keeps the tracks synchronized.
There are several ways to use this feature.
To use the Sound on Sound method of mixing, use the following steps:
As long as no clipping occurs, you may perform the above steps as many times as you like without degrading each track, but you cannot change the levels of any tracks once they are recorded.
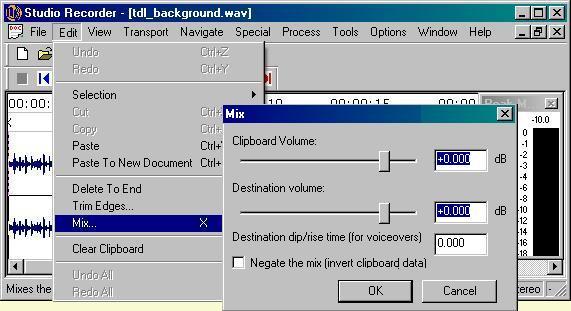
In Track Mix Recording, you record in one document while playing a second and mix the two documents after recording to produce a final result. This lets you control source and destination levels and minimizes clipping.
To mix with this technique:
You may repeat the above steps to mix multiple tracks. You may also wish to save tracks as you go for possible future negation or remixing.
This command (press x) mixes sound on the clipboard with the data at the current position. When you select this command, the program shows a dialog with two sliders that control the levels of the mix, an edit field to control Dip/Rise times, and a checkbox that negates the mix.
The Clipboard Volume slider controls the level of the clipboard data. The Destination Volume slider affects the destination (the current document). You would normally set the destination to 0 and use the Clipboard Volume slider to adjust the level of the mix. It may be necessary, however, to use both level controls if clipping occurs.
This edit control lets you specify the time in seconds before the mix that the destination level dips down to match the destination mix level. This time is also used at the end of the mix to raise the level back to the original level.
To properly use this feature, set the destination level to a value less than zero and place a non-zero value in this edit field. If you do not wish to Dip or Rise the destination, use 0 as the value for this field.
The Negate checkbox negates the effect of a previous mix. You must still have the source data on the clipboard. This feature can be useful when you mix many documents together and realize you need to remove one of the tracks in the chain. You may only negate a mix if the data did not clip on the original mix, and you negate at the same position as the original mix and at the same level as the original mix. You must always set the destination level to 0 dB.
The Record Bell is useful when preparing material which must be limited in length to fit production requirements, such as material for a show, commercial, or audio cassette.
The Record Bell is a tone that sounds at a pre-determined time to prompt the narrator to prepare for the completion of, for instance, one side of an audio cassette. Such preparation could include the searching for an appropriate breaking place, the announcement of cassette side information, or the finalizing of several other tasks.
The Record Bell setting is controlled either with Ctrl+B or with the Record Bell option in the Options menu.
When you give the Record Bell command, Studio Recorder responds with a dialog showing three options.
The first option is a checkbox that tells Studio Recorder to notify you with a bell tone at a specific time. If this option is selected, two more options become available--the time to sound the bell, and the time to repeat the bell after the initial notification.
Studio Recorder lets you insert up to ten different audio cues into your recording. While the program comes supplied with default sounds you may insert, it is easy to add custom sounds.
To insert an audio cue, use the keys Alt+1-Alt+0 while recording. You may audition these sounds by pressing the appropriate command key while the transport is in the stop mode.
The audio cues are grouped by folder according to the sample rate. Each folder contains ten files named 1.wav, 2.wav, etc.
By default, the root of the audio cues is the folder called "Bins" in your Studio Recorder program folder. The Paths tab of the Settings dialog controls this root folder. Such control is useful for sharing a set of audio cues among several users in a network setting.
By default, the folders in the Audio Cue root folder correspond to sample rates. It is important to ensure that the type of file you try to insert into your document is compatible with your document. Maintaining separate folders for files of specific sample rates is an efficient way to keep the files organized.
To select the group to use, press Ctrl+G or select Audio Cue Group from the Options menu. When you do, Studio Recorder displays a list of the folders located in your Audio Cue root path. Select the folder you want to use for your special audio cues.
To add additional groups, make a new folder in the Audio Cue root folder and give it a meaningful name. Next, add files named 1.wav, 2.wav, etc., for each custom sound you wish to add into the folder you just created.
Studio Recorder lets you export your document as an MP3 file. MP3 is an industry standard way of providing a reasonable rendition of an audio file in much less space than is required for an uncompressed, high quality audio file. MP3s are excellent for transmission via the Internet or to store much more audio material on a CD.
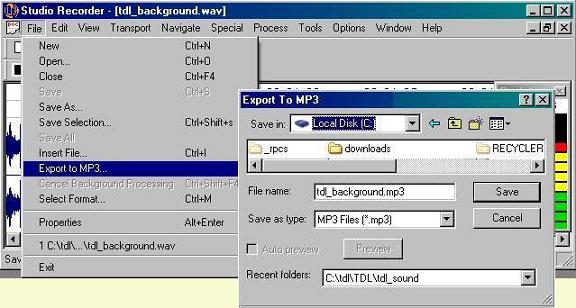
Unfortunately, you do not want to use MP3 as your master file for editing or making changes. Each time you export a native wave file to MP3, you loose quality.
When you select Export to MP3 from the File menu, Studio Recorder displays a dialog box that lets you name the new file. By default, the program gives you the original name with an .MP3 extension.
Once you name the file, Studio Recorder displays another dialog box that lets you select options about the quality and type of file you want converted to MP3. In general, most files should use the default values for these options. If you have specific requirements, you may wish to adjust one or more of the items in this dialog.
The variable bit rate encoding option can potentially render smaller file sizes that maintain a better sound.
Bit Rate is the level of compression applied to the file. The higher the number in this field, the better the sound quality will be, though the file will be larger.
Resample Rate is the sample rate at which the output file will be written.
The mode tells the MP3 encoder if you want mono, stereo, or joint stereo.
The Quality setting gives you a choice between sound quality and encoding speed.
Studio Recorder takes special care to save your marks along with your MP3 file. Since the MP3 format has no formal means of preserving marks, Studio Recorder uses its own scheme. This scheme works by saving a file with the same base name as your MP3 file, but with an "mrk" extension. The program reads these .mrk files when you reopen an MP3 file.
If you are reading an MP3 file from a read-only media, such as CD, Studio Recorder cannot save the .mrk files to that media. It is in such cases that you want to use the External Mark Folder option in the Paths tab of the Settings dialog to tell Studio Recorder where to place these mark files.
The Export All Correction Marks function saves all the correction marks and associated text from all open files to a text file that you may view or print.
The Mark Sentences command on the Special menu places a generic mark before each sentence found in the document. The pause used to determine a sentence is set in the Navigation tab of the Settings dialog.

There are often times when it is useful to split a large document into many smaller ones. This can be done with the Split By Marks command found on the Process menu.
When you use this command, you are asked for the folder where the split files should be placed. You may type the folder name, or use the Browse For Folder button to select a folder. You should probably create a folder to be used specifically for this command, since the command automatically overwrites any existing files.
When splitting by marks, the resulting file names are composed of several segments, separated by a dash. The number of segments depends on the type of marks in the document, and whether the marks are named.
The first segment of the split file name is always the original document's file name.
The second segment is always the sequence number of the split file, with the first file numbered as 0001. The sequence number allows sorting all split files with their document name sequentially when sorting files alphabetically in Windows.
The next segment is the level number of the custom mark, based on the mark type. For example, all custom 2 marks appear as l2. Generic marks, those marks set with the letter m, do not include this segment.
The final segment is the mark's name. If the mark is not named, a sequential number for the type of the mark is used in place of the name.
The Split By Marks command works by saving content between marks into individual files. If there is no mark at the beginning of the document, content between the beginning of the document and the first mark is saved in a file called < file name>-premarked Content.wav.
Studio Recorder opens mp3 files instantly. If, however, you wish to edit such a file, the program must decode it first. Normally, Studio Recorder decodes on demand except in the case where you wish to record into an mp3 file. If you attempt to record to an mp3 file that has not already been decoded, the program warns you that you must decode first. This warning must exist, because decoding takes time, and the recording would not start instantly if you didn't decode.
The other slight drawback to on-demand decoding when using common editing functions is that decoding the mp3 file to permit editing takes time. The program only has to decode once, and it does it automatically when necessary, but you may use the Decode command to perform this decoding when you wish.
Once Studio Recorder decodes an mp3 file, it stores the file internally as a wav file. You may save the wav file if you think you will need to edit again. (This is recommended because if you edit mp3 files multiple times, the quality of the resulting file degrades with each decode/reencode cycle.)
The Cancel Background Processing option is available if you have enabled background processing capabilities in the Advanced tab of the Settings dialog and you have started a processing operation which runs in the background. When you use this command (Ctrl+Shift+F4), Studio Recorder cancels the command which is running in the background on the current document.
To see a list of technical information about a document, use the Properties option on the File menu, or press Alt+Enter. This command shows the documents type, sample parameters, and encoding parameters for MP3 files.
If your keyboard does not have an Applications key, you may use Ctrl+Shift+X to open Studio Recorder's context menu. This function is usually accessed with Shift+F10, but Shift+F10 is used by Studio Recorder for the Magnify Down command.
The sample is the smallest unit of an audio file. If the occasion arises where you need to move the caret just one sample at a time, you can press Ctrl+Alt+Left Arrow to move to the previous sample, and Ctrl+Alt+Right Arrow to move to the next sample. You may also use Ctrl+Alt+F11 and Ctrl+Alt+F12 to accomplish the same task.
Studio Recorder allows you to change the start and end of the selection by a very small amount. This can be helpful for tuning pops and clicks out of a selection, or for creating sample loops.
Use Ctrl+Shift+Right Arrow or Ctrl+Shift+Left Arrow to change the selection by the scrub distance specified in the General page of the Settings dialog. You may substitute F11 for the Left Arrow and F12 for the Right Arrow in these commands to minimize conflicts with screen readers. When using these commands from Stop mode, the scrub segment is looped as when normal scrubbing is performed. Note: it may be helpful to set the Scrub Move Time and the Scrub Play Time to the same value to hear an accurate representation of what is being selected.
Use Ctrl+Alt+Shift+Right Arrow or Ctrl+Alt+Shift+Left Arrow to change the selection by one sample. You may substitute F11 for the Left Arrow, and F12 for the Right Arrow in these commands. These commands produce no sound when used from Stop mode.
It is helpful to loop the selection while fine tuning it with the above commands, so you can hear your changes in real time. If you use the Loop Selection command, Ctrl+Shift+Space, the selection will continue to loop while you tune it.
When tuning a selection while looping it, it becomes necessary to tell Studio Recorder which end of the selection you wish to modify. Studio Recorder defaults to modifying the end of the selection while looping. You may press Alt+End to toggle between tuning the end or the start of the selection.

A looped sample is a short piece of audio which is generally loaded into a sampler (a sampling keyboard or sample rendering software), and played back using MIDI (Musical Instrument Digital Interface.) Studio Recorder supports one looped sample per file, and only supports forward loops.
To create a looped sample, you must first select the material which will be looped. This is true even if the material will only loop once, that is, will not be repeated. If the material will be looped, use the techniques discussed in Fine Tuning the Selection to tune the loop.
When the loop is ready, use the Create/Update Looped Sample command on the Special menu to create the looped sample. This command presents a dialog where you specify details about the sample.
Specify how many times to repeat the loop in the Loop Repeat Count field. Entering 0 will cause the loop to loop infinitely until it is stopped by the sample rendering device. Specifying 1 will play the loop through once without repeating it.
Use this combo box to specify the MIDI note (pitch) of the sample. The default is middle C, MIDI note 60.
To play the looped sample, use the Play Looped Sample command on the Transport menu, or press l.
If you wish to set the selection to an existing sample loop, use the Select Sample Loop command on the Selection submenu, or press Shift+L. You can then adjust the sample loop if desired.
To remove the looped sample from the document, use the Clear Looped Sample command on the Special menu. This command only removes the parameters of the looped sample; the actual wave data are left intact. The sample is automatically cleared if the document is changed by any other action, such as recording, or changing the volume.
The Next and Previous CD Block commands are found on the Navigate menu, and can be useful when preparing tracks for an audio CD. Blocks of data on an audio CD contain 588 stereo samples each. Therefore, audio CD tracks always contain a multiple of 588 audio samples.
If a .wav file you are burning onto a CD does not contain a multiple of 588 samples, your CD writing software will probably pad out to the next CD block with zeros, resulting in silence. If your CD tracks are not meant to run together, you can simply let your CD writing software pad your files with silence as it creates the CD. If, however, you are preparing live material, such as a lecture or a concert, you should use the Next and Previous CD Block commands to be sure you split your CD tracks on a 588 sample boundary. This will prevent the chance of a very small gap of silence being added between tracks. Note that these commands only work with documents containing the following format: 44,100 samples per second, 16 bit samples, two channels (stereo.)
{ moves to the previous CD block and } moves to the next CD block.
Unfortunately, there are times when you will find audio files that are not complete. The file may have part of its header information missing, or it might have mangled information in the header. Studio Recorder provides a means to load these raw audio files so you may correct, edit, and save them as regular .wav files with proper headers.
One occasion to use the ability to load raw audio data is the very rare instance where Studio Recorder crashes. The program stores its files in your temp folder with the name that starts with spr. You may load these temporary files and piece them together to recover any data you may have lost.
To open a raw audio file, use the normal open dialog, but use Raw as the file type.
When you use raw files as the file type, the program shows you all files weather they are audio or not. Of course, loading a non-audio file into the program results in audio that you would never want to use or save.
Once you identify the file name, Studio Recorder asks for some information about the file. In addition to the information in the Select Format dialog, the Import Raw Data dialog asks for the number of bytes to ignore at the beginning and at the end of the file. The header is stored at the beginning of the file. If you don't know the number of bytes to skip, it is usually best to select 0 then cut out the audio noise that results from playing non-audio data as audio.
Note that temporary files generated by Studio Recorder do not contain headers.
If your channels are reversed or if the file plays incorrectly when you load raw audio data, you should increase the number of bytes to skip at the beginning of the file until you get a number that yields correct results.
Studio Recorder recognizes several command line switches the help automate recording tasks.
Studio Recorder opens any file names you pass on the command line. The program creates a new document window for each file.
The /record command line switch starts Studio Recorder with a new document and begins recording. You may also specify the amount of time to record with the /record switch. The following command starts the program and begins recording until 30 minutes elapse. sr.exe /record 30:00
The /play switch makes the program begin playing a file. You may specify a file name with the /play switch. If you do not specify a file name, the switch begins playing the current document if the program is already running.
The /stop switch makes the program stop playing or recording the current document.
The /stopall switch makes Studio Recorder stop all playing and recording, no matter which document is active.
The /nofocus switch tells Studio Recorder not to take the focus when the program starts. This switch is used to prevent the program from taking focus when it is called from the Windows Task Scheduler.
One of the most important aspects of making a good recording is choosing the proper equipment to be used. At the heart of this equipment is the sound card.
Unfortunately, the sound card that came with your computer is probably not the one you want to use for professional recordings, though you may need it in conjunction with another sound card if you want to use Intercom Mode. The main differences between any two sound cards are performance and options. A basic multimedia sound card, such as one that might be sold already installed in a computer, generally has at least three 1/8" jacks. The three most common jacks are a microphone input, a line input, and a line output. If you want to make anything better than a casual recording, avoid using the microphone input on this type of sound card. These inputs are generally noisy, and work with inexpensive electret microphones, which are unsuitable for professional work.
If you have a microphone preamp and a suitable microphone, you may be able to connect your preamp to the line input of an inexpensive sound card. Results with this kind of configuration can vary from fair to good. Mid-range sound cards offer improved support for games. While some of these cards will sound better than the most inexpensive ones, they will not perform as well as a professional sound card, and their microphone inputs should never be used for serious recordings. Moreover, beware of sound cards, such as some Creative Labs cards, which perform real-time sample rate conversion. Using a sample rate other than the optimal one on these cards can degrade recording quality.
As with basic sound cards, higher quality or professional sound cards offer various levels of performance and options. Most often, they will offer only line-level inputs and outputs, and will support balanced connections. You should use balanced connections between recording sources and your sound card when possible, because balanced connections are generally much quieter than unbalanced ones. A balanced connection is one that uses three conductors instead of two. This allows the positive and negative sides of the signal to use one conductor each and a ground to use a third conductor. The ideal configuration would include, at minimum, a high-quality microphone preamp with an output level control and a professional quality sound card. If your professional sound card offers a microphone preamp, you should be able to use it instead of an external preamp.
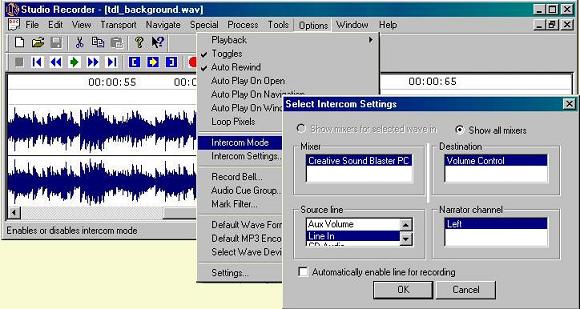
Intercom Mode lets you use your sound card as an intercom. This might be useful, for example, when recording a narrator who is working with a narration monitor.
Because of limitations related to how Intercom Mode is implemented, only monaural programs can be recorded with Intercom Mode.
Intercom Mode works a little differently with different brands of sound cards, so a little experimentation may be necessary. For this discussion, we will be using a Sound Blaster-compatible sound card. Note that Intercom Mode does not work with most professional quality sound cards. Intercom Mode requires a sound card that supports the Windows Multimedia mixer services. If you want to use Intercom Mode with a sound card that does not support the Windows multimedia mixer services, you will have to add another sound card to your system.
Intercom Mode also requires that you run Studio Recorder in Windows XP Compatibility Mode.
To use Intercom Mode, you need two microphones with corresponding preamps, two pairs of headphones, a mixer, and proper connecting cables. Of course, you may be able to find one component to meet all of the mixing and amplification requirements. Note that if your sound card has a microphone input, you cannot use it for Intercom Mode. These types of inputs are generally monaural, and are of a lesser quality than a line level input.
Studio Recorder uses the Windows multimedia mixer driver provided with your sound card to control the flow of the line input on your sound card to the line output. When the transport is stopped, both the left and right channel of the line input pass through to the line output. This allows the narrator and narration monitor to speak with each other. When the transport is playing, both channels of the line input are muted at the line output, preventing either channel from being heard. This allows the narrator and the narration monitor to hear only the recorded information without distractions from either microphone. When the transport is recording, only one of the channels is allowed to pass from the line input to the line output. This is called the narrator channel, and it can be either the left or the right channel based on your preference. The narrator channel is also the only channel that is recorded when Intercom Mode is active.
To use Intercom Mode with a basic Sound Blaster-compatible sound card, follow these steps:
Connect the output of the narrator's mike preamp to the left channel of the line input on the sound card.
Connect the monitor's mike preamp to the right channel of the line input on the sound card.
Connect both the left and right output of the sound card to a device, such as a mixer, which allows both outputs to be mixed. Connecting the outputs to each other directly may work, but it is not recommended.
Connect both pairs of headphones to the mixer. Make sure that both channels of the sound card output are present in both sides of the headphones.
When you select Intercom Mode for the first time, or if you choose Intercom Settings from the Options menu, the Select Intercom Settings dialog box opens. This dialog box lets you specify the four pieces of information that Intercom Mode needs to operate. These are the Mixer, the Destination Line, the Source Line, and the Narrator Channel. When first configuring Intercom Mode, check the radio button labeled "Show all mixers." This ensures that all multimedia software mixers on your system are displayed. From the mixer box, choose the mixer that is associated with the sound card you intend to use for recording. It should have a name similar to the name of your sound card.
From the destination box, choose the destination line that Intercom Mode will use. This can be confusing, especially since the terminology itself lacks clarity. In short, the destination line is an output line that is the result of mixing several source or input lines. For this example, choose the line that has a name like "Play Control." This is the line that goes to the output of the sound card. From the source line box, choose the line that has a name like "Line In." This should be the line input on your sound card to which the microphone preamps are connected. From the Narrator Channel box, you may choose either Left or Right. For this example, choose Left.
Below the configuration boxes, there is a checkbox labeled "Automatically enable line for recording." If selected, Studio Recorder attempts to choose the line used for Intercom Mode for recording as well. In most cases, you will want to select this box, but if you are using a different line or sound card for recording than you are for Intercom Mode, or if you get an error message after closing this dialog box, try deselecting this box. If you deselect this box, you will have to use some other mixer control, such as the Windows Volume Control, to ensure that the line is enabled for recording.
As mentioned earlier, Intercom Mode does not work with most professional quality sound cards. You can use Intercom Mode, however, by using a professional quality sound card along with any other sound card that supports the Windows multimedia mixer services. To make this work, simply configure Intercom Mode as described above for the intercom sound card. Then, choose the Select Wave Devices command from the Options menu. In the Play Device box, select the sound card you plan to use for Intercom Mode. Then in the Record Device box, select the professional quality sound card. Finally, connect the output of the narrators mike preamp to the input of both the Intercom sound card and the professional quality sound card.
The Breath Attenuation feature of Studio Recorder consists of a suite of commands which aid in reducing or eliminating breath sounds in recordings. When working with these tools, it is important to remember that Studio Recorder cannot recognize breaths, and in fact, the breath marking commands may mark regions of content that are not breaths at all. Studio Recorder deduces regions of content which may be breaths by analyzing pauses. It is up to you to verify that what Studio Recorder has marked as a breath is, in fact, a breath.
The Mark Breaths command uses the Sentence Detection parameters, found on the Navigation tab of the Settings dialog, to determine what content might be breaths. Therefore, it is very important to be sure the Sentence Detection parameters are set accurately for the material to be marked. Pay special attention to the Threshold parameter. The threshold should be set just above the loudest breath to be attenuated. Setting this value too high, however, increases the chance of marking content that is not a breath.
The Mark Breaths command also uses parameters set in the Breath Attenuation Parameters dialog, which is accessed from the Options menu.

The Breath Handling option lets you choose how to handle breaths. You may attenuate breaths (make them softer), mute them entirely, or replace them with room tone. If room tone is to be used, you must first copy a selection containing room tone to the room tone buffer with the Copy Room Tone command, Ctrl+Shift+N, found on the Edit menu. The room tone buffer is independent of the clipboard.
The Attenuate By control lets you specify the level of breath attenuation to be applied. The default is -10 dB.
The Loop Breaths checkbox makes Studio Recorder loop breaths when navigating to them. You may want to check this box if you plan to manually edit breaths after automatically marking them.
Check this box to remove breath marks when attenuating breaths. Uncheck this box if you wish to leave the marks in tact so you can quickly review breaths after they have been attenuated.
This control allows you to ignore pauses which may be too long to be considered a breath. The value is specified in seconds, and the default is 2 seconds.
This control allows you to ignore pauses which are too quiet to contain a breath. The level is specified in dB, and the default is -50. Setting this value too low results in pauses being marked as breaths which contain nothing.
This checkbox helps in situations where a loud breath may exceed the phrase detection threshold as the breath rises. When checked, Studio Recorder will guess at whether the pause contains a breath which extends beyond the pause, and mark the end of the breath beyond the pause if necessary.
The Restore Defaults button returns all parameters in the dialog to their default setting.
There are two ways to mark breaths in a document, automatically and manually.
Use the Mark All Breaths command on the Special menu to automatically mark all potential breaths in the document or selection. When this command completes, the number of marked breaths will be reported.
To mark breaths manually, select the breath with the normal selection commands, then use the Mark Breath From Selection command, Ctrl+Shif+K, which is found on the Special menu. This command is also useful when manually adjusting a previously marked breath.
Once you have marked some breaths, you may navigate between them and listen to them to be sure what is marked is actually a breath.
You may navigate between marked breaths with the Previous Breath and Next Breath commands, which are found on the Navigate menu. The Previous Breath command, Ctrl+Shift+Page Up, moves to the beginning of the previous breath, selects the breath, and plays it. The Next Breath command, Ctrl+Shift+Page Down, moves to the beginning of the next breath, selects the breath, and plays it.
You may listen to a breath with its surrounding content by using the Breath In Context command on the Transport menu, or by pressing Shift+H. This command pre-rolls before the breath, plays the breath, and post-rolls after the breath.

Once you have marked and confirmed breaths, you may attenuate them, mute them, or replace them with a room tone sample.
Use the Attenuate All Breaths command on the Process menu to either attenuate breaths, mute breaths, or replace breaths with room tone. The action taken depends on the setting of the Breath Handling option in the Breath Attenuation Parameters dialog.
Use the Attenuate Breath command on the Process menu, Ctrl+Shift+H, to attenuate a single breath. The caret must be within the bounds of a marked breath for this command to be available.
If you choose to leave breath marks in the document after attenuation, you may wish to clear the marks after reviewing the attenuation results.
Use the Clear Breath Mark command on the Special menu, Ctrl+Shift+M, to remove the breath mark at the current location. The caret must be within the bounds of a marked breath for this command to work.
Use the Clear All Breath Marks command on the Special menu to remove all breath marks from the document. Note that the Mark All Breaths command automatically removes all existing breath marks before starting, so that the results of marking all breaths are accurate for the current state of the document.
IMPORTANT - READ CAREFULLY: This End-User License Agreement (the "Agreement") is a legal contract between you (either an individual or a single entity) and American Printing House for the Blind ("APH") relating to the software product with which this End-User Agreement has been provided (the "Software"). As used in this Agreement, Software shall include computer software and, as applicable, associated media, printed materials, and electronic documentation.
BY CLICKING THE "ACCEPT" BUTTON BELOW OR PRESSING [ALT+A], OR BY INSTALLING, COPYING, OR OTHERWISE USING THE SOFTWARE, YOU AGREE TO BE BOUND BY THE TERMS OF THIS AGREEMENT. IF YOU DO NOT AGREE TO THE TERMS OF THIS AGREEMENT, DO NOT INSTALL OR USE THE SOFTWARE.
Following acceptance of this Agreement, APH grants you the nonexclusive right to install and use one copy of the Software in accordance with the terms of this Agreement.
You may use the single copy on one hard disk or other storage device for one computer, and you may access and use the Software at that location so long as only one copy of the Software is in operation. If you are an entity rather than an individual, you may authorize employees, students or others served by your organization to use the Software, but only one person at a time may use the Software on one computer at a time. The primary user of the computer on which the Software is installed may make a second copy for backup/emergency recovery purposes for his or her exclusive use on a backup or portable computer, so long as each copy of the Software is used on only one computer at a time.
You may store, install and access this version of the Software through an internal network, if you obtain and pay for a license for the number of users that will access the Software through the network at the same time. In a lab setting, you must purchase a license for the number of computers on which the Software is installed.
You may not rent, lease, sublease, sublicense or lend the Software.
You agree to not modify, decompile or disassemble the Software or create derivative works from the Software. APH may provide you with support services related to the Software ("Support Services"). Use of Support Services is governed by APH policies and programs, which may change from time to time. Any supplemental software code provided to you as part of the Support Services will be considered part of the Software and subject to the terms and conditions of this Agreement. With respect to technical information you provide to APH [as part of the registration of your license to the Software or] in connection with the Support Services, APH may use such information for its business purposes, including for product support and development.
You may permanently transfer all of your rights (including all updates) under this Agreement, provided that you retain no copies, you transfer all of the Software (including all component parts, the media and printed materials, any upgrades, you notify APH of the transfer and the name and address of the recipient, and the recipient agrees to the terms of this Agreement.
Without prejudice to any other rights, APH may terminate this Agreement if you fail to comply with the terms and conditions of this Agreement. In such event, you must, at the option of APH, either return to APH or destroy all copies of the Software and all of its component parts.
This Agreement will be governed by the laws of the Commonwealth of Kentucky.
All title and copyrights in and to the Software (including, without limitation, any images, photographs, animations, video, audio, music or text incorporated into the Software), the accompanying media and printed materials, and any copies of the Software are owned by APH or its licensors. The Software is protected by copyright laws and international treaty provisions. Therefore, you must treat the Software like any other copyrighted material, except that you may copy the software portion of the product onto a computer hard disk for installation purposes provided that it is used as specified, and is subject to, the provisions of this Agreement. All copyright notices must appear on any copy of the Software and may not be altered. You may not replicate any materials that accompany the Software.
Should you decide to transmit to APH any materials or your input such as ideas, suggestions, or techniques for new or improved services and products, you agree such submissions are unrestricted and will be deemed non-confidential. In addition, you grant APH and its assigns a non-exclusive, royalty-free, worldwide, perpetual, irrevocable license, with the right, including but not limited, to use, reproduce, create derivative works of, display, perform, transmit, and distribute such submissions.
THE SOFTWARE IS PROVIDED "AS IS" AND APH DISCLAIMS ANY AND ALL OTHER WARRANTIES, WHETHER EXPRESS OR IMPLIED, INCLUDING, WITHOUT LIMITATION, ANY IMPLIED WARRANTIES OF MERCHANTABILITY OR FITNESS FOR A PARTICULAR PURPOSE.
ANY LIABILITY OF APH FOR A DEFECTIVE COPY OF THE SOFTWARE WILL BE LIMITED EXCLUSIVELY TO REPLACEMENT OF YOUR COPY OF THE SOFTWARE WITH ANOTHER COPY OR REFUND OF THE INITIAL LICENSE FEE APH RECEIVED FROM YOU FOR THE DEFECTIVE COPY OF THE PRODUCT. IN NO EVENT WILL APH (OR ITS SUPPLIERS) BE LIABLE TO YOU FOR ANY CONSEQUENTIAL, INCIDENTAL OR SPECIAL DAMAGES, INCLUDING ANY LOST PROFITS OR LOST TIME, EVEN IF APH HAS BEEN ADVISED OF THE POSSIBILITY OF SUCH DAMAGES, OR FOR ANY CLAIM BY ANY THIRD PARTY.
Some states or jurisdictions do not allow the exclusion or limitation of incidental, consequential or special damages, or the exclusion of implied warranties or limitations on how long a given warranty may last, so the above limitations may not apply to you.
If you have any questions concerning the Software or this Agreement, you may contact us at:
American Printing House for the Blind
1839 Frankfort Avenue
P. O. Box 6085
Louisville, Kentucky 40206
USA
Attn: Customer Relations
Email: [email protected]