Copyright 2016-2018
American Printing House for the Blind, Inc.
Talking Typer for iOS® devices is an accessible typing and computer keyboard training app and is designed for use by an individual or by multiple students in a training environment. It comes with several editable lessons, and offers lots of options for teachers and parents, including editing existing lessons, creating new lessons, forming student groups, and so on. It also includes the fun, fast-paced game Hurry Scurry.
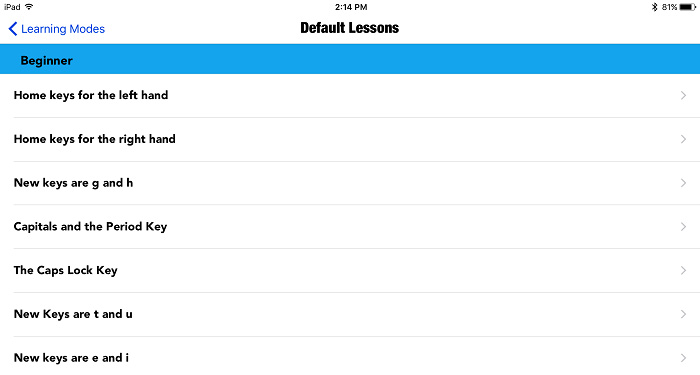
The app includes 35 default lessons that are grouped into two degrees of difficulty: Beginner and Advanced.
The only requirement for the Talking Typer app is an Apple® device running version iOS 9.1 or higher.
Go to Apple's App Store® online store through the icon on your device or from iTunes® online store. Search for Talking Typer or browse in the Education and Games categories. Select the app and click download. You are prompted to enter your iTunes password. Once the app is downloaded, it is ready for immediate use.
Talking Typer works with the onscreen keyboard of your Apple device, but is intended primarily for use with an external keyboard. For help with connecting an external keyboard, consult the keyboard maker’s user guide for instructions.
You may opt to use VoiceOver with the Talking Typer app for iOS. If so, please be aware of the following conditions:
For information about VoiceOver commands for keyboards and refreshable braille displays, check out this website: Quick reference guide for voiceover on iOS.
You may opt to use the Echo Keys feature in Talking Typer for iOS. Echo keys repeat the keystrokes, letter for letter. Echo Keys does interfere with VoiceOver, so make sure VoiceOver is turned Off before turning Echo Keys On.
The default setting for Echo Keys is Off. To turn the setting on, you must go to the App Preferences screen. To access the App Preferences, tap the Admin button on the Home screen, then tap the App Preferences button on the Administrator screen.
Note: Students may need assistance getting this setting turned On, because of the password security.
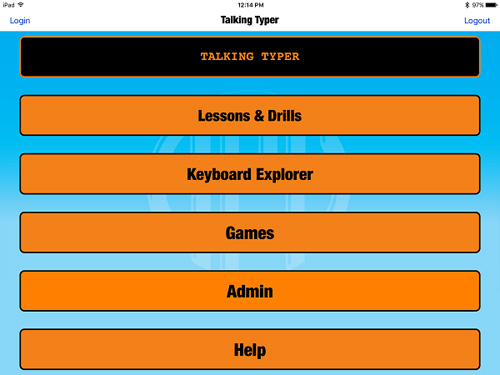
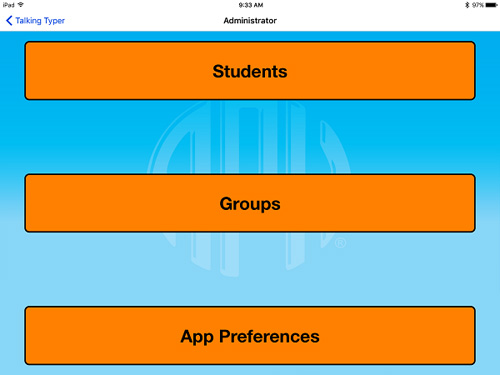
When you open the app for the first time, it opens to the Home screen. From the Home screen you can go to any page in the app. The Home screen is where most of the tasks begin. It includes buttons that comprise the major sections of the app.
You can move forward (or drill down) to the screen of your choice by selecting a button on the screen or the plus symbol (+) right-top corner of the screen. The back button (
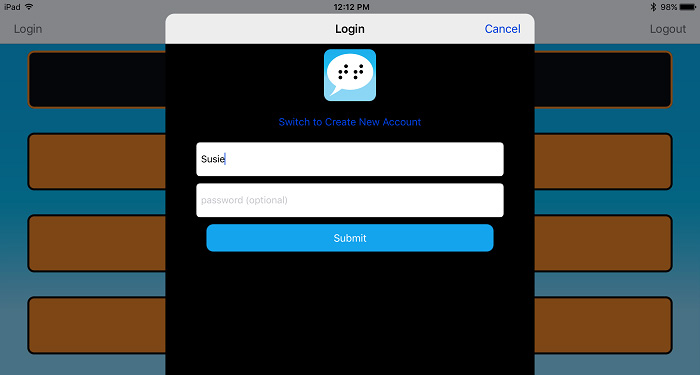
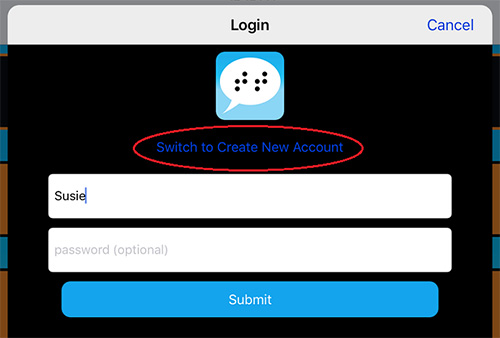
Creating a Login is not a requirement to begin using the app. Students and administrators may begin using the app immediately.
While Talking Typer does not require an administrator password to perform any of the functions within the app, the advantage to setting a password through the creation of a login is the additional security protocol. Passwords can be changed in the Settings. See Setting Admin Preferences to learn more.
Admin logins – associate student accounts created by that Admin to the login information. If multiple Administrators use the same device, the login allows access only to the students created by that individual administrator. Administrators can also create students (new accounts) through the login. See Create a Student Account for more information.
Student logins – allow access only to the individual student's information. Students are not able to access the information of another student through the use of logins. When a student logs in, the student's dashboard is available. Lessons assigned to the student can be viewed from the student's dashboard. See Login to a Student Account for more information.
Independent learner logins – offer the ability to monitor personal progress through the lessons. Independent learners are administrators of their own account.
Passwords are required for certain functions by default. These include access to the Admin Settings and editing or deleting lessons, students, or groups. To disable the password requirement, the Admin can remove it in the Settings menu.
Administrators are the managers of the app. A manager might be a teacher, a parent, or an independent learner. The Administrator performs most of the managerial tasks.
Admin tasks include:It is not necessary to create an account to start using Talking Typer right away. However, creating an account allows multiple administrators/independent learners to use the same app without being able to access other user's information. Passwords are optional, but setting the password keeps your information, and the information of the students tied to your account, private and inaccessible.
An administrator must create an Admin account in order to set up student accounts and groups that are tied to that account. An independent learner must create an account in order to follow their individual progress.
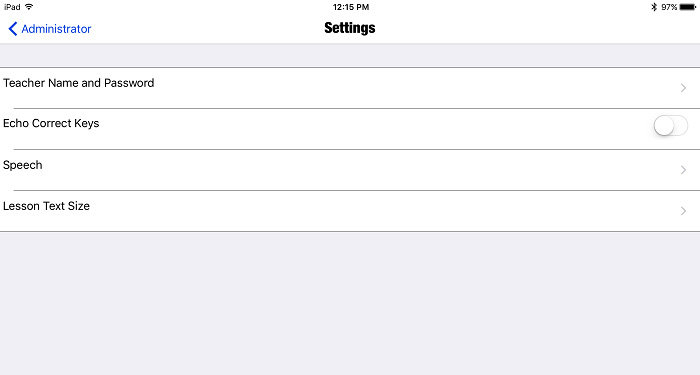
There are several default settings for Talking Typer. To meet your the needs and those of your students, you can change the default settings in the Settings screen.
To access the App Preferences, tap the Admin button on the Home screen, then tap the App Preferences button on the Administrator screen.
In Settings screen you can make or set changes for the several items.
After reviewing/changing the settings, tap Done in the upper-right corner to save the settings and return to the Administrator screen.
The Settings screen contains general default settings with different controller mechanisms.
| Setting | Controller | Result/Action to take | Default Setting |
|---|---|---|---|
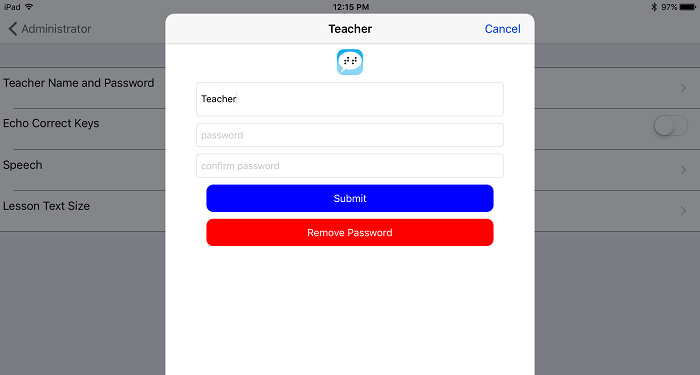
| Teacher Name and Password | > | Pop-up window with text entry field to enter new password or delete password | N/A |
| Echo Correct Keys | On/Off button | Off (white button is on the left and clear on right) On (white button is on the right and yellow on the left) |
Off |
| Speech | > | Opens page with Rate slide bar, Pitch slide bar, Change Voice picker, Test Speech button, and Restore Defaults button | Rate: 0.5; Pitch 1.0; Voice: Samantha (Enhanced) |
| Lesson Text Size | > | Slide bar | iPad: 42; iPhone/iPod Touch: 32 |
This sequence of tasks is intended for first-time use or until you are familiar with the app. It is not the only method to operate or navigate the app and is intended to act merely as a guide or suggestion. It is not imperative that you follow this sequence.
Many of the tasks for first-time use are optional. You may elect to use default settings or change them at a later time.
Independent Learners are students who can manage their own accounts and are learning to type on their own, outside of a classroom setting. Independent Learners have the same level of access as Administrators and can do the same tasks as both Administrators and Students.
Student accounts are for individuals using the app to learn to type. A student may also be an administrator of the app.
As the administrator of the Talking Typer app, you can create student accounts and then edit or delete them as necessary. Student accounts help you keep track of an individual’s level of improvement, which in turn, assists you in the management of assigning appropriate lessons.
Creating student accounts allows you to monitor the improvement in speed and accuracy of individual students. It also allows the student to monitor their improvement independently.
There are two ways to create a student account: through the Admin screen or through the Login.
Create a student account through the Admin screen:
Create a student account through the Login:
Optional steps: You may elect to add the student to a group or assign lessons at this time. See Assign to Group or Assign Lessons for more information.
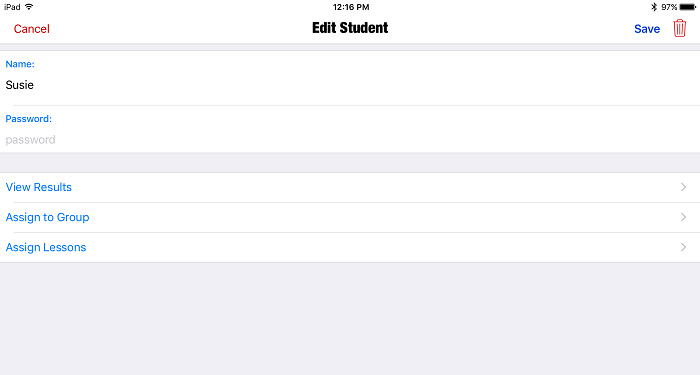
Occasionally, you may need to edit a student account for any number of reasons. This task is accomplished from the Edit Student screen.
Because each student is different, you may want to set different targets for them. These targets can be adjusted through the Students page of the app.
For example, student "Suzie" may have a high accuracy rate, but her speed is a little slow. You can change the default settings to set a lower target rate of speed and increase the accuracy rate, to adjust to Suzie’s individualized needs.
Note: Edits are made by typing in the text field below the item to be edited or choosing a selection from a picker or list.
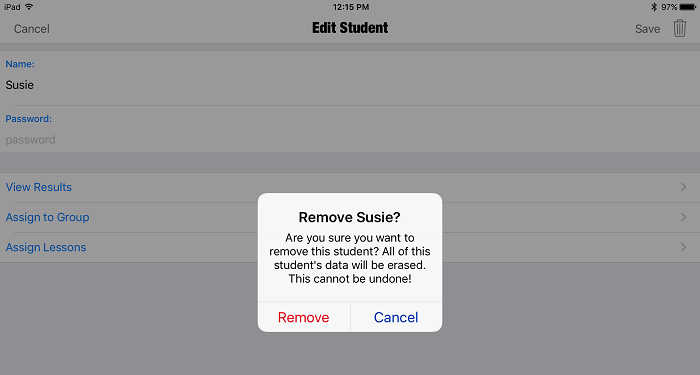
To keep from developing a long/outdated list of students, it is good practice to delete student accounts for students who are no longer taking the course. This can be done from the Edit Student screen of the app.
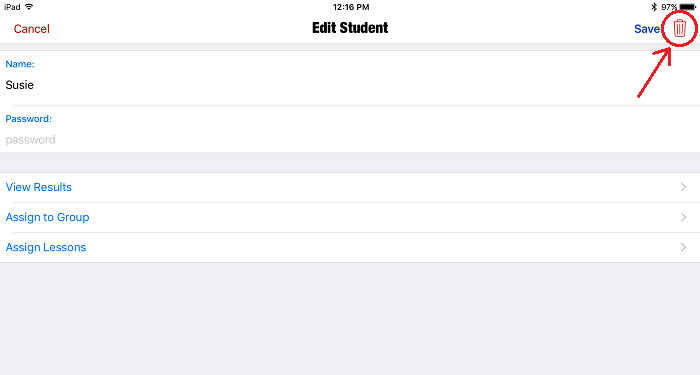
The Edit Student page contains general default settings with different controller mechanisms.
| Setting | Controller | Result/Action to take | Default Setting |
|---|---|---|---|
| Name | Edit field | Pop-up keyboard to type entry | Blank |
| Password | Edit field | Pop-up keyboard to type entry | Blank |
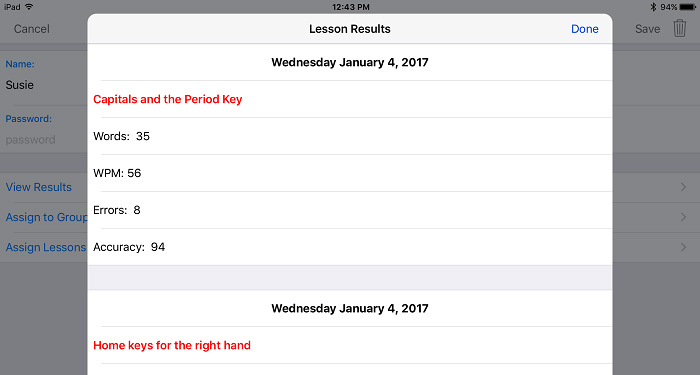
| View Results | > | Opens pop-up window with a history student’s lesson results by date (current at the top) | N/A |
| Assign to group | > | Opens pop-up window with a picker list to select from | N/A |
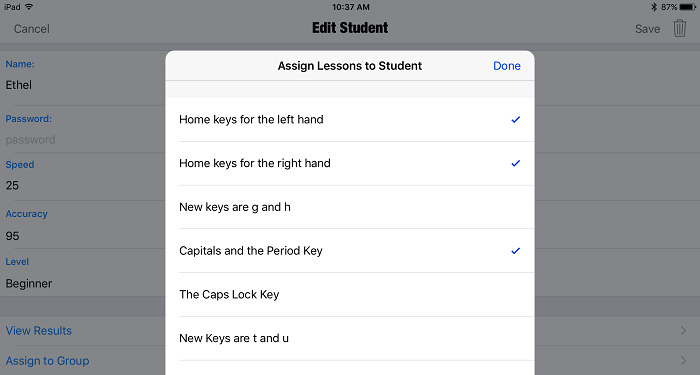
| Assign Lessons | > | Opens pop-up window with list of lessons to select (or deselect) | N/A |
Student lesson scores are stored in the Talking Typer app by date with the most current lesson taken at the top of the list. A history of scores allows administrators to review, follow, and access student progress, thus making lesson assignment easier.
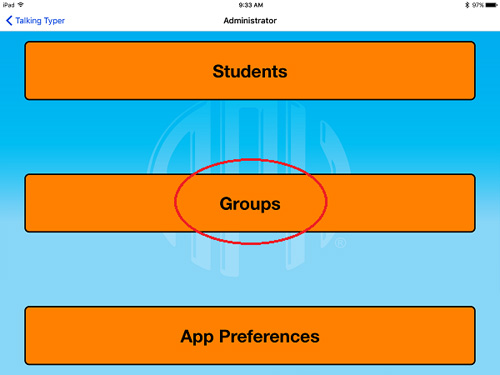
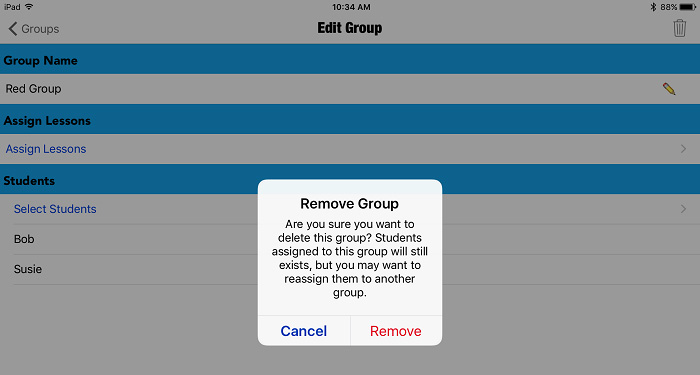
Creating, editing, and deleting groups is very similar to the same processes for individual students. Groups must be named, provided a password (optional), and allotted certain settings, just like students.
Administrators of the Talking Typer app can create student groups and then edit or delete them as necessary. Assigning students to groups makes it easy for teachers to assign lessons to several students at once.
Assigning students to groups saves time and helps with organization. It makes it easy for teachers to assign lessons to several students at once. By default, all new students are assigned to the default group.

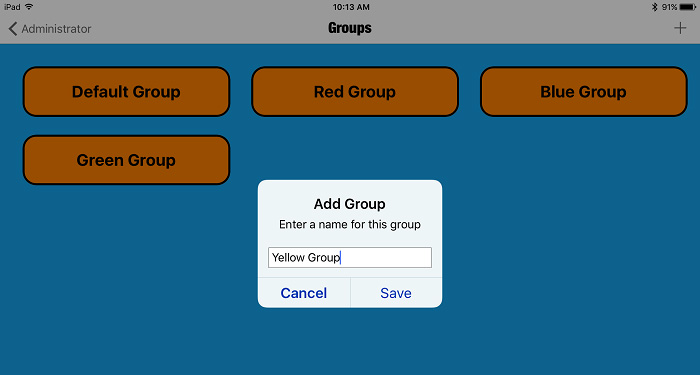
By default, all new students are assigned to the Default group. Students can be added to a group from the Edit Group screen or the Edit Student screen.
Add a student to a group through the Edit Group screen:
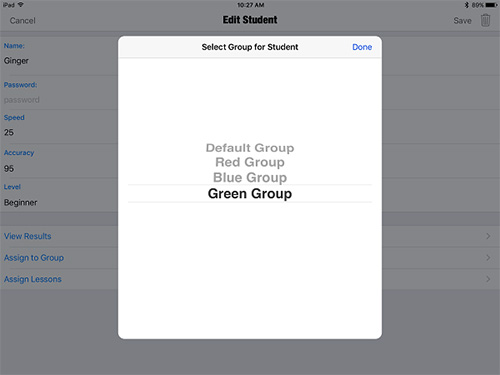
Add a student to a group through the Edit Student screen:
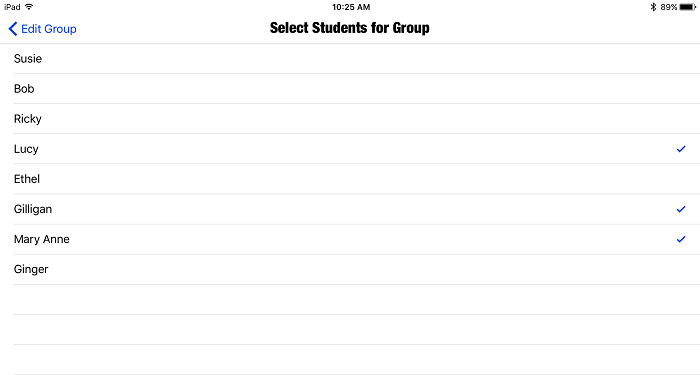
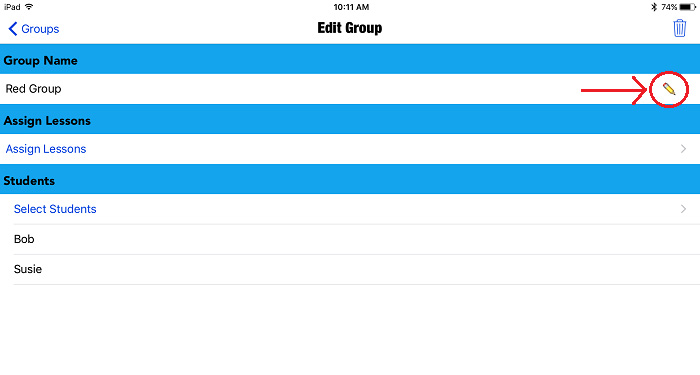
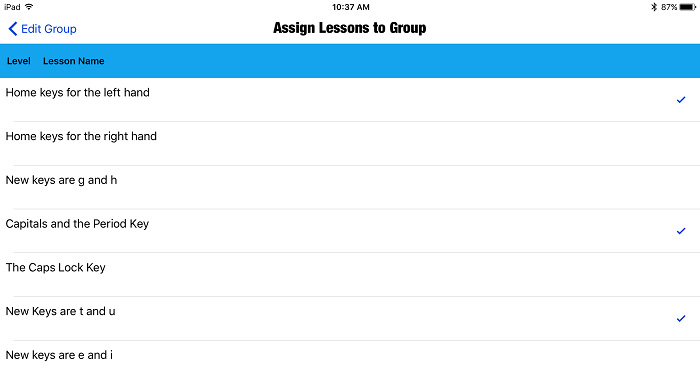
There are three ways to edit a group: rename, assign lessons, or assign students. All are accomplished from the Edit Group screen.
Edit a group name:
Assign lessons to a group:
Assign students to a group:
To keep from developing a long and/or outdated list of groups, it is good practice to delete group accounts when students who are no longer taking the class. This can be done from the Edit Group screen of the app.
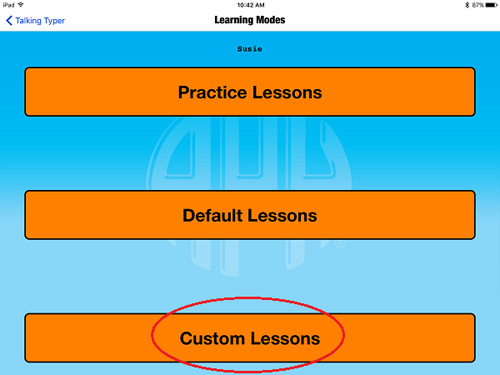
There are two types of lessons: Custom and Default. Default lessons are the lessons included with the app when you download it. Custom lessons are lessons you create. Administrators can assign any number of lessons to individual students or groups. Default Lessons can be duplicated and then edited to better suit the needs of the student and/or a new lesson can be created.
Talking Typer gives teachers and parents the ability to tailor the learning program to meet the needs of the student by incorporating the options to assign, create, and edit lessons.
Talking Typer includes 35 default lessons at two degrees of difficulty: 14 Beginner and 21 Advanced.
| Default Lesson Name | Degree of Difficulty |
|---|---|
| Home keys for the left hand (a,s,d,f) | Beginner |
| Home keys for right hand (j,k,l,;) | Beginner |
| New keys are g and h | Beginner |
| Capitals and the Period Key (.) | Beginner |
| The Caps Lock Key | Beginner |
| New keys are t and u | Beginner |
| New keys are e and i | Beginner |
| New keys are e and n | Beginner |
| New keys are v and o | Beginner |
| New keys are c and y | Beginner |
| New keys are w and m | Beginner |
| New keys are b and p | Beginner |
| New keys are x and q | Beginner |
| New keys are z and comma (,) | Beginner |
| New keys are quotation mark (“) and apostrophe (‘) | Advanced |
| Number keys | Advanced |
| New keys are forward slash (/) and question mark (?) | Advanced |
| The brackets [ ] and braces { } | Advanced |
| Phrases | Advanced |
| More Phrases | Advanced |
| Sentences | Advanced |
| More Sentences | Advanced |
| Special Punctuation – acute, grave, or back quote (`) and tilde (~) | Advanced |
| Special Punctuation – exclamation point or bang (!) and ampersat or at (@) | Advanced |
| Special Punctuation – number, pound, or hash (#) and dollar sign ($) | Advanced |
| Special Punctuation – percent (%) and caret or circumflex (^) | Advanced |
| Special Punctuation – ampersand or and (&) and asterisk or star (*) | Advanced |
| Special Punctuation – left parenthesis and right parenthesis | Advanced |
| Special Punctuation – hyphen, dash, or minus (-) and underscore (_) | Advanced |
| Special Punctuation – equal (=) and plus (+) | Advanced |
| Special Punctuation – backslash (\) and vertical bar or pipe (|) | Advanced |
| Special Punctuation – less than () | Advanced |
| Numeric Keypad – 4,5,6 – 1,2,3 – 7,8,9 | Advanced |
| Numeric Keypad – 0 and decimal or period (.) | Advanced |
| Numeric Keypad – divide (/), multiply (*), and minus (-) | Advanced |
There are two types of lessons in Talking Typer: Default Lessons and Custom Lessons. The Talking Typer app comes with 35 Default Lessons. The Assign Lessons option can be found on the Edit Student screen or the Edit Group screen.
Assign a lesson(s) to a student:
Assign a lesson(s) to a group:
One of the most useful features of Talking Typer is the ability to create custom, targeted lessons for individuals or groups, enabling students to focus on areas that need additional practice. Lesson creation can also make for a more personal experience for both teacher/parent and student.
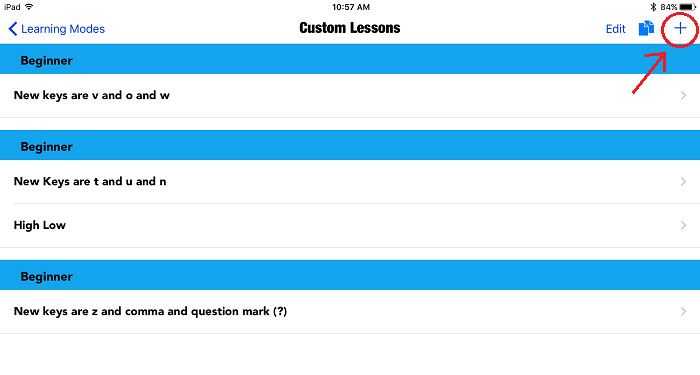

Duplicating lessons makes it easy to create new lessons without having to start from scratch. In this way, you can duplicate a lesson that is similar to what you want to create, then edit and rename the duplicated lesson.
 in the upper right-hand corner of the screen.
Occasionally, you may need to edit a lesson for any number of reasons. This is accomplished from the Lessons screen.
1. Tap the Lessons & Drills button on the Home screen.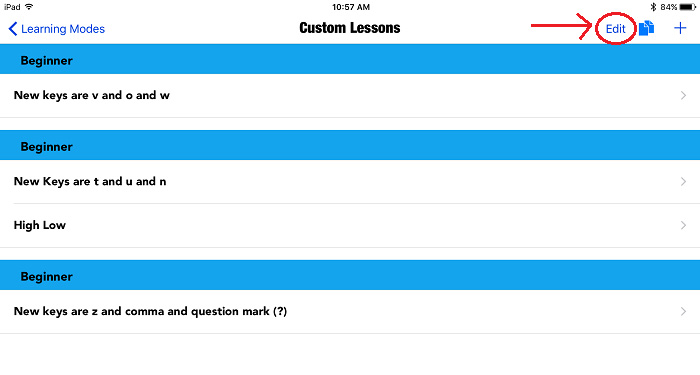
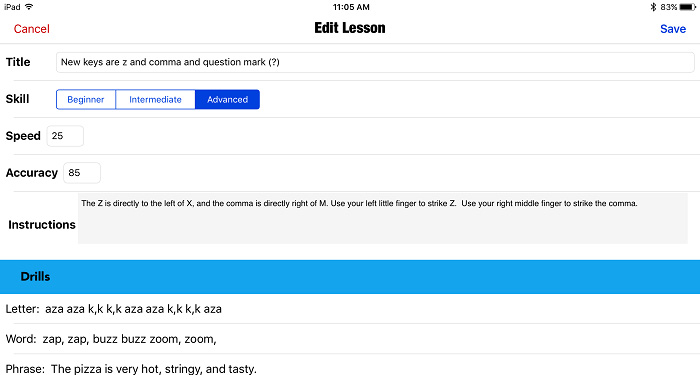
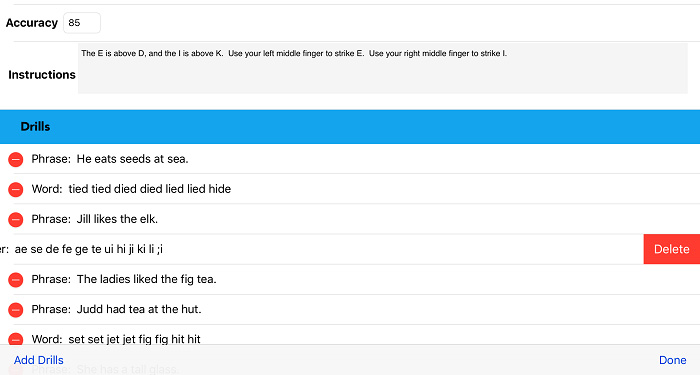
6. Add/delete the drills by tapping either Add Drills in the bottom-left corner or Delete Drills in the bottom-right corner of the screen.
The Edit Drill pop-up window opens.
Add drills:
Delete drills:
7. On the Edit Lesson screen, tap Save in the upper-right corner of the screen. 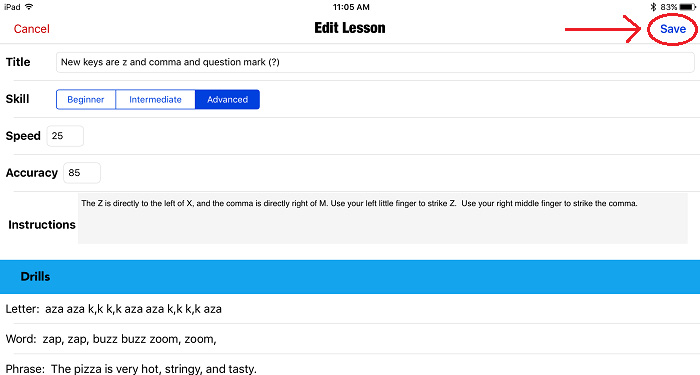
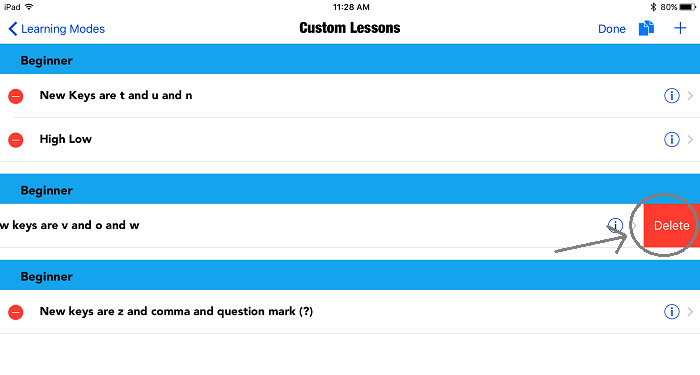
If you find you have too many lessons or duplicate lessons, you can delete them from the Custom Lessons page.
 next to the name of the lesson.
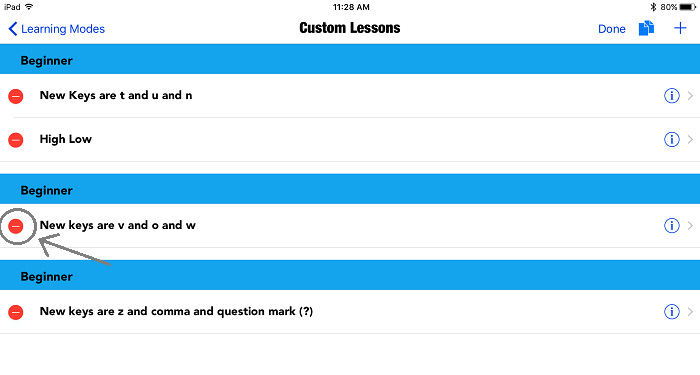

A student account is not required to start using Talking Typer right away. However, student accounts allow administrators and students to follow the history and progress of the individual student. An administrator can creates a User Name and Password (optional) for the student that allows access only to the individual student's information. See Create Student Account for more information. This account is linked to the administrator, allowing administrators to assign the student to a group or particular lessons.
Students can login and work on the lessons assigned to them. Students are not able to access the information of another student through the use of logins.
Logins allow students to access information about their individual progress and assignments. It also allows administrators to keep track of individual progress. If a student is not logged in when completing the drills, the results are not saved to the student's account.
When a student logs in, it is indicated on the Home screen. The top button changes from "Talking Typer" to the student's name. 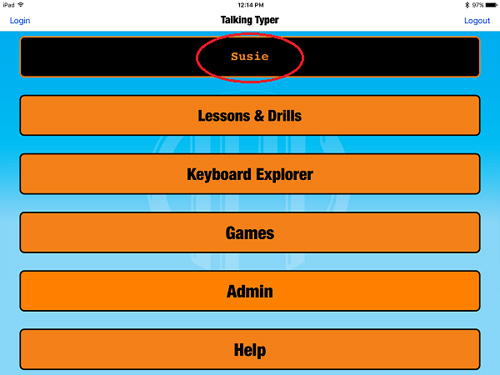
This button is now the Student Dashboard button. 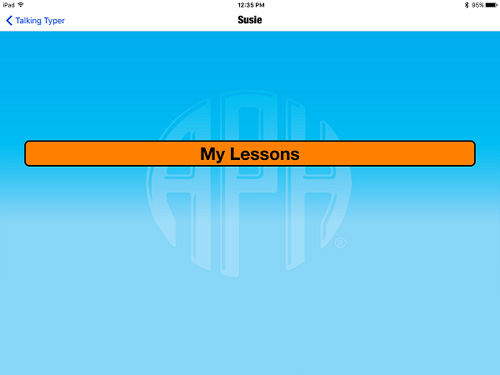
Student's can view and start the lessons assigned to them there. 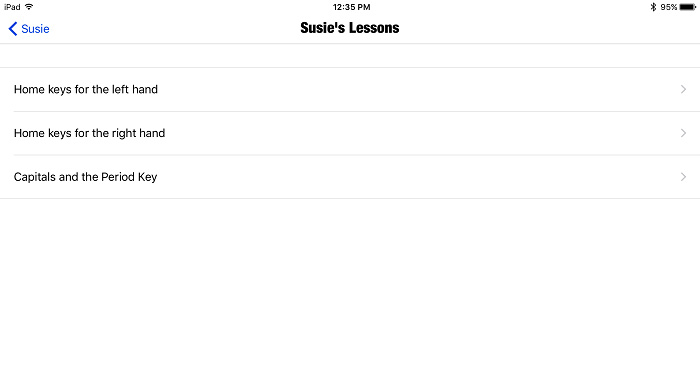
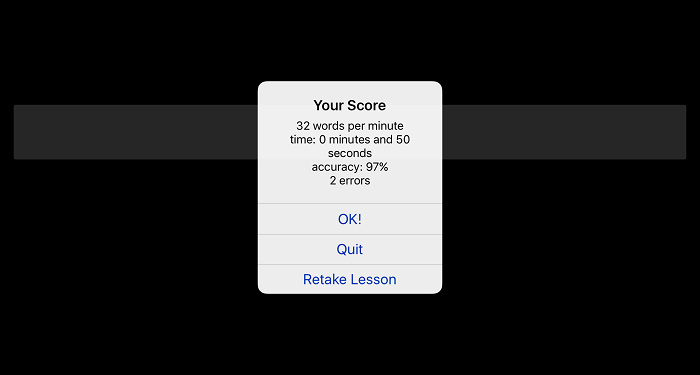
Lessons differ from Practice Drills in that results are saved to the student information for the teacher to assess, when the student is logged in. The results are displayed at the end of the lesson and can be reviewed later from the Edit Student screen.
There are two ways to start a lesson: through the Learning Modes screen or through the Student Dashboard.
Take a lesson through the Learning Modes screen:
Take a lesson through the Student Dashboard:
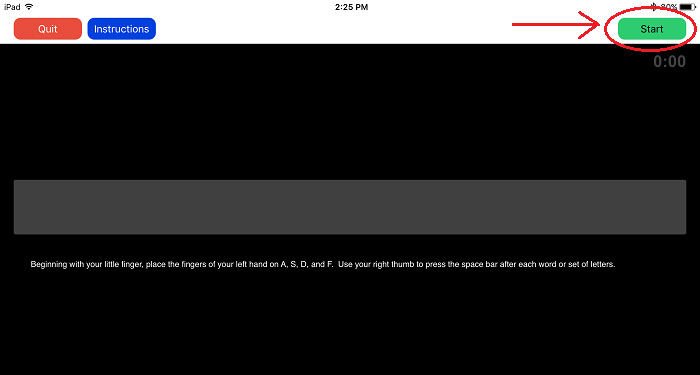
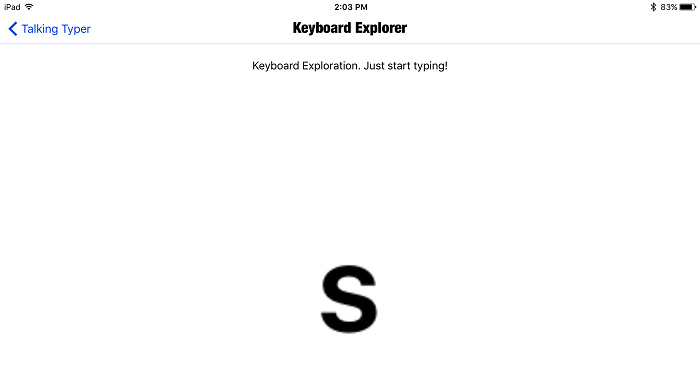
Keyboard Explorer is a place to just begin typing and exploring the keys on the keyboard. There are no set directions or timed lessons. Keyboard Explorer displays one letter or character at a time. It is intended to get students oriented to where keys are located on the keyboard.
Practice drills allow students to work on particular keyboard activities prior to starting a lesson or between lessons to improve problem areas.
Like lessons, practice drills are divided into two skill levels: Beginner and Advanced. The drills correspond with the Default Lessons. For example, the practice drill "Home keys for the left hand" correspond with the lesson for that same exercise.
Practice drills provide audio feedback when a wrong key is pushed and a score at the end of the drill, but are not recorded in the student information. In this way, students can practice and receive feedback without it counting either way.
When you have completed a practice drill, you may elect to retake the drill, try a different one, or continue on to an exercise.
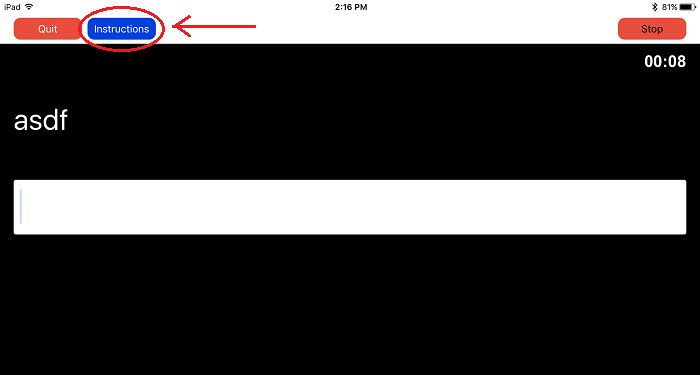
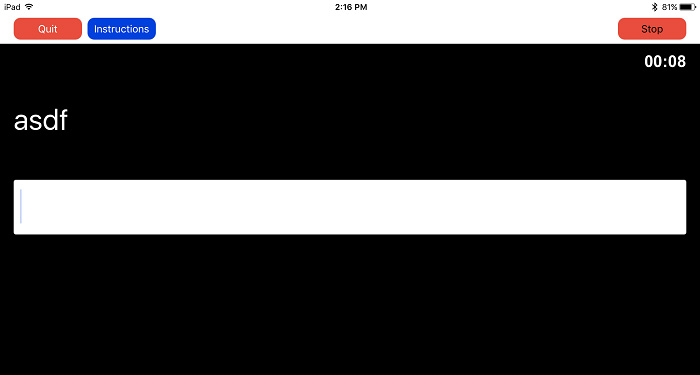
Instructions for the drills are included below the drill or can be heard by tapping the blue Instructions button at the top-left of the screen.
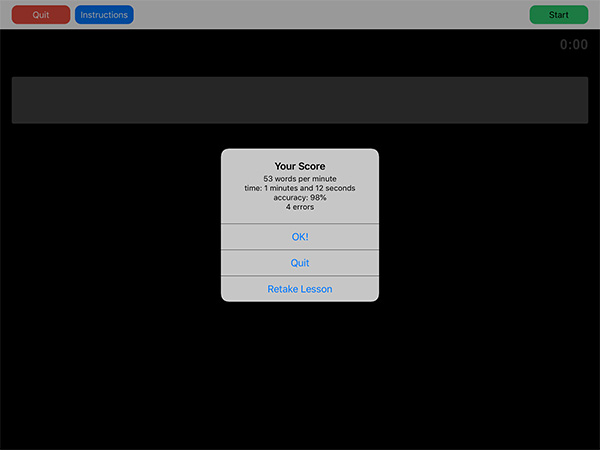
Alternatively, you can quit the practice drill at any time by tapping the red Quit button (top-left corner). This action returns you to the Practice Lessons screen.
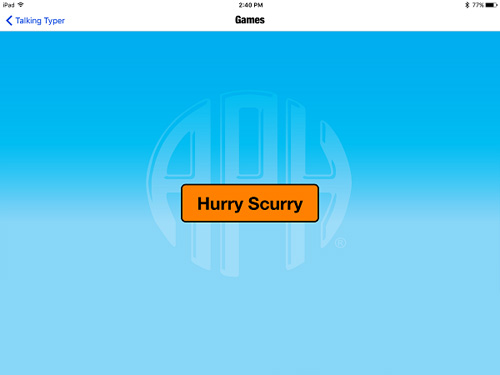
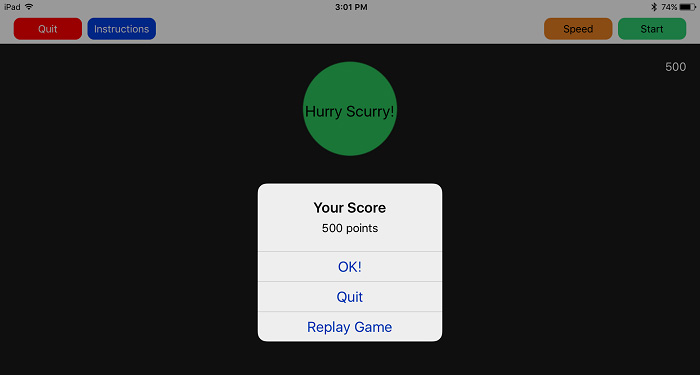
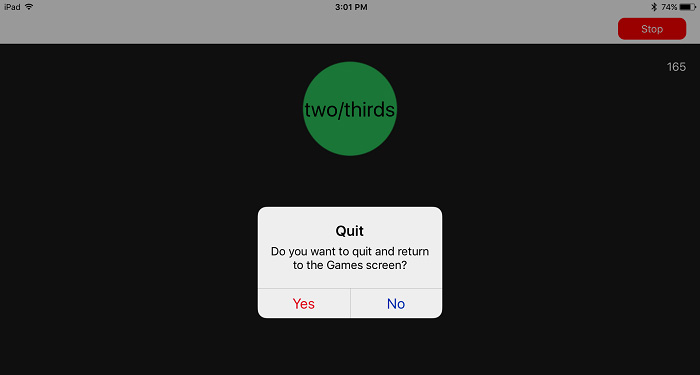
Hurry Scurry is a fast paced, fun game that is useful for improving accuracy and speed. Race to type the characters before the green dropping ball hits the ground and turns red.
The speed of the dropping ball can be adjusted by tapping Adjust Speed in the upper-right corner of the screen. Slide the button to the right to make it go faster and to the left to slow it down. Press Done when finished. The default speed is as set at 2 on a scale of 1-10.